After 25 years of corporate software development I am trying something different.
I just received an email from Rancho Bernardo High School confirming that I am eligible to start work as a part-time assistant art teacher. The opportunity caught me by surprise and I owe a debt of gratitude to my friends and neighbors for recommending me for the role, and their ongoing encouragement. The position is only through June, but will hopefully give me a taste of the classroom.
I also volunteered for Encorps, a non-profit organization that helps STEM professionals get into the classroom and, eventually, credentialed. Over ten weeks I will volunteer as a computer science instructor in underprivileged schools once a week.
Why am I doing this?
I want to teach, but I’d like to “test the waters” first. Originally, my plan was to substitute teach, but my applications went largely unnoticed. This way, however? It’s better. I get to teach kids what I love – Art and Programming – and see if the grass truly is greener on the other side of the fence, at least for me.
Holy Cr@p, Teenagers
Ashley takes after many women in my family. Like my Vavoa, however, it’s all about finding the right approach. For my Vavoa it was See’s Candy. For Ashley? Just give it time 😉
I now am the proud father of two …. teenagers. Ashley is now 15. Kaylee is now 13. Being a guy, it’s amusing to experience how the teenage years play out for my two girls. To all the girls I knew when I was a teenager, you had me completely fooled! I thought you had everything figured out the entire time I was tripping over my own hormones and treading water in an ocean of social awkwardness. Ha! I know better now!
Anyhoo, I drew Ashley a comic on the eve of her 15th birthday. She’s notorious for being difficult to shop for. Her sister, Kaylee, however, is not. I hope I did a good job of conveying that in the comic.
Suno – A Generative AI Music Service
I strongly believe that Generative AI is going to dramatically change how music is created. I only hope it’ll be for the better.
If you haven’t tried out AI by now, you should. I’ll admit, I was scared of it first, but I am also finding it to be an amazing tool.
About a month ago my friend, Ben Good, introduced me to Suno, a generative AI music service. First, he showed me how he could provide Suno a “theme” ( i.e. “I want a happy summertime song about driving along the beach and enjoying the sun” ) and a “style” ( i.e., “American Folk” ) and it would generate a song complete with vocals and a backing track. Then, as a gag, he fed Suno lyrics – in this case a random wikipedia page – to show me that Suno could make a song out of just about any source material. You haven’t truly rocked out until you’ve rocked out to Wikipedia, by the way.
I was hooked ( Ben already was ). I bought a subscription and started feeding it some song lyrics that I had been working on. Low and behold! Suno generated a song. It wasn’t perfect, but it was a start. A huge start, honestly. Just hearing my lyrics sung to a backing track got my creative juices flowing.
Since then Ben and I have discovered you can explicitly tell Suno through a prompt what exactly you want your song to sound like ( baritone, edgy, acoustic, heavy metal, twangy, emotional, simple melody, etc …) as well as specify the structure of the song ( verse, chorus, intro, solo, etc … ). The end result? Still not exactly what I was looking for – but close enough.
Here’s the coolest part if you can play an instrument and have a decent voice ( cough, cough – me ). Suno also allows you to download what’s called “stem” files for any song it generates for you. One stem file is the vocals. The other stem file is the music track. Then, you can take the stem files, feed them into a transcription service, generate the sheet music for your song, and learn to play it. Of course, you can generate them by hand – I mean ear, too, it just takes a little longer.
So what happens next?
Well, it doesn’t take too much effort to see the music industry is fighting back. Their claim is that Suno has “trained” its AI model on existing songs. I know for a fact that I heard inklings of well-known artists’ voices in the songs that it generated for me. However, in my very humble opinion? The train has left the station and is roaring along at breakneck speed. I, personally, don’t think they can stop it.
As for me? It’s an enormous win. Suno is helping me create music – my music – music that might have never been heard, otherwise. And with the stem files? I plan on learning to play and sing it, too. Ben and I are currently collaborating on an album. I’ll post here soon about it!
Vandervort Realty has a website
Last, but certainly not least – I finally got around to launching a website for Jodie’s brokerage, Vandervort Realty! You can see it here. Jodie is still very much into the sales side, but has been expanding more and more into property management as well. If you have any questions regarding buying or selling a home, or if you need help with a rental, feel free to use the “Contact Us” page – mainly because I haven’t tested it yet. ( Just kidding, I have ).
That’s all for now! Thanks for reading, people, I hope to post again soon. In the meantime? Go create … and….
Before I share some of my New Years Resolutions, I’d first like to post some of the projects that I have been working on…
No bad days – if you look through the rose colored glasses of nostalgia, that is.
I’ve been told that this methodology works in other professions as well…
My new design for a cheer t-shirt I can wear to my daughters’ games. Jodie was taken aback when I showed her the finished product. “I didn’t think you’d actually DO it”, she said in alarm. You can buy your very own t-shirt at my TeePublic store.
Some college friends and I started tossing around ideas for a portfolio of products to teach network security. One idea was to create a comic strip, to which I wholeheartedly agreed and created some concept sketches. Unfortunately, the idea never progressed further than a few cups of coffee – and these drawings.
As far as my resolutions?
Get proficient at Data Science and Machine Learning
A couple of conversations with my sister-in-law, Jayme, and friend, Ben Good, have spurred my interest in Data Science and Machine Learning using Python. I have been taking free courses on Kaggle, and have been nothing short of fascinated. A lot of the examples leverage housing data, which is of great interest to me in supporting my wife’s brokerage, Vandervort Realty. Ben also introduced me to Suno, which uses artificial intelligence to allow users to create songs ( yes, with vocals ). I have a few songs I have been working on that sure could use some help, even if it’s… artificial?
Draw more!
Obvious, right? From my experience being a project manager I know that all good goals should have good mile markers, less there is never a semblance of “done”. For art, however, I am beginning to realize there is never really a “done”. Leonardo de Vinci was supposedly quoted as saying, “Art is never finished, only abandoned”. Aside from me being a far ( far ) cry from the master, I am beginning to see his point. For 2025, however, I would like to produce something each week. I would also like to get a lot better about learning – whether it is YouTube videos, books, or just “copying” others works.
Okay, so only two resolutions – or, at least only two that I am willing to share. I have many more, of course, but to post them here would hold me accountable, and I am not quite sure I am ready for that sort of commitment. Not, yet, anyway. Stay tuned, however, as me thinks it’s going to be a very very exciting year. I hope it will be for you, too.
To my (old) team at UPS : Thank you for helping me keep the ol’ train on the rails for the last couple of years.
This is my station ( time to get off ) …
I resigned from my job as an Application Development Manager at UPS. While I enjoyed working with my team, I found myself increasingly at odds with my supervisor, a rigid back-to-office policy, an incredibly stale technology stack, an almost criminal lack of respect for working conditions, and an-out-of-touch CEO.
I have started interviewing, but it has been rough. I am finding myself overqualified for the software development positions that I enjoyed during the first two decades of my career. In Corporate America you are two things : a number and a salary. When either of those tips the scale you either need to adapt, or risk sliding off of the scale altogether. I’m trying to adapt, but as a software engineer ( also known as an “Individual Contributor”), I am finding myself competing with younger and/or cheaper talent than me.
That leaves management, which, at least at UPS, became an increasingly tough pill to swallow. As a manager I felt like my primary function was to find ways to manipulate people to do the greatest amount of work possible in the least amount of time against increasingly impossible deadlines. As a manager I never felt like I was helping people grow or learn. Aside from the paycheck, it was not a rewarding experience.
As I have gotten older and dealt with some pretty significant life changes, I find myself wanting to make a difference – wanting to help people. Yes, I am probably naive in the assumption that such a meaningful position exists for me, but I am not going to give up hope.
One last thing …
Interviewing can suck hard
One company I interviewed at had a final three hour interview, the first hour of which was a slideshow presentation. The recruiter suggested I “tell a story” to engage my audience. Taking him too literally, I drew a bunch of quick sketches to illustrate my take on managing a software development team ( the position was for a Software Development Manager ). After my presentation concluded I was met with blank stares and silence, like I farted loudly in an empty concert hall. The hiring manager just said, flatly, “Did you even read the instructions?” Needless to say I didn’t end up getting the job.
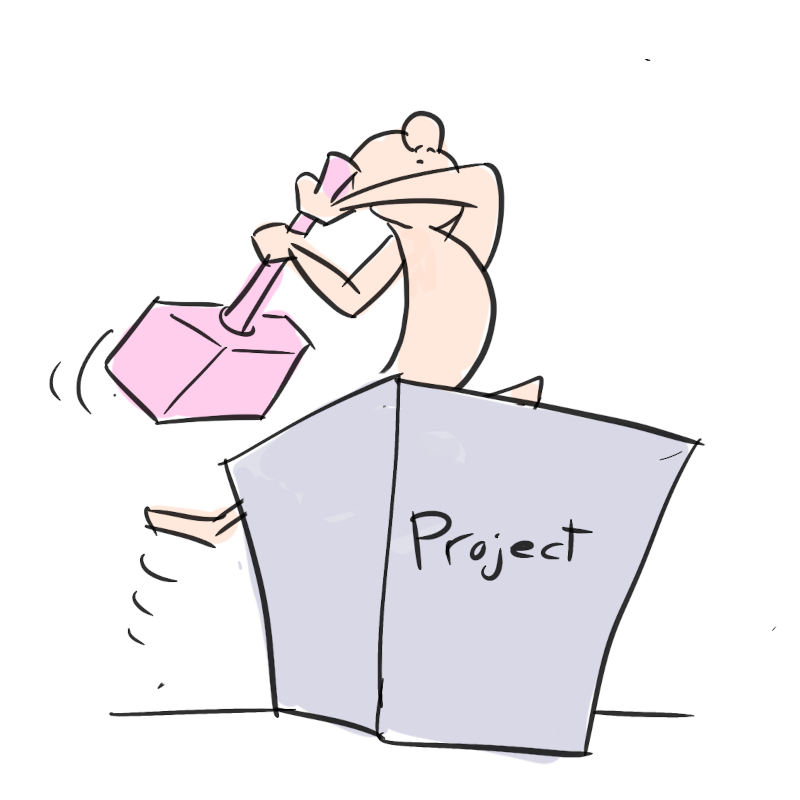
Are we there yet? There are many obstacles before you can deploy to production.
Always break up projects into manageable pieces that can fit into a 2-week sprint.
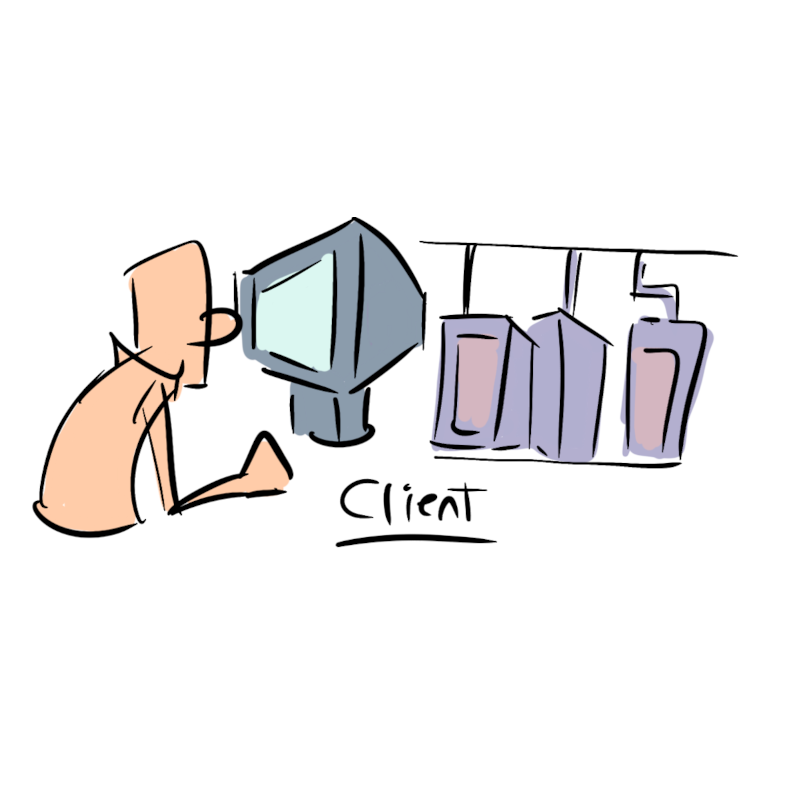
The client is just one of many stakeholders.
Licensing is a constraint to successful projects.
As an incoming manager, don’t rock the boat until you first determine how it’s floating.
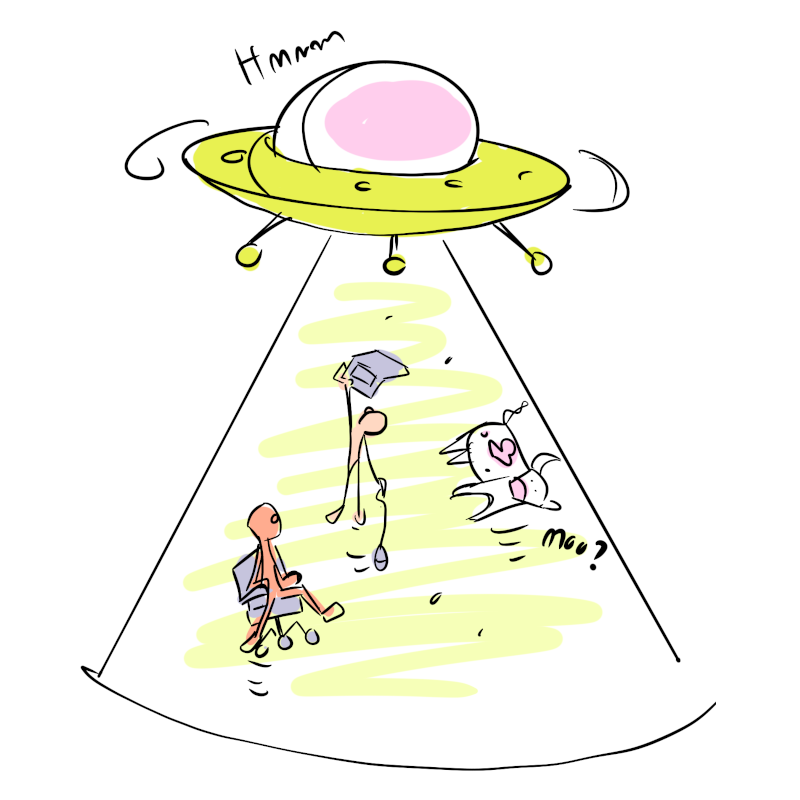
There are lots of different sources of information an onboarded team member can learn from.
It’s not always a technical problem. Sometimes, it’s morale.
I thought it was a technical problem …
Always keep offshore teams engaged.
Keep the [ sprint ] board clean.
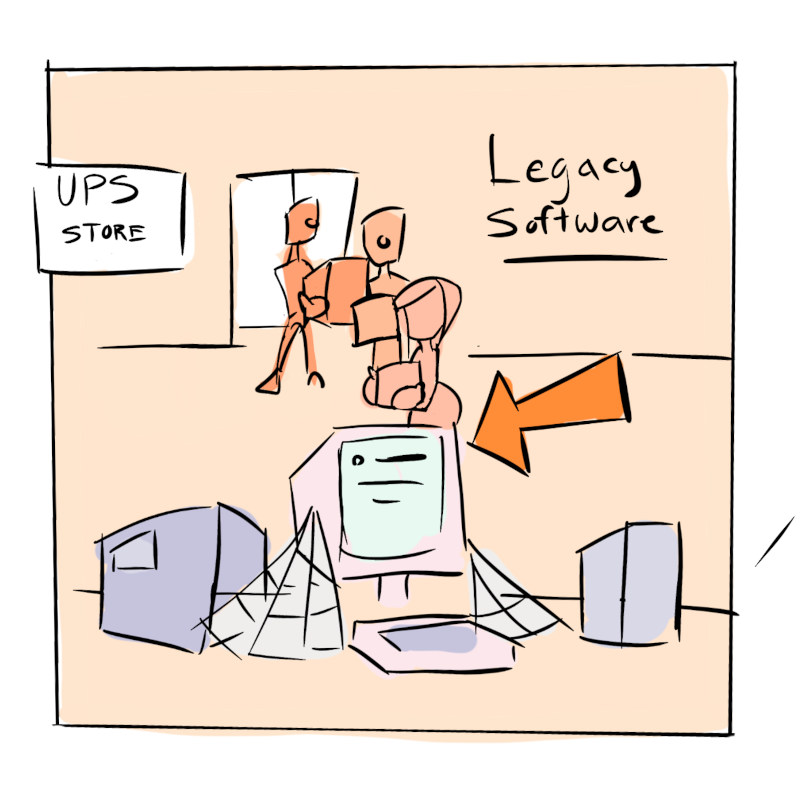
Sometimes it’s a legacy [ software ] problem.
Make first contact with the product owner and manager as soon as possible.
Meet regularly and see how you can help.
Only rock the boat after you’ve had a chance to study it first; you’ll get more support from your team.
I have a friend, Richard. Over twenty years ago we worked together at a small software startup in Kearny Mesa. Since then Richard has delved into real estate and investments, while I’ve continued down the path of a software developer. We hadn’t talked in a while, so we agreed to meet up for coffee about a year ago.
“I’ll pick you up.”, he offered.
“You sure?”, I asked.
“Yes.”, was his response.
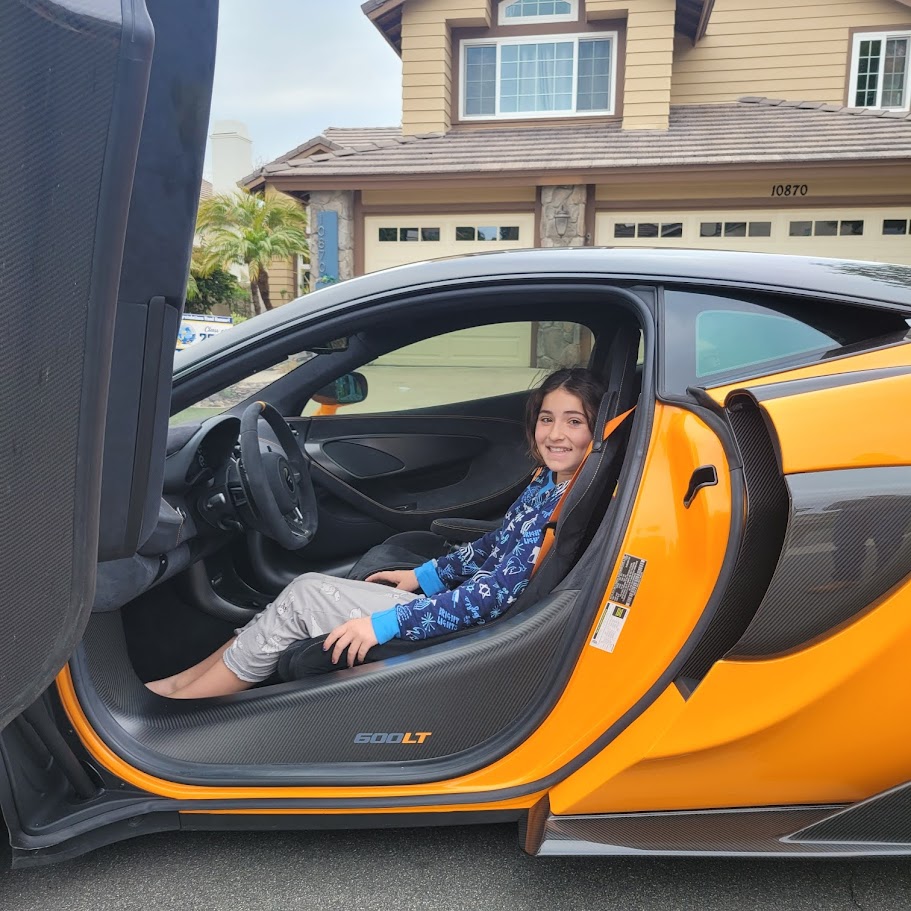
A few days later he rolled up in front of my house in a bright orange McLaren supercar. It stood in stark contrast to my current ride, a 2010 Chrysler Town and Country ( yes, that Town and Country ).
In the blink of an eye my daughter, Kaylee, who had been watching from the living room window, ran outside and pleaded to sit in the driver’s seat.
Kaylee, in Richard’s McLaren
After Kaylee was pacified I climbed in and Richard and I headed for coffee.
After swerving to avoid anything bigger than a pebble, I realized that supercars come at a cost.
“Your ride is cooler, but mine is way more comfortable.”, I told him.
“But overall, you seem to be, uh, doing well”, I continued, looking around the interior of his car.
He smiled.
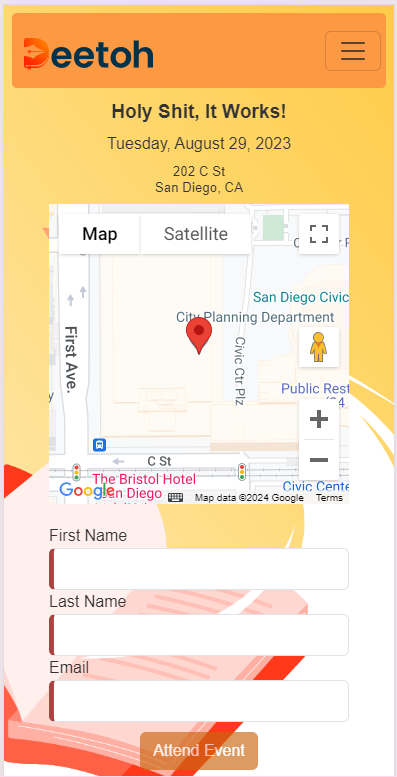
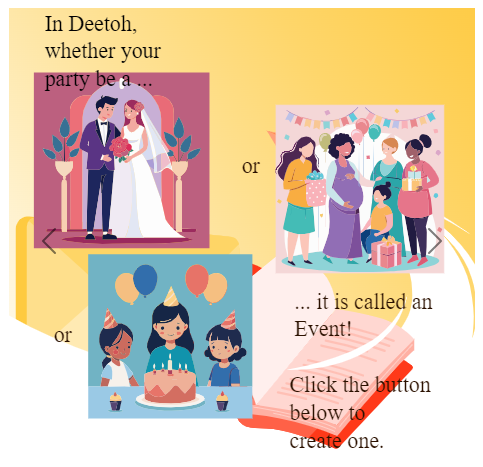
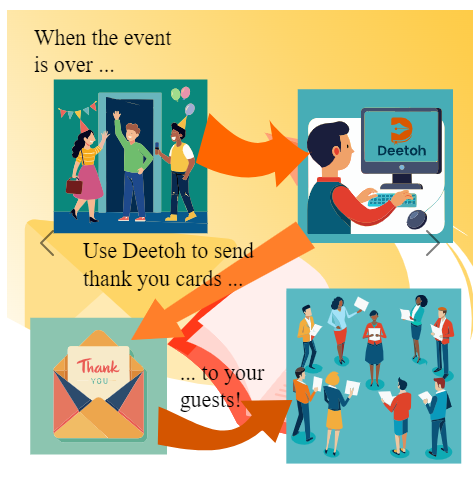
Over coffee we discussed several things, but focused on a project that he wanted to build and launch. He wanted to bring to market a digital guestbook, and was looking for help.
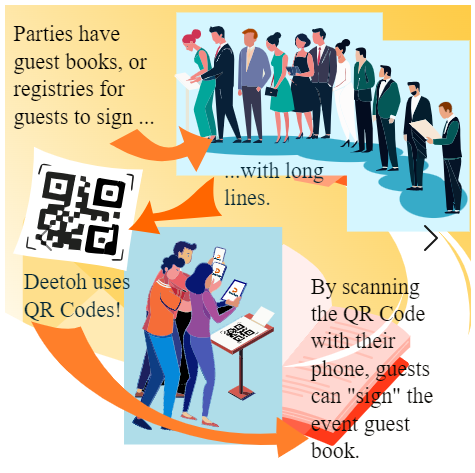
He explained that it could be used at weddings, birthdays, baby showers, etc.., to streamline the process of registering at the party, making it easier for the party’s host to send correspondence.
“Instead of signing a physical guestbook, guests will photograph a QR Code. The QR Code will redirect them to an online guestbook.”, he told me.
The ubiquitous QR Code, a modern day bar code you can cram full of data.
“Then, after the party is over we can automate emails to all of the party’s guests”, he continued.
Without thinking I uttered the words no developer in their right mind should ever say.
“That sounds easy…”, I told him.
And then I uttered the other words no developer in their right mind should ever say.
“It shouldn’t take too long.”, I told him.
Richards’ proposal was timely.
I had studied Software Engineering in college for the creative aspects: the ability to create something from nothing. For the last year I had been working as an Application Development Manager, and, although the role offered me the chance to mentor other developers and plan and guide projects, it didn’t leave much time to, well, to create. Furthermore, I felt my programming skills stagnating, as well. So, when Richard asked me if I’d like to partner with him, I jumped at the idea.
A year later we launched Deetoh, Rich handling marketing and legalese, and I the software development. Here’s the link :
I decided to use Azure, .NET Core, Angular, and Bootstrap for Deetoh’s technology stack to create some synergy between Deetoh and what I was doing at my employer, a .NET shop with Azure “cloud” aspirations.
I have been using Angular since its initial implementation a decade ago, so no problem there. Bootstrap, too, although I would be using it foremost for its “mobile friendly” layout engine, and secondly for its UI components. Deetoh was to be a “mobile-first” application, after all.
I have been using .NET for over twenty years. Back then ASP.NET Web Forms and MVC were king. For Deetoh, however, I’d only be using it to create Web APIs – or, REST APIs that the Angular front-end could consume. In retrospect, I probably should have opted for Azure Functions as hosting a Web API as an Azure Web Service on Azure is pricey. Given Deetoh had no established audience, pay-as-you-go Azure Functions would have been much much cheaper in the short term. On the other hand, .NET Core, which Deetoh’s Web APIs were built upon, can be run as Linux Containers on Azure. Initially, I had everything running on Windows on Azure. After realizing I could migrate to Linux and cut my hosting costs in half, I switched.
Admittedly, Azure was new to me. At my prior employers I had used Amazon Web Services. What I found is that for every product offered by AWS, Azure had a doppelganger.
I used Azure AD B2C and MSAL for user management and token-based authentication. This project provided a good foundation for my Angular front-end. Azure B2C provided user flows for registering new users, signing in, and password resets. My only complaint is that it proved to be a little lacking in custom claims. The JWT tokens generated by Azure B2C were limited to the standard username, address, phone number, etc….
For security, I would rely on Angular Guards to authorize access to each of Deetoh’s routes. The Guards would leverage the MSAL library to “sniff” the token generated during sign-in. On the backend, the WebAPI would also use MSAL to restrict access to the various REST endpoints based upon the same token. So, even if a user were able to circumvent the front-end’s security, they wouldn’t be able to access any data on the back-end.
My .NET Core Web API would consume Azure’s NoSQL database, called Cosmos DB, using Entity Framework. In retrospect, using an ORM was probably overkill, but the implementation would be sparse and straightforward given the flat, non-relational nature of NoSQL, so I figured, why not?
To support Deetoh’s emailing of guests I used Azure’s Email Communication Service and a Storage Account. At my employer I’ve used SendGrid for sending emails, but SendGrid only offers up to 100 emails/month for free. After that it’s $19.95/month. Knowing that I’d likely blow well beyond 100 emails in testing alone I opted for Azure’s platform, which charges a flat fee of $0.00025 per email. Azure’s service doesn’t have as much polish as SendGrid, but so far it’s worked out well.
“If Deetoh ever gets enough traffic so that our costs increase enough to warrant a revaluation of our platform, our service providers, or even a refactoring – I think it’ll be a good thing!”, I joked with Richard.
That’s not to say Deetoh isn’t production ready, but if it miraculously receives traffic rivaling Evite overnight, there will definitely be growing pains. Obviously, I don’t expect that. Don’t build a cruise ship when a sailboat will suffice, right?
A little help from AI
About a month before launch Richard was demoing Deetoh to a couple of his friends that wanted to use it for their upcoming wedding. At the time Deetoh was fully functional, if not a little rough around the edges.
“It needs a better help experience”, he told me. “They didn’t know how to use it.”
At this point Deetoh’s system consisted of little help bubbles that could be toggled on-and-off. Richard, however, wanted full page overlays with rich graphics.
“Who is going to do the artwork?”, I asked Richard, already knowing the answer.
If you’ve been following my website long enough – heck, just by the website’s name alone, you probably realize that I am an artist, too. However, at this point I had already revised Deetoh’s email feature twice per Richard’s request, and just wanted to launch. After sketching up what I wanted the help pages to look like I quickly realized the custom artwork was going to take a lot more time than I was willing to spend. I started perusing the web for open source artwork, but realized that I’d never find content specific enough. Then I tried AI.
AI is an acronym that has been met with both fear and excitement. As a software developer, I’m scared that someday it might be able to render code well enough to replace me, yet I am excited by its possibilities as a tool I can use to speed up my daily work. As an artist, I discovered the same fears, only multiplied. I have little doubt that in less than five years the majority of corporate artists will be replaced by AI. Keep in mind I say “Corporate Art”; this is the “generic” kinda’ stuff you see on internal memos, training videos, and the like. Anything public facing will undoubtedly undergo more scrutiny. For Deetoh, however, AI just worked. With the help of a mobile application called Recraft I was able to generate specific-enough content for Deetoh’s help pages. Admittedly, I still had to make alterations ( i.e. “nip and tuck” ), but overall it took me easily a quarter the amount of time. As far as the alterations? I vectorized the AI-generated imagery using Adobe Express Online and manipulated the resulting graphics using Inkscape. Here’s a sample of the end result. What do you think?
Closing thoughts
Deetoh took a lot longer than I expected. At most jobs I’ve worked I’ve taken to doubling my estimates and then some when determining how long something will take. Rarely, have I come under ( or over, for that matter ). For Deetoh, I went over. Way over. Why? It came down to two things :
A simple misunderstanding between what Richard, the product owner, wanted, and what I built.
An inability on my part to determine how many hours a week I could dedicate to the project.
Ironically, these two problems plague every single software project that I have led or worked on. Part of the problem is Agile Methodologies, or incremental / progressive development. Agile doesn’t leave a lot of time for proper design. However, I’ve worked on way too many waterfall-based projects, Agile’s polar opposite, where all planning is done up front, to realize its faults, too. I’ve seen Waterfall stall out before a single line of code, much less a prototype, saw the light of day. With Agile, the focus is in delivering something, anything.
Aside from governance, developing Deetoh gave me a renewed respect for Cloud to leapfrog development. There was a time not so long ago where I would have had to provision my own servers, my own user management, my own database, my own authentication, and so on. Now, I can do it relatively quickly ( and cheaply ). Cloud is not just for large corporations, but for the little guys, too – like Deetoh.
“Guess what girls? As of August 1st I can get you all of the free bubble wrap and boxes that you want!”, I joked. “I just accepted a new job at UPS!”
“Which store will you be working at? The one next to CVS?”, Kaylee asked.
“Uh….no….”, I laughed, “No, it’s a management role. I’ll be managing other engineers.”
“Oh…..”, they said in unison. Almost disappointed.
More than a few of my friends have also suffered through a similar lack of enthusiasm from their own kids. Working for Apple does not mean you work at the Genius Bar, nor does working at Qualcomm mean you hustle popcorn and beer at football games, although admittedly, the latter is a bit stale given the closure of the prior home of the Chargers football team.
As a manager I’ll be herding engineers rather than the 1’s and 0’s that have been the hallmark of my prior positions. It’ll be a change of pace for me, but one I have been working towards for a while. Over the last couple of years I have been reading books on management strategies, interviewing past co-workers, and enrolling in classes. This year culminated with a Certified Associate Project Manager (CAPM) certification, a Certified SCRUM Master certification, and, of course, this new job.
“To be honest, there are faster, smarter, quicker engineers than me…”, I admitted to my soon-to-be boss during my interview.
He raised an eyebrow at me.
“…I mean, I’m no slouch!”, I corrected quickly. “But, over the years I’ve had the opportunity to work with some amazing people, and, given my own experiences, I feel like I am in a great position where I can guide and motivate them to become what they were meant to be.”
“‘I’m a ‘People Person’, too”, I laughed, “You know, like Tom Smykowski from Office Space? You know, Office Space? The movie?”
A questionable stare. I guess not. Probably a bad analogy anyway, though, given that Tom was anything but a people person.
For me it’s all true, though. Between a one-two punch of a cancer diagnosis and COVID lockdown, I need to be working with people again, not staring at a computer screen. There will still be problems, of course, just of a different, more “people-y” nature, and I am so looking forward to it.
So, before I go, some job search statistics for those who are interested:
I submitted at least 80 job applications over a 3-month period. The first of which was on 4/17/2022, the last of which was on 7/15/2022.
I interviewed with 12 different companies. This equates to 15% of the companies that I had applied to. The majority of the interviews were split into three different parts – an HR screen, an hour-long interview with the hiring manager, and, finally, a half-day panel interview with the team. I am still waiting on responses from some of the interviews that I participated in.
I received 3 offers, which is roughly 4% of the companies that I had applies to and 25% of the companies that I had interviewed with.
The most responsive of the larger companies that I applied to were BD, Sony, and Amazon. The bad news is that BD, after several rounds of interviews and over a month-and-a-half of waiting, cancelled the requisition altogether. Meanwhile, two months and three interviews later I am still “waiting” to hear from Sony. As for Amazon, I almost felt I had to beat them off with a stick. I was contacted by so many of their recruiters over the course of my search that I lost count. I can’t help but think I was just a quota as follow-up calls were few and far in-between. An engineer with a heartbeat, yup, that’s me.
The least responsive large companies were Intuit and HP, both of which I submitted multiple applications, but never received a single follow-up. Intuit was by far the most frustrating as I attended not one, but two career events – uh, I mean, mixers.
Routing is a cornerstone of single page applications (SPA’s). In SPA’s, a single page is loaded and the application resides within it. Re-loading the page or navigating to a new page or url is a no-no.Keeping the url static for the lifetime of the SPA is equally bad. Static urls don’t allow the web browser to collect history. Without history the web browser’s back button will just go to whatever site you visited previously – even if you spent 10 minutes judiciously navigating around the SPA. Bookmarks will become meaningless as well.
The Hash
So changing the url is mostly bad. A way around this is using hashes (#) in the URL Path. Hashes were initially used to navigate within a page to different anchor tags ( <a/> ) on the same page. They don’t cause a page refresh and are collected in the web browser’s history. A good example is a page that has a table of contents in the header. Clicking the hyperlinks in the table of contents scrolls down to that particular section on the page which is tagged with anchor. Adding ( or removing ) hashes to the URL does not cause the page to refresh.
So, ../quote/msft will load the TickerComponent with ticker info for Microsoft.
And the “Child Route” ../quote/msft/details will load the TickerContainerComponent as a child element of the TickerComponent.
Child Routes
Child routes allow you to display a child component within a parent component based upon the URL. Typically, the Application component template contains a <router-outlet> directive that displays the initial Component. Parent Components follow a similar pattern. They will likewise have a <router-outlet> directive in which their child component gets loaded.
To clarify I should point out that the ultimate routing table that I ended up using for the Stock Portfolio does not use child routes. I just wanted to give a quick overview of them here as well, I almost used them.
The Routing Module
This is what the Routing Module ( minus the Routing Table ) looks like :
import { NgModule } from '@angular/core';
import { RouterModule, Routes } from '@angular/router';
import { APP_BASE_HREF} from '@angular/common';

import { TickerComponent } from './components/ticker/ticker.component';
import { TickerAddComponent } from './components/ticker-add/ticker-add.component';
import { TickerNewsAddComponent } from './components/ticker-news-add/ticker-news-add.component';
import { TickerContainerComponent } from './components/ticker-container/ticker-container.component';

const appRoutes: Routes = [
   /* Routing Table */
];

@NgModule({
   providers: [
      {provide: APP_BASE_HREF, useValue: '/stockapp'}
   ],

   imports: [
      RouterModule.forRoot(
         appRoutes,
         { enableTracing: true } // <-- debugging purposes only
      )
   ],
   exports: [
      RouterModule
   ]
})
export class AppRoutingModule {}
Make sure that you import all of the Components that are loaded by the URL Paths into the Module. The router needs to know about the Components it should load.
What is APP_BASE_HREF?
After migrating routing to a Module I kept getting an error when running my unit tests for the “root” AppComponent:
“Please provide a value for the APP_BASE_HREF token or add a base element to the document.”
Strangely, the error was NOT occuring at runtime. To fix the error I followed these instructions on the Angular website. The router needs to know which “base url” to use when navigating to your routes.
Why a Separate Module?
Best practices dictate that routing should be kept in a separate module from the rest of the application. Another best practices should also be to explain why doing something as such is a best practice. Unfortunately, the official Angular documentation dictates it as such and glosses over the “why”. I’ll take a stab at it :
Seperation of Concerns. Components shouldn’t care what URL invoked them. They should be stand-alone and isolated from such things.
Strategy Pattern. Keeping routing in a seperate module makes it easier to change which URLs launch which Components.
In a hurry?
The finished source code is available on my GitHub repository.
The finished application is up-and-running on Heroku here. Be aware that it is running on a “free” development server so give it a minute or so to spool up.
That’s it for now. Please let me know if you have any questions or comments!
I couldn’t find a good illustration for my daddy/daughter programming project so I created my own. Minecraft, Raspberry Pi, Python, and daughters – what’s not to love?
Introduction
So, I really want my girls ( 7 and 9 ) to learn how to program. At the very least it will make them more comfortable with computers. At best it will spark their imaginative spirit and inspire them to create something cool. Just last weekend we were going to play a board game together before we discovered the spinner missing. I told them that we could write a program to mimic the spinner on a computer. My oldest immediately got excited – and so did I.
I’ve taken my girls to STEM fairs and realized very quickly that although there are countless after school programs willing to teach programming they all change exorbitant rates. Being a software engineer ( and a “frugal” one at that ) I decided that the only way my girls were going to learn is if I teach them myself.
This is my first of lesson on how to teach my girls to program.
Enjoy!
What is Programming?
Today I’m going to teach you how to be programmers. Programmers create “programs” that are run on “computers”.
Some examples of programs are :
Games : All of the games that you play are programs – Minecraft, Pokemon Go, Roblox, …
Singing birthday cards : A programmer wrote a program to play “Happy Birthday” when you open a birthday card.
Wrist watches : Even something as simple as a wrist watch has a program that keeps track of and display the time.
Machine Language
Computers don’t understand your language – they understand machine language. Machine language looks like a bunch of numbers and letters. This program is written using a machine language. It tells the computer to write “Hello World” :
Programming Languages
Programmers can’t read or write machine language. Instead, they use a Programming Language to tell a computer what to do. A programming languages is a special languages that you can understand that is “translated” to machine language. Translating a program written in a programming language to machine language is called compiling.
Programming Languages are not spoken like English – they are written. We are going to be writting our programs using the Python programming language. Here’s what a very simple program written in the Python langauge looks likes :
print("This line will be printed.")
This program writes “This line will be printed” to the screen. Pretty simple, right? Python isn’t the only programming language. There are many many others and just like the languages that we speak they all look a little different.
The Raspberry Pi
This is the Raspberry Pi – the computer that we’ll be creating programs for.
The Raspberry Pi is a cheap yet powerful computer that runs an operating system called “Rasbian Linux”.
Operating Systems
An operating system is special type of program upon which other programs can be run. Usually a programmer will create a program that runs on an operating system rather than directly on the computer itself. Why? To save time. An operating system can already do a bunch of things that a programmer might want to do. For example : it “knows” how to listen to your keyboard and your mouse. As a programmer why would you want to create another program to do this?
An internet connection. The Rasberry Pi supports Wifi as well as an ethernet cable.
The first step is to get the Rasbian Operating System on the Micro SD Card. Follow these instruction to do that. After Raspbian has been copied onto the Micro SD Card you can slide it into the slot on the Raspberry Pi and power it on.
The Rasbian OS will lead you through some initial setup stuff. After that we can finally get coding …
Hello World
As a programmer your first application when learning a programming langauge is “Hello World”. What does it do? It prints “Hello World” onto the monitor. That’s it. Drum roll. Boring? Maybe. But as simple as it may seem its a good test to make sure everything is working properly before getting your hands dirty with anything more complicated.
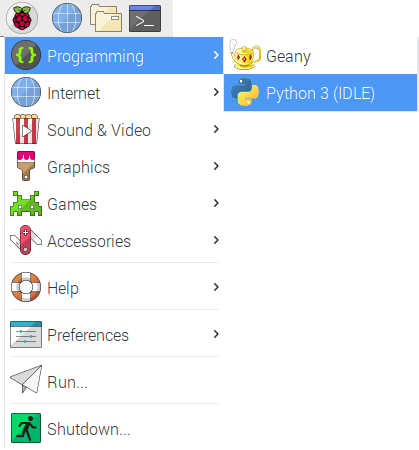
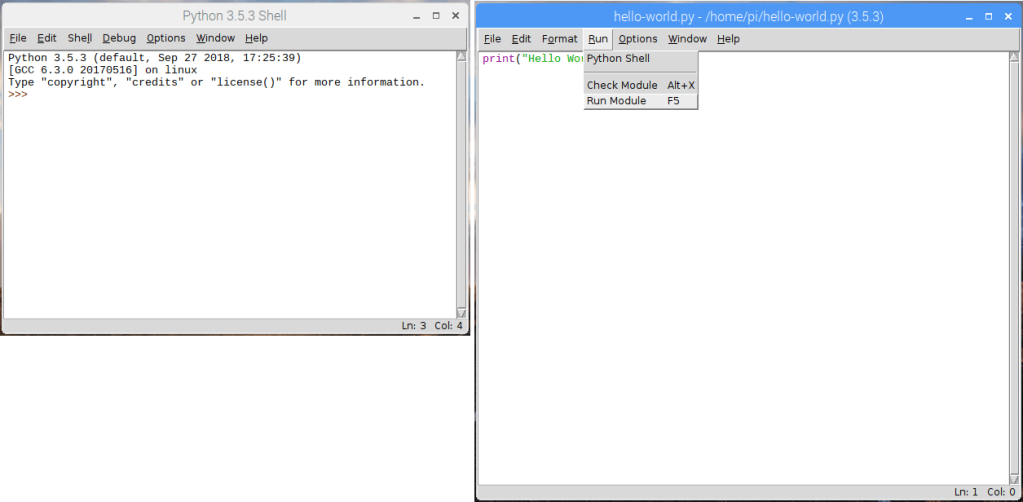
Step 1 : Start Python
Click on the “Raspberry” button at the top-right of your screen. Select “Programming” and “Python 3”.
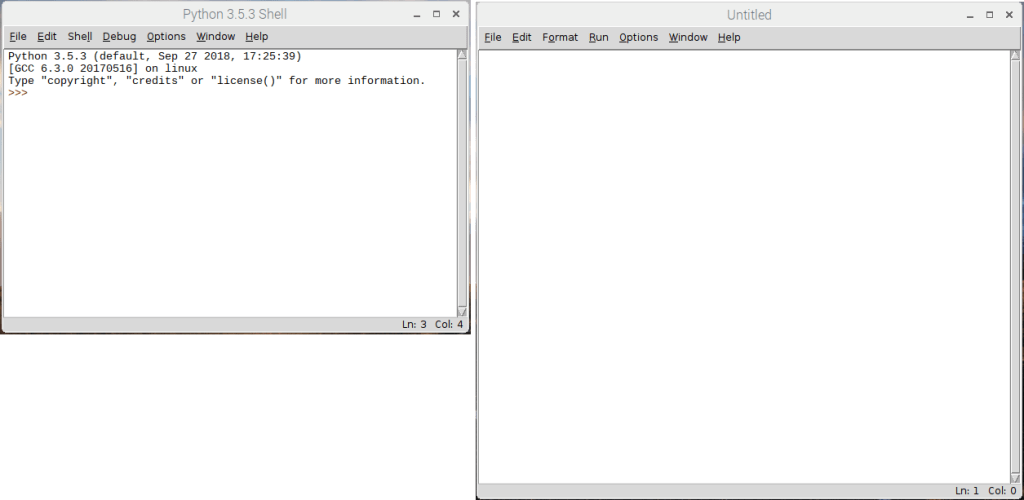
Step 2 : The Python Shell
This will bring up the Python Shell. You can run Python programs through the shell. The >>> is called a cursor. You can write stuff on the cursor in the Python language to tell the computer to do something cool.
Step 3 : Create a Program File
Programs can be very long. Having to type a program in by hand every time you run it is boring. If I had to do this every time I wouldn’t be a programmer! Fortunately, the Python Shell allows you to to create a “file”. The Python Shell will “read” from this file when running your program. On the Python Shell click “File” and “New File”.
Step 4 : The Text Editor
You will create your program “file” in a text editor.
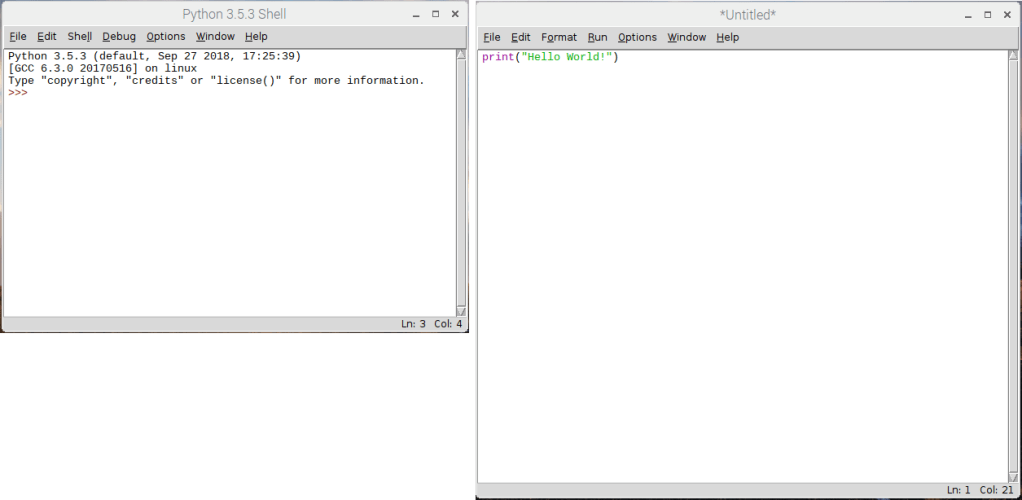
Step 5 : Type in the Program
Type this into the text editor :
print("Hello World!")
Step 6 : Save the Program
Now click “File” and “Save As” to save your first program as a file.
Step 7 : Give the Program File a Name
You need to give your program file a name. We’re going to call it “hello-world.py”. Why the “.py”? It’s called an extension. File extensions tell the operating system ( and us programmers ) what a file is used for. Python programs always have the extension “.py”.
Step 8 : Run the Program
Now that you have a program “file” you can run it in the Python Shell by clicking “Run” and selecting “Run Module”.
Step 9 : Hello World!
In you see “Hello World” in the Python Shell – congratulations! You just created your first program using Python!
Pretty boring, right? Programming langauges like Python would be pretty useless if all they did was say “Hello World”. Let’s try something a little different.
Hello “You”
Let’s create another program. This program will allows you to type in your name and it will write “Hello You!”. And by by “you” I mean your name…
Create a new file using the Python Shell again by following Steps 3-7.
For Step 5 type in this :
print("Enter your name:")
myName = input()
print("Hello " + myName)
For Step 7 save the file as “hello-name.py”.
Now, if you click “Run” and “Run Module” from the Python Shell it will ask you for your name. If you type in your name and click the ENTER button it will write out “Hello, Scott”.
So how does this work?
input() “reads” whatever you type with the keyboard. When you click the ENTER button whatever you typed is saved to a variable called myName.
Variables
A variable is a way of storing stuff in a program that you want to use again. You can store sentences ( also known as “strings” in programmer-speak ) in variables as well as a bunch of other things. Without variables the program would have to keep asking you for your name.
print() “writes” the variable to the screen. If you typed “Scott” it will write “Scott”.
Still pretty boring, right? One more thing before we move on to something way cooler. Loops.
Loops
What if I wanted to do something over and over again?
Create a new file using the Python Shell again by following Steps 3-7.
For Step 5 type in this :
print("Enter your name :")
myName = input()
counter = 0

while counter < 100:
   print("Hello " + myName)
   counter = counter + 1
For Step 7 save the file as “hello-name-100.py”.
Now, if you click “Run” and “Run Module” in the Python Shell it will ask you for your name. If you type in your name and click the ENTER button it will do write out “Hello, Scott” 100 times.
Can you guess why this happened?
while causes this code to repeat over and over again.
print("Hello " + myName)
counter = counter + 1
counter is a variable. It is set to 0 at the beginning of the program – before the while loop starts.
counter = 0
Each time the code is repeated 1 is added to the counter variable. So, the first time counter is 0. The next time it’s 1. The next time it’s 2…
counter = counter + 1
The code will be run again and again as long as the counter variable is less than 100.
Minecraft Pi
The Rasbian Operating System running on the Rasperry Pi supports a “special” version of Minecraft that you can program using the Python programming language. First things first – we need to install it! You will need to use the Terminal ( also Command Line, Command Prompt ) to install Minecraft.
The Terminal
The terminal allows a programmer to type in commands to tell the computer to do things. Before there were laptops, tablets, phones, and home computers with fancy touch screens and pretty buttons there was only the terminal. The terminal originally wasn’t even a computer. It was just a screen and a keyboard that would “talk to” a computer. The computer could be in the next room or even in another country.
The terminal that we are going to use to install Minecraft Pi can be run by clicking the black box icon on the top-left of the screen. This terminal talks directly to your Raspberry Pi.
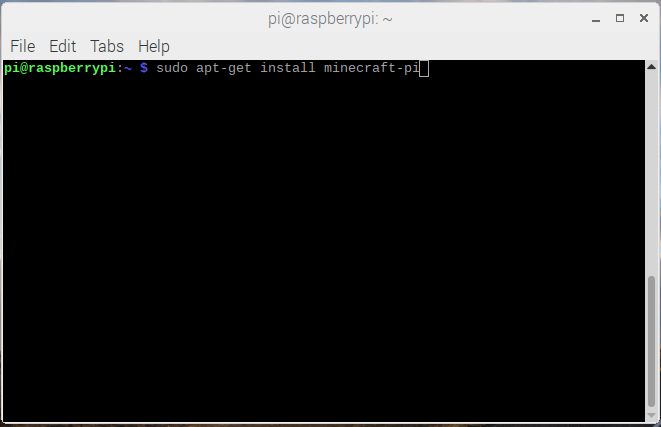
Installing Minecraft
To install Minecraft Pi you will need to type the following in the Terminal:
Step 1 : Check for updates for stuff that is already installed.
Type in “sudo apt-get update” and click the ENTER button.
Step 2 : Install Minecraft Pi.
Type in “sudo apt-get install minecraft-pi” and click the ENTER button.
Sudo
You’re probably wondering what all that stuff you typed into the Terminal means. Well, sudo is one of many commands that you can use. It means “superuser do”. A “super user” is someone who has the highest permissions on the computer. So, you’re telling the computer to do something as the “super” user. Why? Well the next command is apt-get. apt-get is a another command that installs stuff onto the computer. Only “super” users have permissions to “do” this.
Hello, Minecraft
Now that we have Minecraft Pi installed can you guess what we need to next? That’s right! We’re going to write a another “Hello World” program to make sure that everything works properly.
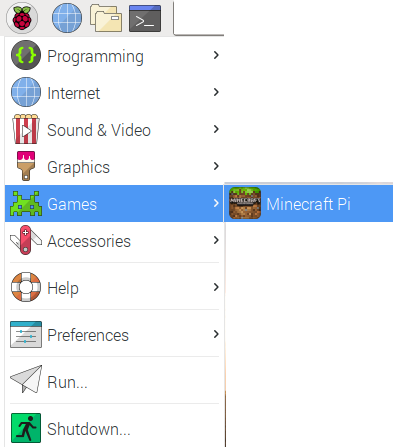
Step 1 : Start Minecraft Pi.
Step 2 : Start a Game.
Next, from the Minecraft Pi menu click on “Start Game” and “Create new” to start a new game.
Step 3 : Start the Python Shell
Next we need to start the Python Shell. If you move your mouse you will notice that it is kind of “glued” to Minecraft. If you click the “Tab” button Minecraft will “let go” of it and allow you to do other things. This is called toggling. You will need to toggle the mouse on and off in Minecraft to play with the Python Shell. Go ahead an click the “Tab” button to free up the mouse. This will allow you to Click on the “Raspberry” button at the top-right of your screen. Select “Programming” and “Python 3”.
Step 4 : Create a Program File.
Next let’s create a file to store our program so we don’t have to re-write it each time. On the Python Shell click “File” and “New File”.
Step 5 : Type in the Program and Save.
Next, type this into the text editor. When you’re done click “File” and “Save As” and save your program as “hello-minecraft.py”.
from mcpi import minecraft
mc = minecraft.Minecraft.create()
mc.postToChat("Hello world!")
Step 6 : Run the Program.
Finally, click “Run” and select “Run Module” in the Text Editor. You should see “Hello World” displayed in Minecraft.
Libraries
In order for you to do stuff in Minecraft using Python you need to import a library called “mcpi”.
from mcpi import minecraft
In real life a library is a building where a bunch of books are stored. You can check books out and read them to learn new things. In programming a library is a bunch of applications and code that is kept together. The programs that you write can import the stuff stored in a library. The “mcpi” library has a bunch of code that allows you to program Minecraft through the Python Shell. We’re going to use this code in all of our Minecraft programs. Creating the “mcpi” library on our own would take a lot of time. You can look through the library here. That’s a lot of code, right? See? We’re being smart by reusing stuff that is already written
We can program Minecraft Pi using the “mc” variable that we get from the “mcpi” library.
from mcpi import minecraft

mc = minecraft.Minecraft.create()
Functions
Can you guess what postToChat() does? It’s called a function and it prints “Hello World” to the Minecraft screen. Functions do different things – this one prints a sentence to the screen. The “mc” variable that we imported from the “mcpi” library has a bunch of useful functions that we can use to do cool stuff in Minecraft Pi.
mc.postToChat("Hello world!")
Minecraft Pi Controls
I am going to assume that you have played Minecraft before. The Pi version isn’t much different other than it is lacking some features. The mouse moves you character’s “head” around. To move your character ( and more ) you will need to use the keyboard as follows:
Key
Action
W
Forward
A
Left
S
Backward
D
Right
E
Inventory
Space
Jump
Double Space
Fly / Fall
ESC
Pause / Game Menu
Tab
Release/Toggle Mouse
Teleporting
For our next program let’s “teleport” – or move ourselves somewhere else in the Minecraft world. In order to do this we first need to know where we are.
The X, Y, and Z Coordinates
Our location in the Minecraft world – and any first-person video game for that matter is made up of three numbers identified by the letters – X, Y, and Z. These are called coordinates. If you think of the Minecraft world as a checkerboard – the X and Y coordinates are used to determine which “box” you are in.
What about the Z coordinate? Well, if you go up a mountain the z-coordinate will increase. So, instead of a “checkerboard” think of a “Rubik’s Cube”. The z-coordinate is how “high” ( or “low” ) a box is in the cube. Make sense?
Getting Our Coordinates
In our previous program we used the “mc” variable from the “mcpi” library to write something to the screen. We can also use it to tell us where we are in the Minecraft World. Assuming that you still have the Python Shell and Minecraft Pi running let’s go straight to Step 4 and create a new program.
For Step 5 type the following into the Text Editor and save it as “get-position-minecraft.py”.
from mcpi import minecraft

mc = minecraft.Minecraft.create()
pos = mc.player.getPos()
mc.postToChat(pos)
Now run the application like you did in Step 6 above. Your position in the Minecraft World will be displayed as three numbers seperated by commas. The middle number is the z-coordinate, or how “high” you are. The other two numbers are the x and y coordinates – or where you are on the “checkerboard”.
Teleport Up
Now let’s teleport. Let’s create another application called “teleport-minecraft.py”. I’m not going to go through the steps again as we should be “pros” at this by now. The program should look like this:
from mcpi import minecraft

mc = minecraft.Minecraft.create()
pos = mc.player.getPos()
mc.postToChat(pos)
mc.player.setPos(pos.x, 20, pos.y)
What happened? You should have fallen from the sky? How far? 20. The setPos() function allows you to set your x, y, and z coordinates in the Minecraft World. You are calling the getPos() function to get your position in the Minecraft World and setting it to a variable called pos. The pos variable stores three numbers – your x, y, and z coordinates in Minecraft. You can use these coordinates to set your position.
Teleport Sideways
Now change the last line in your program, save it, and run it again :
from mcpi import minecraft

mc = minecraft.Minecraft.create()
pos = mc.player.getPos()
mc.postToChat(pos)
mc.player.setPos(pos.x+10, pos.z, pos.y)
Your position in the Minecraft World should change by 10 – but “sideways” this time. Remember, the x and y coordinates are used to determine your location on a flat “checkerboard”.
Create a Block
Now that we know a little about coordinates let’s write one last program. Let’s create a block in front of us. Assuming that you still have the Python Shell and Minecraft Pi running let’s go straight to Step 4 and create a new program.
Type the following into the Text Editor and save it as “create-a-brick-minecraft.py”.
mc = minecraft.Minecraft.create()

x, y, z = mc.player.getPos()
mc.setBlock(x+1, y, z, 1)
Now select “Run” and “Run Module”. Poof! a block will appear in front of you. Okay, maybe not right in front of you. I had to use my mouse to look around for it – but rest assured it will very close to you. How close? 1 unit away. We used the setBlock() function to do this.
You can use the setBlock() function to create blocks in mid-air as well by changing the z-coordinate. Remember the z-coordinate is “height” or how far up something is on the “Rubik’s Cube”.
A Wall of Blocks using a Loop
Single blocks are so boring. Let’s use our knowledge of loops from earlier to create an entire wall of blocks. Remember, you can use a loop to repeat the same code over and over again.
Assuming that you still have the Python Shell and Minecraft Pi running let’s go straight to Step 4 and create a new program.
Type the following into the Text Editor and save it as “create-a-wall-minecraft.py”.
from mcpi import minecraft

mc = minecraft.Minecraft.create()
x, y, z = mc.player.getPos()
counter = 0
while counter < 100:
	mc.setBlock(x+counter, y, z, 1)
	counter = counter + 1
Now select “Run” and “Run Module”. Cool wall, huh? We’re using the setBlock() function and a loop to place blocks in a line. Each time the loop runs it’s code it creats a block 1 space in front of the prior block.
That’s All Folks…
Please let me know if this lesson was helpful. And stay tuned … I plan to create more lessons like this one as time permits.
I want live data form my stock portfolio application. Alpha Vantage provides a “free” REST service that supports a plethora of calls for retreiving stock information. If you go here you can make calls against their services. To make calls from your own application however you are going to need to generate your own unique API Key.
CORS
The cool thing about Alpha Advantage is that their REST services are CORS-enabled. CORS-enabled services can be called directly from a web browser without being blocked by cross-domain policies. Typically, a web browser will not allow you to GET data from a domain other then the one your application is running on. So, http://www.mysite.com/myapp can not make calls to http://www.yoursite/yourservice. CORS includes a special headers in the REST HTTP Request, “Access-Control-Allow-Origin” that circumvents this restriction. Prior to CORS and it’s predecessor ( JSONP) I would of had to expose a proxy service on the web application running the stock portfolio application. The proxy service wouldn’t be restricted by cross-domain policies as it would be running on the server. The web-browser would call the proxy service which would in turn call the service residing on another domain.
To get a quote for a stock we’re going to make this REST call against Alpha Vantage. This is what the result looks like :
Although we could store the quote as-is it would be a better idea to create a Strongly-Typed Model for it using Typescript. By using a Strongly-Typed Model :
The signature of the result will be known to downstream consumers – eliminating guesswork and confusion.
Typescript provides validation support. The compiler will notify you if you’re trying to access field on the Model that does not exist.
I created a Ticker Service to fetch the quote from Alpha Vantage’s REST service, wrap it up as a Quote object, and then return it. As REST service calls are asynchoronous the Quote is returned as an Observable. The Ticker Service returns the Observable immediately – even if the REST call hasn’t completed :
The consumer/client subscribes to the Observable – and waits. When the REST service data is finally fetched, “subscribe” is invoked along with a “data” object (the desired Quote). This code snippet is from the Ticker Service’s Unit Test
The finished source code is available on my GitHub repository.
The finished application is up-and-running on Heroku here. Be aware that it is running on a “free” development server so give it a minute or so to spool up.
The requirements presented to me for the coding challenge were pretty sparse :
Create an application for managing “news” articles for a user’s stock portfolio.
It needs to be responsive so it displays nicely on a variety of devices.
Naturally, I had to add my own requirements :
The users’ stock portfolio and news needs to be persistent; a user should not have to re-create their portfolio every time they use the application.
Stock data for the users’ portfolio needs to be refreshed in real-time.
The user should be able to view historical data for a stock in a chart.
Why Components are Awesome
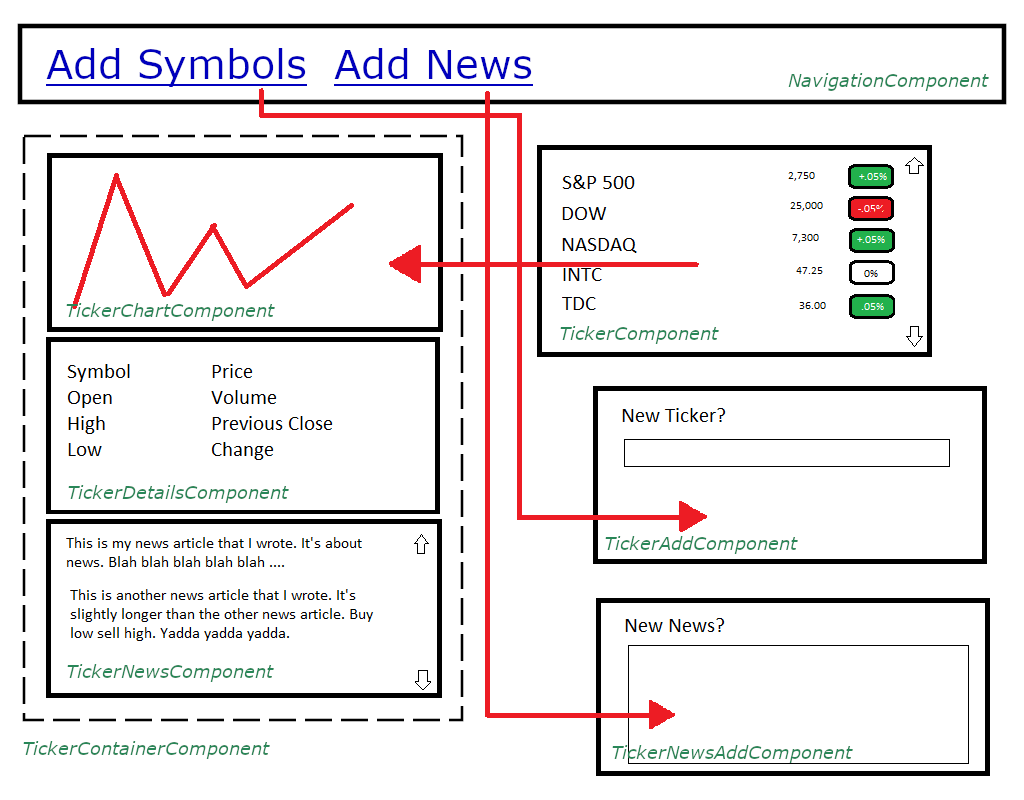
The cool thing about modern web frameworks is that they force you to compartmentalize your stuff into reusable widgets. So, instead of a huge monolithic Javascript file you have a bunch of self-enclosed “widgets”. Each “widget” performs a specific task and has it’s own javascript, html, css, and tests. A “widget” can be used for fetching data or displaying a particular section of markup. This a huge boon when working on large projects on a large team as it allows you to break up the work more easily.
This is a mock-up of what the Components looks like as well as their interaction.
In a hurry?
The finished source code is available on my GitHub repository.
The finished application is up-and-running on Heroku here. Be aware that it is running on a “free” development server so give it a minute or so to spool up.
I’m interviewing right now. One thing that has changed dramatically since I last interviewed is …. the dreaded “Coding Challenge”. What used to consist of a quick whiteboarding excercise has now progressed into the design and development of an entire application. The good news is that employers typically allow you to do it from the comfort of your own home and at your own pace. The bad news is that the challenges can be quite elaborate.
A Stock Portfolio using Angular 6
One of the coding challenges that I was presented with by an employer was to develop a “stock portfolio” application that would allow you to enter stock tickers and news articles. The rules were vague: I just needed to use a newer Javascript Framework ( React, Angular, Vue, etc … ) as well as a Presentation Framework ( Angular Material, Bootstrap, etc… ).
I accepted the challenge, started working on it, and then quickly realized how much cooler the stock portfolio application could be with some additional features. I coul pull in Local Storage, a Live Stock Feed, Charting! Professionally this would be taboo – a bad case of what is know as scope creep. However, being unemployed with some extra time on my hands I felt it was an opportunity to showcase something pretty cool.
In a hurry?
The finished source code is available on my GitHub repository.
The finished application is up-and-running on Heroku here. Be aware that it is running on a “free” development server so give it a minute or so to spool up.


