Calling it a “cup” is probably the worst decision in the history of naming things. At best it could be some sort of headgear. At worse, you’re just confusing young boys as to what the heck it’s actually for, much less where it goes.
If there’s one thing COVID taught me, it’s how important it is to get up and move. Being confined to a desk for work is bad enough, but being confined to my house is something else entirely. After dealing with lower back pain for a months I tried some things.
First, at the recommendation of my friend and neighbor, Missy, I bought a standing desk. It’s a relatively affordable tabletop model from Vari, just big enough to fit a single 27″ monitor. Unfortunately, my monitor was 32″, just big enough to hang over the sides of the platform and bulky enough to max out its’ hydraulic lifting mechanism. After cannibalizing a smaller monitor from my kids’ gaming setup, my back pain was better, but persisted.
Next, at the recommendation of my wife, Jodie, I started following an online Yoga Instructor, Adrienne. Adrienne’s video, Yoga For Lower Back Pain, is short, concise, and effective. I’ve been doing some variation of her routine nightly before bed ever since, effectively serenading my wife with a cacophony of cracking, popping, grunting, and ( yes ) occasionally farting noises as she drifts off to sleep. Again, it helped a little, but the back pain persisted.
Next, I submitted myself to a chiropractor, specifically Cooke Chiropractic in Rancho Bernardo. I survived 47 years without ever seeing a chiropractor and only did so at the recommendation of my wife. First off, Ian Cooke is awesome. He showed me massaging techniques with a racquetball, various stretches, and encouragingly told me that I would, in fact, be back up and running in no time. Near the conclusion of our first session he positioned me on a small massage table, gently placed his hands on a couple of spots on my back and hip, and rearranged every single vertebrae in my back with a violent jerk. This resulted in a loud audible crack, an even louder shriek from me, and hysterical laughter from my wife. It helped a little, but the back pain persisted.
Finally, I bought a Fitbit and started tracking my steps. I never gave the 10,000 steps-a-day thing much thought until I realized how little, in fact, I was actually moving throughout the day. Sure, I’ve made a habit of regularly lifting weights, prefaced by a short warm-up on a stationary bike. I’ve even been a devotee of Shawn T’s T-25 workout for several years ( basically, Insanity for the less-inclined ). But, I was averaging only 3,000 steps-a-day. Cranking it up to 10,000, with the help of Adrienne, a standing desk, and a few sessions at Cooke Chiropractic finally did the trick. My back pain is gone and I am even running a few days a week, too.
At this point you’re probably wondering what in the hell this long winded monologue has to do with an illustration of a misplaced athletic cup. Well, 10,000 steps is roughly 4-5 miles and can take a couple of hours. It’s a lonely plod without someone to talk to, so I often walk with my family and friends. On these walks I’ve realized that walking not only loosens up ones back, but ones mouth, too.
To my friend, Missy, thank you for sharing your story. And to her son, Allan, I’m sorry you got caught in the crossfire.
Dungeons and Dragons wasn’t always cool. Back in the 90’s, it was a game played by pimply, greasy, pubescent boys on shag brown carpet under dim incandescent lights with Led Zeppelin rocking in the background. I know because I was one of those boys. Back then I think my friends and I spent more time trying to make each others’ characters miserable, and by extension ourselves, by throwing sadistic, borderline hilarious plot devices at one another.
I had forgotten all about my own experiences until my daughter, Ashley, bought a Dungeons and Dragons Starter Set for her and her friends to play. At first I was astounded that she wanted to play. I mean, Dungeons and Dragons is ( was ) for nerds, right? I was comfortable with it when I was her age, but Ashley? However, after gauging her enthusiasm my attitude quickly morphed into encouragement and finally, well, rejection…
In my defense, she did encourage me to swing harder.
My family and I were recently introduced to Paddleball by Jayme, my sister-in-law. Jayme and my wife, Jodie, were avid racquetball players before the onslaught of our children. A few months ago Jayme started playing a similar sport, called Paddleball, with a group at the local High School on Saturdays. She invited me to join her, and, naturally, I said “maybe”. My history with racquet sports isn’t a pretty one. I was the kid in high school that spent more time fishing tennis balls out of the bushes than hitting them. I was also the dude who screamed like a girl every time I played indoor racquetball with Jayme or Jodie. Simply put : They’re good. I’m not good. But, it’s more than a machoistic thing…
“I’m really not a fan of claustrophobia, 80mph balls, and swinging racquets in close quarters”, I told Jayme.
“It’s not a racquet, it’s a paddle”, Jayme encouraged me.
“And, it’s outdoors”, she continued.
“And, the ball is softer and doesn’t travel as fast.”, she finished.
“Maybe.”, I replied.
I eventually did join her, not to play, but because my youngest daughter, Kaylee, who had been going with Jayme, wanted me to meet “Grogu”, the “cutest puppy in the whole world” that frequented the courts. And, Kaylee was right, of course. Grogu absolutely was the cutest puppy in the whole world. But, I ended up playing a couple rounds of Paddleball, too, and, as expected, hit several balls over the wall in the process. But, everyone encouraged me to keep playing and had tips on how to improve my game. I remember coming home, sore and tired, but excited to tell Jodie all about it.
Fast forward a couple of months and Jodie and I now have our own paddles, made by Gearbox, a set of balls, portable chairs, and lots of new friends. We play Saturdays with the San Diego Elite Paddleball Group.
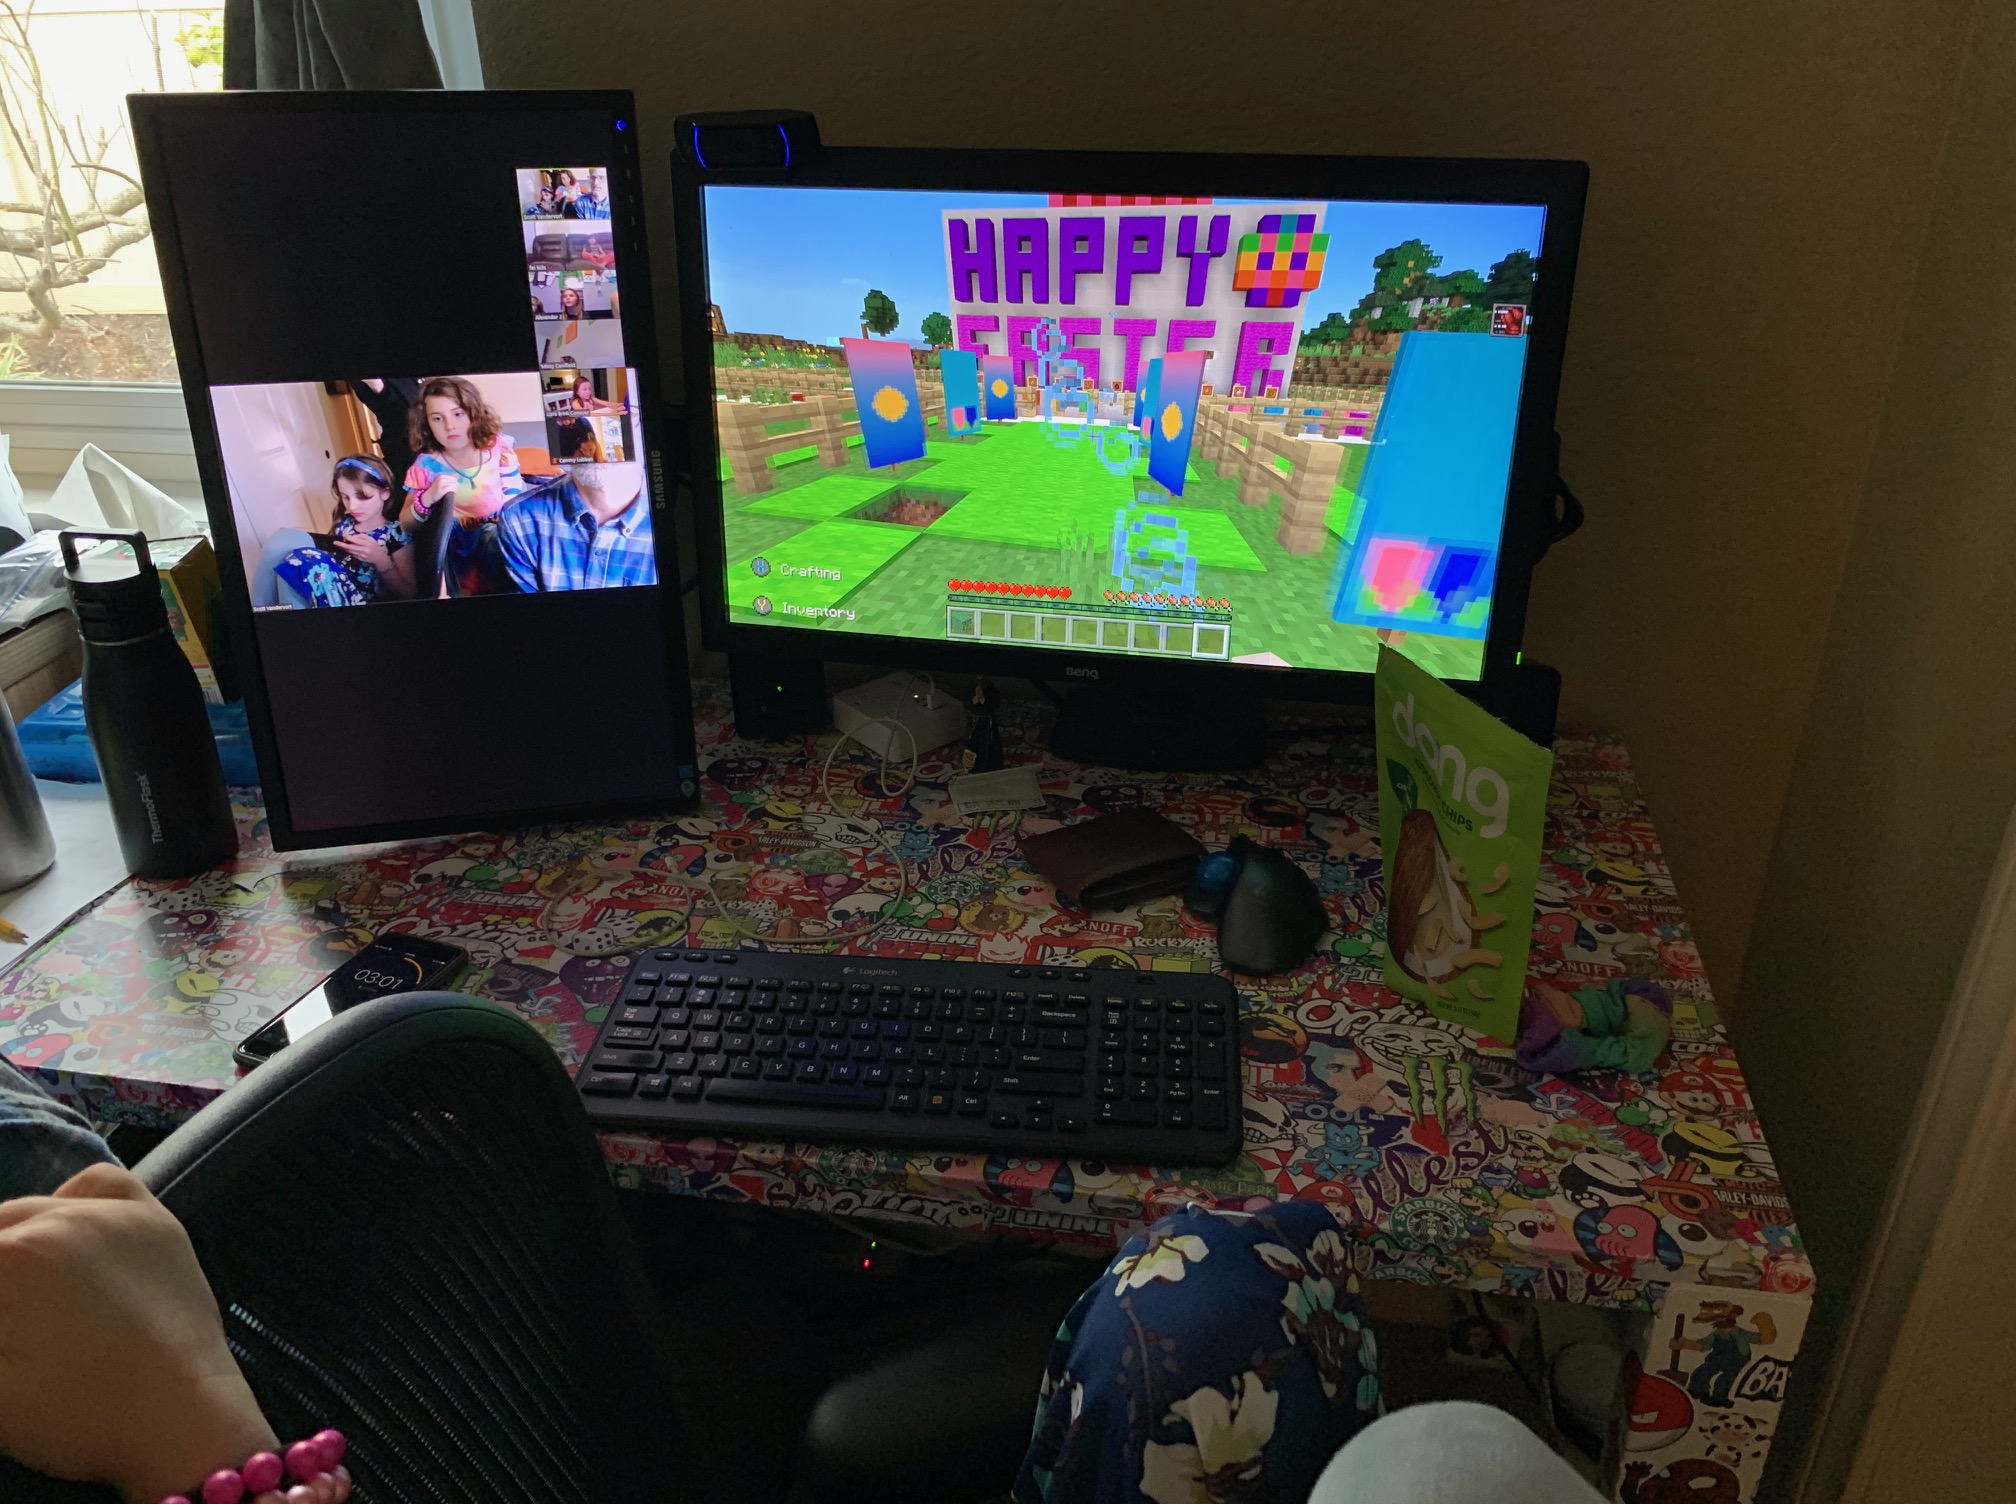
“Dad! Can we do an Easter Egg Hunt on Minecraft?”, my oldest daughter, Ashley, asked me.
In years past we would go to the Westwood Club, our community center, for an annual Easter Egg Hunt with our friends and neighbors. However this year, due to social distancing restrictions enacted to slow the Coronavirus, the community center would be closed and the Easter Egg Hunt, cancelled.
“That is a great – wait, no, fantastic idea!”, I told her excitedly, “Let’s do it!”
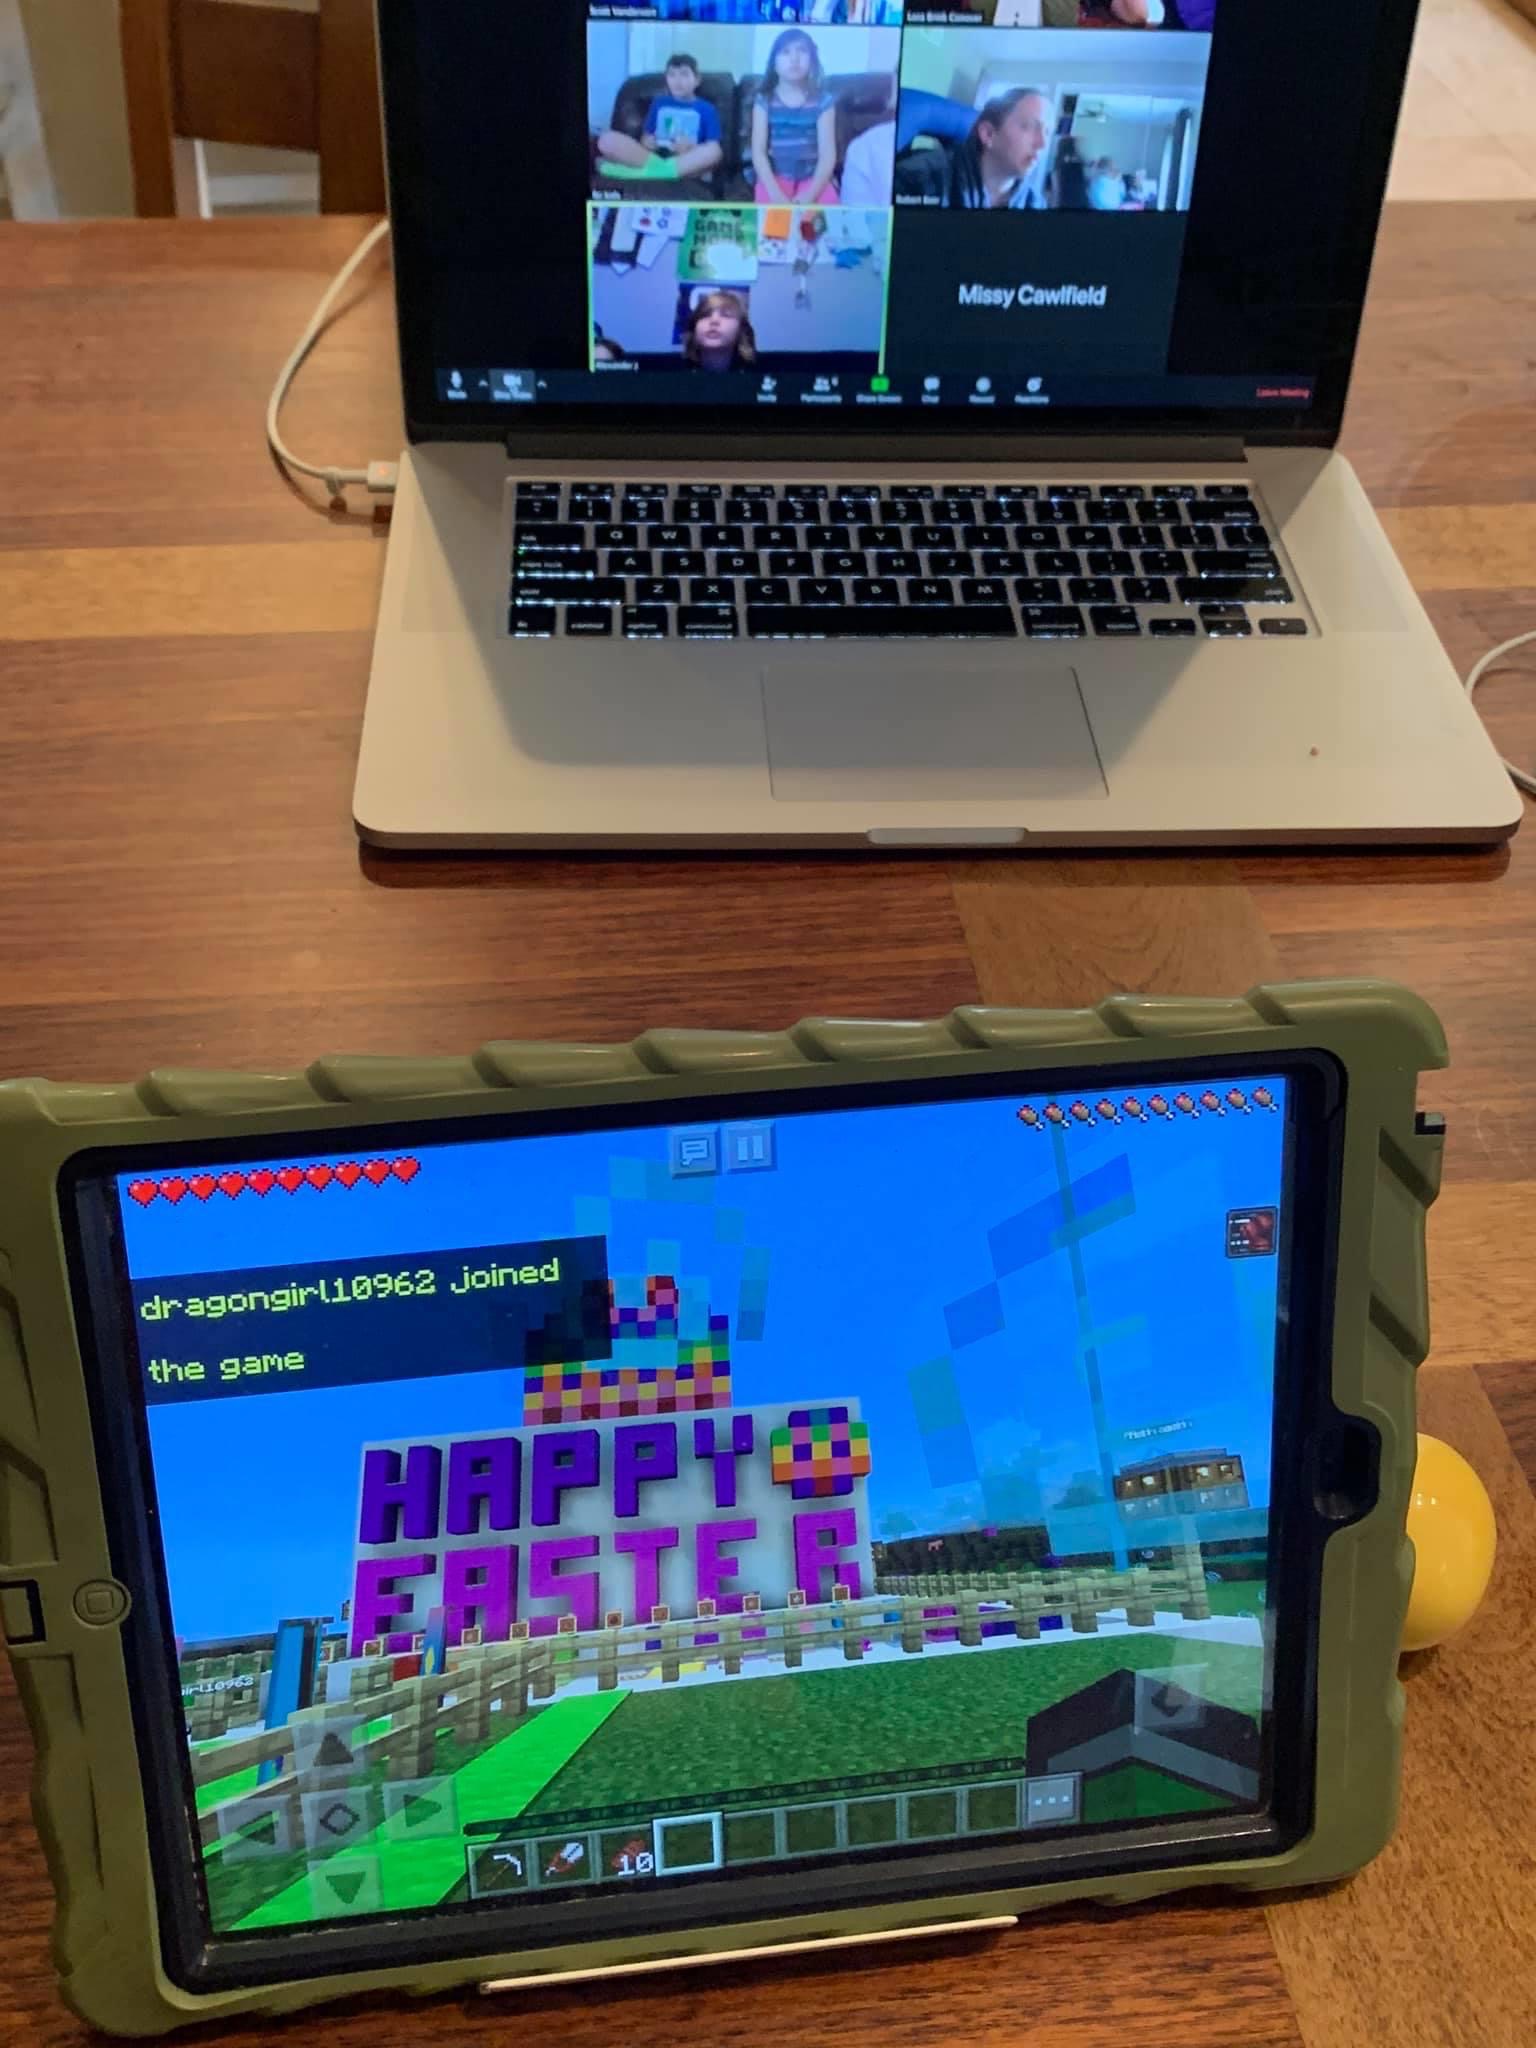
So, during the week leading up to Easter Sunday we created a Minecraft World, populated it with a bunch of colorful “eggs” ( we substituted in-game colored wool blocks ), and scheduled a Zoom teleconference so that the participants could talk.
We kept the rule simple.
Each participant would be provided a “basket” ( an in-game chest ) that would reside in the starting area.
Each basket would contain tools ( a pickaxe and shears ) which would allow the participant to “mine” the eggs.
A hunt would last 15 minutes.
During the hunt each participant would have to find and mine as many eggs as they could and return them to their basket before time ran out. Only eggs inside the basket at the end of the hunt would be tallied.
And most importantly, the participant with the most eggs wins.
For each hunt we also hid a special “golden egg” ( an in-game gold block ) which would be worth ten regular eggs.
To get by Minecraft’s 8-player limit we would hold two hunts. The first would be for the older kids who would re-hide the eggs for the second hunt, which would be for the younger kids.
The hunt had it’s hiccups, but everyone seemed to have a good time. Hopefully next year we’ll be able to once again meet up with our friends and neighbors at the community center for a real, in-person Easter Egg Hunt, but desperate times call for desperate measures and this measure, in my humble opinion, wasn’t so much desperate as it was fun.
Take care. Stay healthy. Live life. And stay safe everyone.
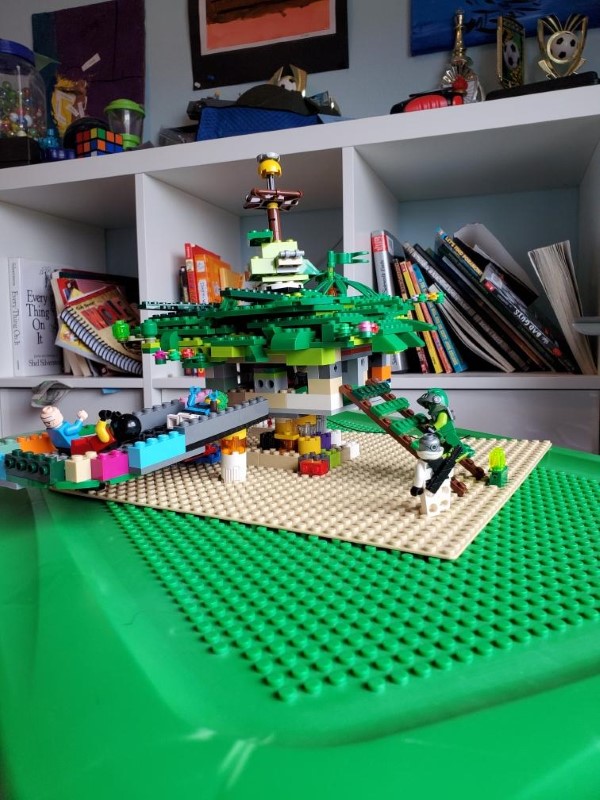
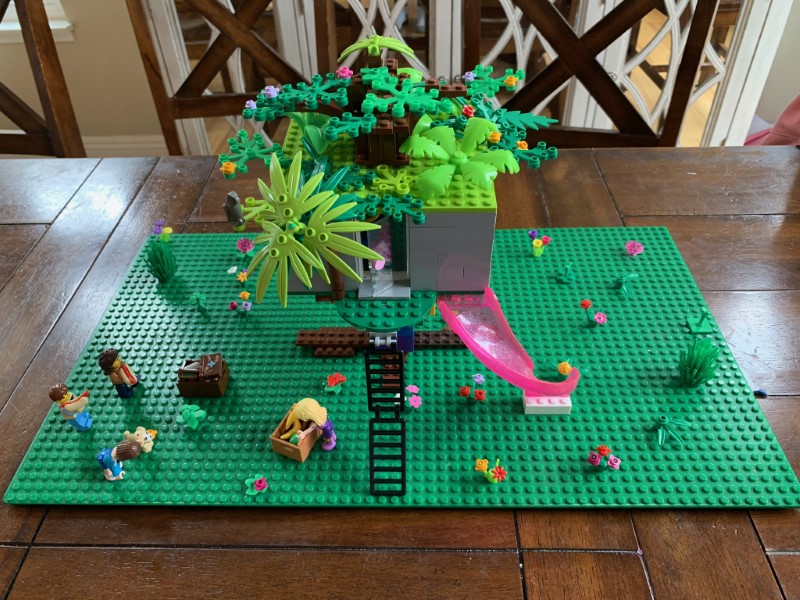
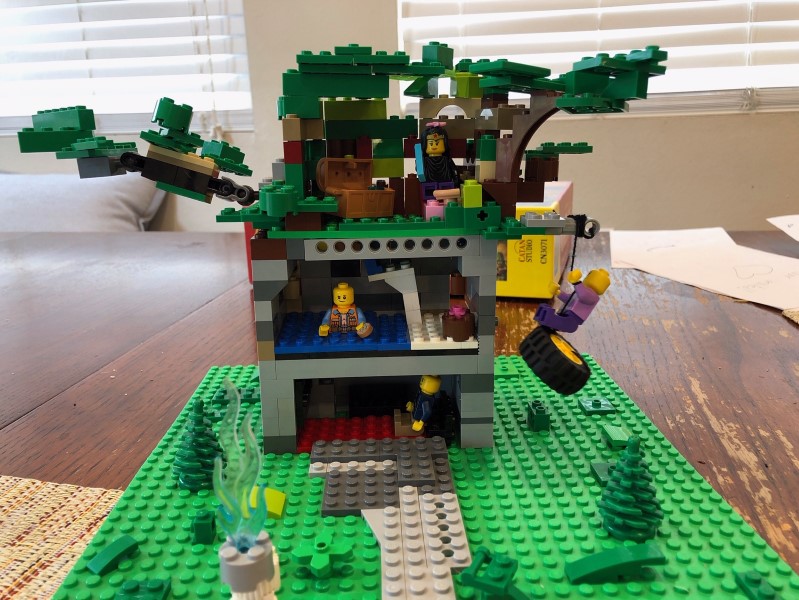
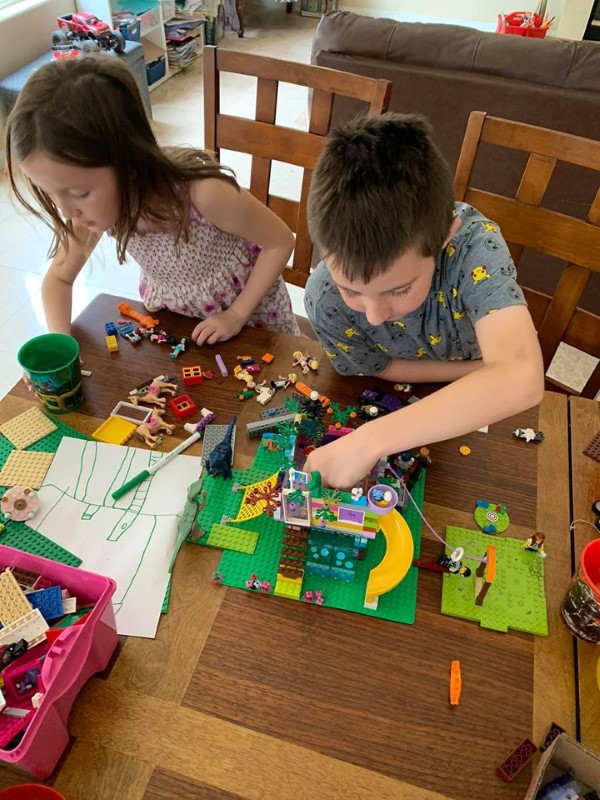
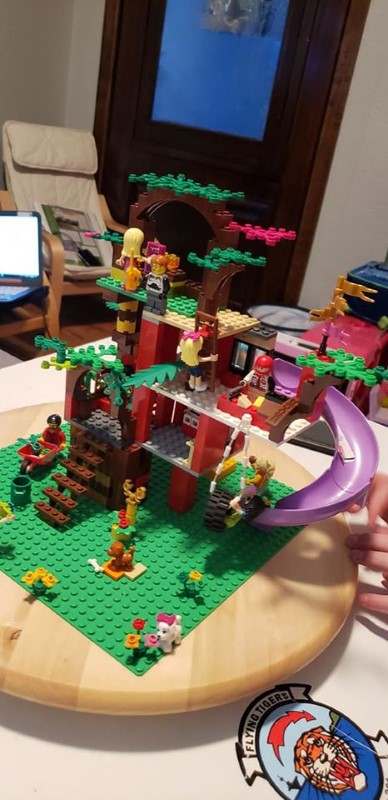
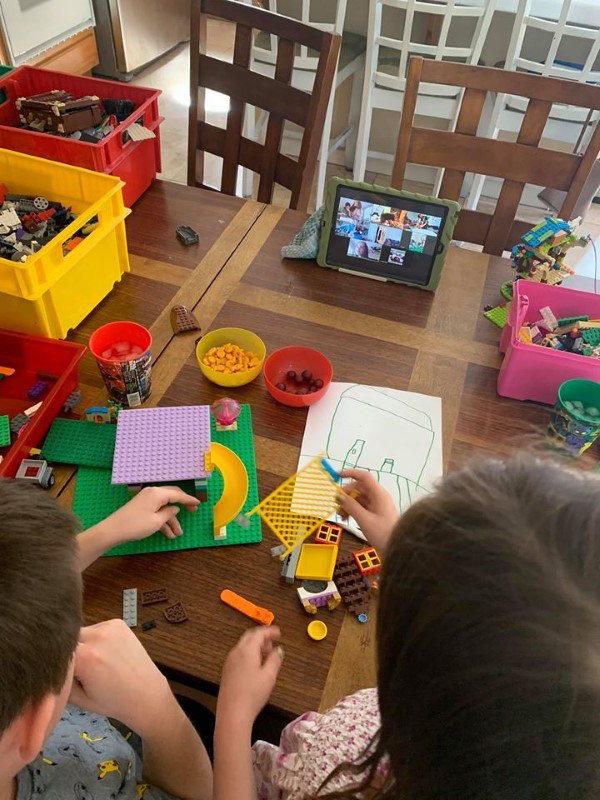
COVID has dramatically changed everyday life in a very short amount of time. LEGO competitions over Zoom with my daughters’ friends was one way to buck the lockdown and establish some normalcy. It’s fun, too!
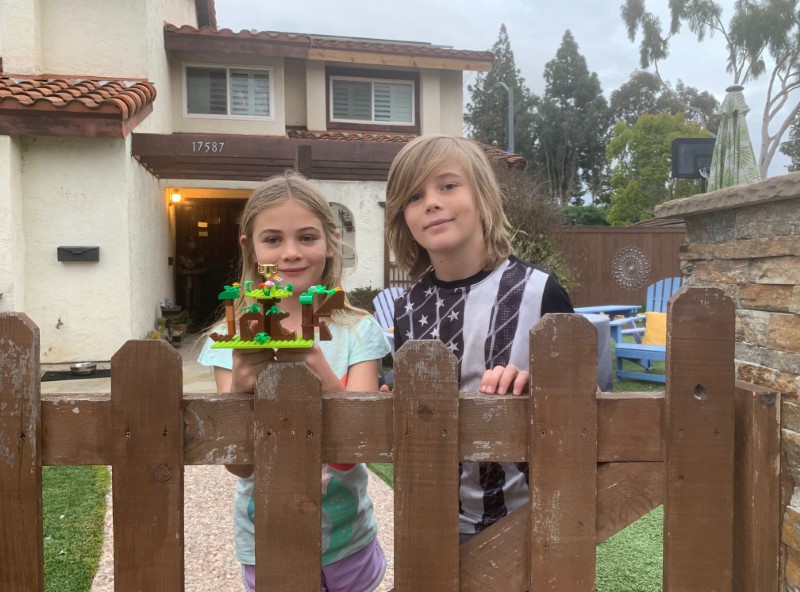
My girls and their friends are all big fans of Lego Masters, a new television show where teams compete with one another to create incredible builds based upon a theme.
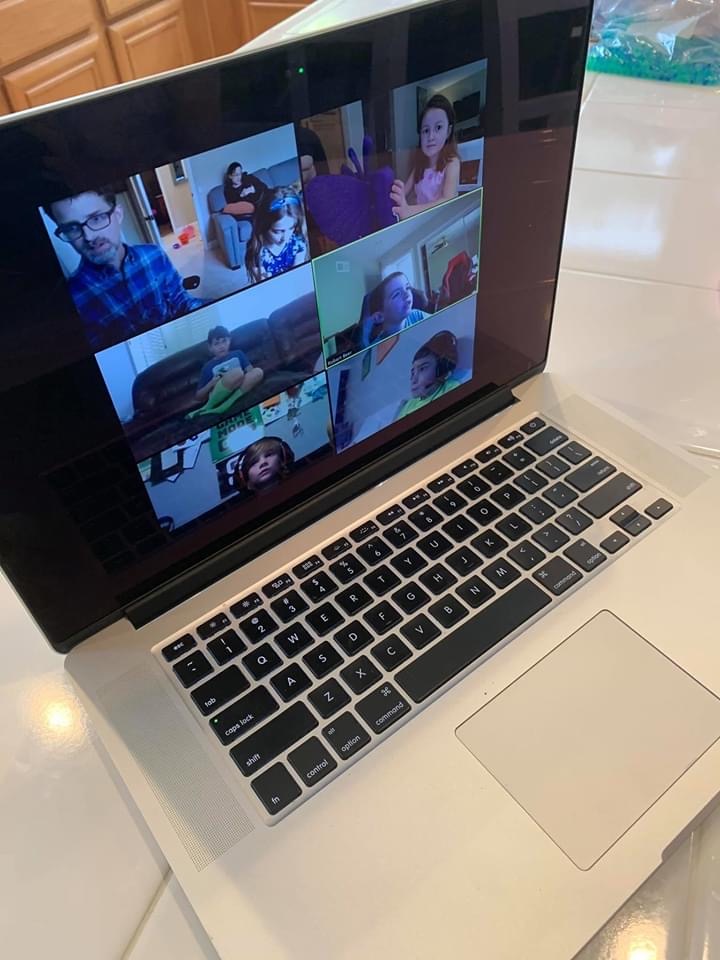
Leveraging the coronoavirus restrictions as a unique opportunity, five families participated in Episode 1 of the “Rancho Bernardo Lego Masters : Coronavirus Lockdown Edition”. Each family used Zoom running on a mobile device or laptop to teleconference so that they could participate.
The winner of this weeks challenge, “Build the World’s Coolest Treehouse” was the Jock Family. Alexander and Kaliope won the exclusive “Rancho Bernardo Cup” with their amazing build. They will hold onto the cup until next Saturday for Episode 2.
Rules
Each family will represent a Team. A Team will be made up of one or more kids.
Each Team will need access to a device capable of running Zoom.
Each family will have two Votes. A family can only Vote for themselves once.
A Host (me) will host the Zoom meeting and be responsible for interviewing ( and muting ) the Teams throughout the challenge.
How it works
A Theme will be chosen from a hat by the Host and presented to all of the Teams.
Each Team will take5 minutesto create a Plan. A Plan is a one page paper describing about how the Team will build a Lego representing the Theme. The Plan can ( and should ) contain pictures. No building should take place during this time.
Each Team will take 1 hour to Build their Lego.
Each Team will take turns Showcasing their Build. While doing so they must describe how their Build fits the Theme.
Each family will submit two Votes for the best Build and discretely tell the Host.
The Host will tally the votes and award the winning Team the “Golden Cup”. The Golden Cup will be re-awarded with each competition.
I couldn’t find a good illustration for my daddy/daughter programming project so I created my own. Minecraft, Raspberry Pi, Python, and daughters – what’s not to love?
Introduction
So, I really want my girls ( 7 and 9 ) to learn how to program. At the very least it will make them more comfortable with computers. At best it will spark their imaginative spirit and inspire them to create something cool. Just last weekend we were going to play a board game together before we discovered the spinner missing. I told them that we could write a program to mimic the spinner on a computer. My oldest immediately got excited – and so did I.
I’ve taken my girls to STEM fairs and realized very quickly that although there are countless after school programs willing to teach programming they all change exorbitant rates. Being a software engineer ( and a “frugal” one at that ) I decided that the only way my girls were going to learn is if I teach them myself.
This is my first of lesson on how to teach my girls to program.
Enjoy!
What is Programming?
Today I’m going to teach you how to be programmers. Programmers create “programs” that are run on “computers”.
Some examples of programs are :
Games : All of the games that you play are programs – Minecraft, Pokemon Go, Roblox, …
Singing birthday cards : A programmer wrote a program to play “Happy Birthday” when you open a birthday card.
Wrist watches : Even something as simple as a wrist watch has a program that keeps track of and display the time.
Machine Language
Computers don’t understand your language – they understand machine language. Machine language looks like a bunch of numbers and letters. This program is written using a machine language. It tells the computer to write “Hello World” :
Programming Languages
Programmers can’t read or write machine language. Instead, they use a Programming Language to tell a computer what to do. A programming languages is a special languages that you can understand that is “translated” to machine language. Translating a program written in a programming language to machine language is called compiling.
Programming Languages are not spoken like English – they are written. We are going to be writting our programs using the Python programming language. Here’s what a very simple program written in the Python langauge looks likes :
print("This line will be printed.")
This program writes “This line will be printed” to the screen. Pretty simple, right? Python isn’t the only programming language. There are many many others and just like the languages that we speak they all look a little different.
The Raspberry Pi
This is the Raspberry Pi – the computer that we’ll be creating programs for.
The Raspberry Pi is a cheap yet powerful computer that runs an operating system called “Rasbian Linux”.
Operating Systems
An operating system is special type of program upon which other programs can be run. Usually a programmer will create a program that runs on an operating system rather than directly on the computer itself. Why? To save time. An operating system can already do a bunch of things that a programmer might want to do. For example : it “knows” how to listen to your keyboard and your mouse. As a programmer why would you want to create another program to do this?
An internet connection. The Rasberry Pi supports Wifi as well as an ethernet cable.
The first step is to get the Rasbian Operating System on the Micro SD Card. Follow these instruction to do that. After Raspbian has been copied onto the Micro SD Card you can slide it into the slot on the Raspberry Pi and power it on.
The Rasbian OS will lead you through some initial setup stuff. After that we can finally get coding …
Hello World
As a programmer your first application when learning a programming langauge is “Hello World”. What does it do? It prints “Hello World” onto the monitor. That’s it. Drum roll. Boring? Maybe. But as simple as it may seem its a good test to make sure everything is working properly before getting your hands dirty with anything more complicated.
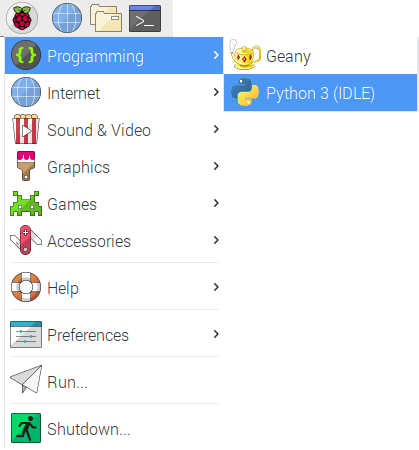
Step 1 : Start Python
Click on the “Raspberry” button at the top-right of your screen. Select “Programming” and “Python 3”.
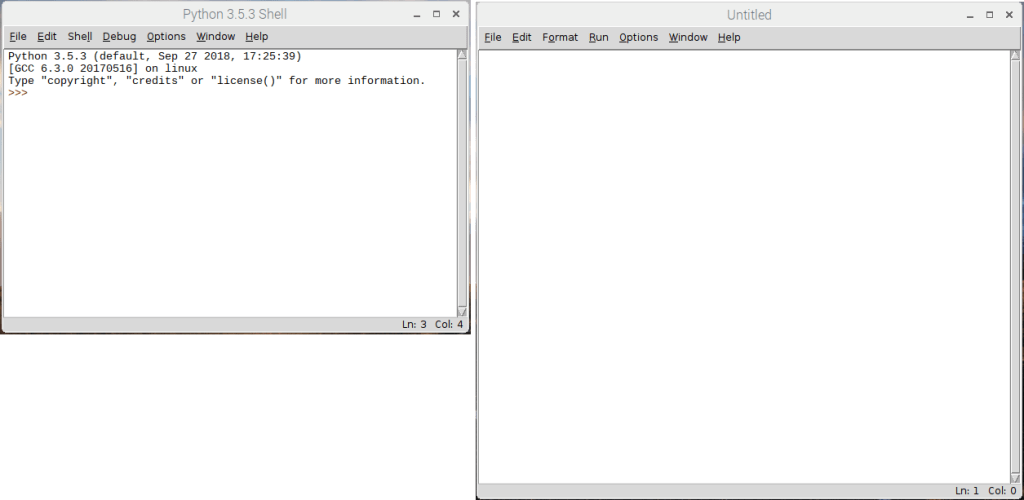
Step 2 : The Python Shell
This will bring up the Python Shell. You can run Python programs through the shell. The >>> is called a cursor. You can write stuff on the cursor in the Python language to tell the computer to do something cool.
Step 3 : Create a Program File
Programs can be very long. Having to type a program in by hand every time you run it is boring. If I had to do this every time I wouldn’t be a programmer! Fortunately, the Python Shell allows you to to create a “file”. The Python Shell will “read” from this file when running your program. On the Python Shell click “File” and “New File”.
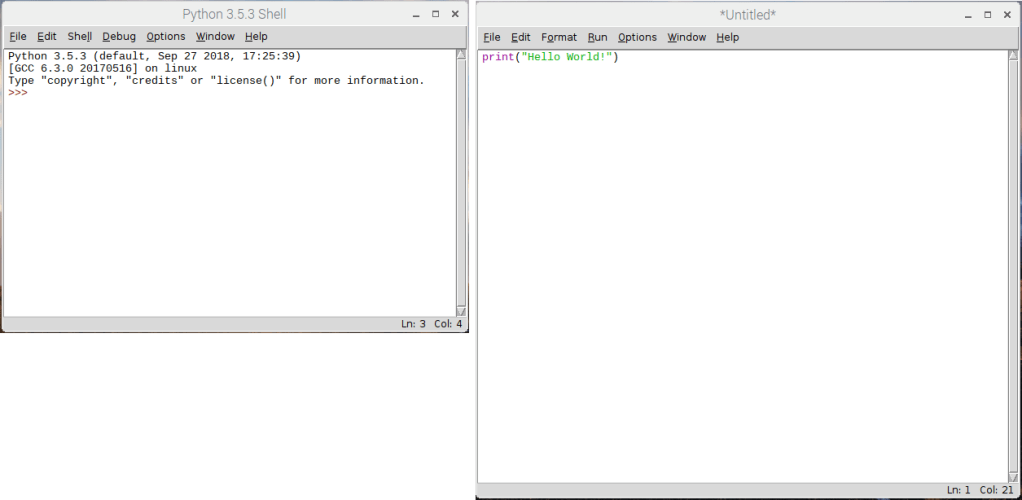
Step 4 : The Text Editor
You will create your program “file” in a text editor.
Step 5 : Type in the Program
Type this into the text editor :
print("Hello World!")
Step 6 : Save the Program
Now click “File” and “Save As” to save your first program as a file.
Step 7 : Give the Program File a Name
You need to give your program file a name. We’re going to call it “hello-world.py”. Why the “.py”? It’s called an extension. File extensions tell the operating system ( and us programmers ) what a file is used for. Python programs always have the extension “.py”.
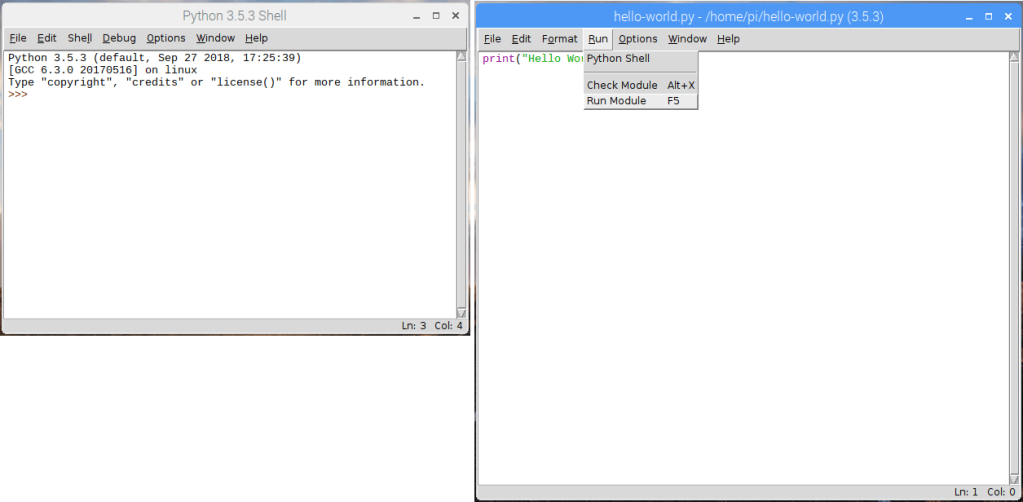
Step 8 : Run the Program
Now that you have a program “file” you can run it in the Python Shell by clicking “Run” and selecting “Run Module”.
Step 9 : Hello World!
In you see “Hello World” in the Python Shell – congratulations! You just created your first program using Python!
Pretty boring, right? Programming langauges like Python would be pretty useless if all they did was say “Hello World”. Let’s try something a little different.
Hello “You”
Let’s create another program. This program will allows you to type in your name and it will write “Hello You!”. And by by “you” I mean your name…
Create a new file using the Python Shell again by following Steps 3-7.
For Step 5 type in this :
print("Enter your name:")
myName = input()
print("Hello " + myName)
For Step 7 save the file as “hello-name.py”.
Now, if you click “Run” and “Run Module” from the Python Shell it will ask you for your name. If you type in your name and click the ENTER button it will write out “Hello, Scott”.
So how does this work?
input() “reads” whatever you type with the keyboard. When you click the ENTER button whatever you typed is saved to a variable called myName.
Variables
A variable is a way of storing stuff in a program that you want to use again. You can store sentences ( also known as “strings” in programmer-speak ) in variables as well as a bunch of other things. Without variables the program would have to keep asking you for your name.
print() “writes” the variable to the screen. If you typed “Scott” it will write “Scott”.
Still pretty boring, right? One more thing before we move on to something way cooler. Loops.
Loops
What if I wanted to do something over and over again?
Create a new file using the Python Shell again by following Steps 3-7.
For Step 5 type in this :
print("Enter your name :")
myName = input()
counter = 0

while counter < 100:
   print("Hello " + myName)
   counter = counter + 1
For Step 7 save the file as “hello-name-100.py”.
Now, if you click “Run” and “Run Module” in the Python Shell it will ask you for your name. If you type in your name and click the ENTER button it will do write out “Hello, Scott” 100 times.
Can you guess why this happened?
while causes this code to repeat over and over again.
print("Hello " + myName)
counter = counter + 1
counter is a variable. It is set to 0 at the beginning of the program – before the while loop starts.
counter = 0
Each time the code is repeated 1 is added to the counter variable. So, the first time counter is 0. The next time it’s 1. The next time it’s 2…
counter = counter + 1
The code will be run again and again as long as the counter variable is less than 100.
Minecraft Pi
The Rasbian Operating System running on the Rasperry Pi supports a “special” version of Minecraft that you can program using the Python programming language. First things first – we need to install it! You will need to use the Terminal ( also Command Line, Command Prompt ) to install Minecraft.
The Terminal
The terminal allows a programmer to type in commands to tell the computer to do things. Before there were laptops, tablets, phones, and home computers with fancy touch screens and pretty buttons there was only the terminal. The terminal originally wasn’t even a computer. It was just a screen and a keyboard that would “talk to” a computer. The computer could be in the next room or even in another country.
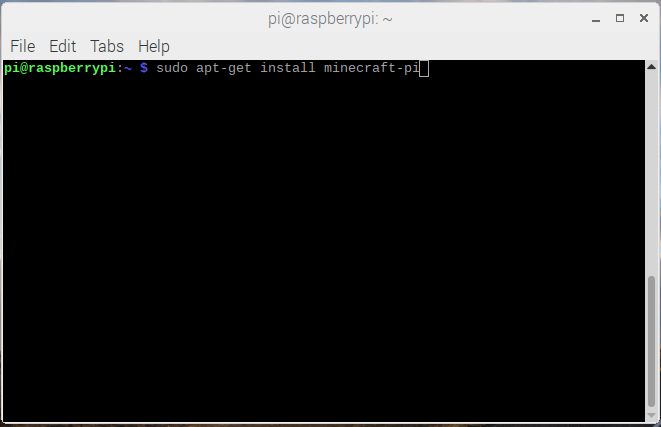
The terminal that we are going to use to install Minecraft Pi can be run by clicking the black box icon on the top-left of the screen. This terminal talks directly to your Raspberry Pi.
Installing Minecraft
To install Minecraft Pi you will need to type the following in the Terminal:
Step 1 : Check for updates for stuff that is already installed.
Type in “sudo apt-get update” and click the ENTER button.
Step 2 : Install Minecraft Pi.
Type in “sudo apt-get install minecraft-pi” and click the ENTER button.
Sudo
You’re probably wondering what all that stuff you typed into the Terminal means. Well, sudo is one of many commands that you can use. It means “superuser do”. A “super user” is someone who has the highest permissions on the computer. So, you’re telling the computer to do something as the “super” user. Why? Well the next command is apt-get. apt-get is a another command that installs stuff onto the computer. Only “super” users have permissions to “do” this.
Hello, Minecraft
Now that we have Minecraft Pi installed can you guess what we need to next? That’s right! We’re going to write a another “Hello World” program to make sure that everything works properly.
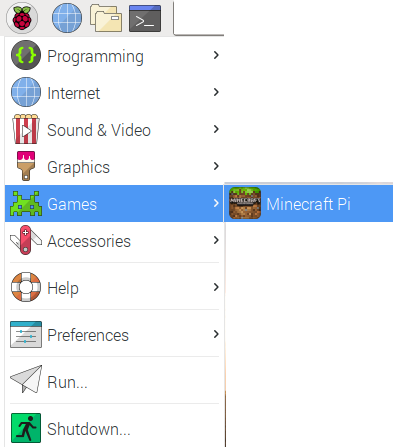
Step 1 : Start Minecraft Pi.
Step 2 : Start a Game.
Next, from the Minecraft Pi menu click on “Start Game” and “Create new” to start a new game.
Step 3 : Start the Python Shell
Next we need to start the Python Shell. If you move your mouse you will notice that it is kind of “glued” to Minecraft. If you click the “Tab” button Minecraft will “let go” of it and allow you to do other things. This is called toggling. You will need to toggle the mouse on and off in Minecraft to play with the Python Shell. Go ahead an click the “Tab” button to free up the mouse. This will allow you to Click on the “Raspberry” button at the top-right of your screen. Select “Programming” and “Python 3”.
Step 4 : Create a Program File.
Next let’s create a file to store our program so we don’t have to re-write it each time. On the Python Shell click “File” and “New File”.
Step 5 : Type in the Program and Save.
Next, type this into the text editor. When you’re done click “File” and “Save As” and save your program as “hello-minecraft.py”.
from mcpi import minecraft
mc = minecraft.Minecraft.create()
mc.postToChat("Hello world!")
Step 6 : Run the Program.
Finally, click “Run” and select “Run Module” in the Text Editor. You should see “Hello World” displayed in Minecraft.
Libraries
In order for you to do stuff in Minecraft using Python you need to import a library called “mcpi”.
from mcpi import minecraft
In real life a library is a building where a bunch of books are stored. You can check books out and read them to learn new things. In programming a library is a bunch of applications and code that is kept together. The programs that you write can import the stuff stored in a library. The “mcpi” library has a bunch of code that allows you to program Minecraft through the Python Shell. We’re going to use this code in all of our Minecraft programs. Creating the “mcpi” library on our own would take a lot of time. You can look through the library here. That’s a lot of code, right? See? We’re being smart by reusing stuff that is already written
We can program Minecraft Pi using the “mc” variable that we get from the “mcpi” library.
from mcpi import minecraft

mc = minecraft.Minecraft.create()
Functions
Can you guess what postToChat() does? It’s called a function and it prints “Hello World” to the Minecraft screen. Functions do different things – this one prints a sentence to the screen. The “mc” variable that we imported from the “mcpi” library has a bunch of useful functions that we can use to do cool stuff in Minecraft Pi.
mc.postToChat("Hello world!")
Minecraft Pi Controls
I am going to assume that you have played Minecraft before. The Pi version isn’t much different other than it is lacking some features. The mouse moves you character’s “head” around. To move your character ( and more ) you will need to use the keyboard as follows:
Key
Action
W
Forward
A
Left
S
Backward
D
Right
E
Inventory
Space
Jump
Double Space
Fly / Fall
ESC
Pause / Game Menu
Tab
Release/Toggle Mouse
Teleporting
For our next program let’s “teleport” – or move ourselves somewhere else in the Minecraft world. In order to do this we first need to know where we are.
The X, Y, and Z Coordinates
Our location in the Minecraft world – and any first-person video game for that matter is made up of three numbers identified by the letters – X, Y, and Z. These are called coordinates. If you think of the Minecraft world as a checkerboard – the X and Y coordinates are used to determine which “box” you are in.
What about the Z coordinate? Well, if you go up a mountain the z-coordinate will increase. So, instead of a “checkerboard” think of a “Rubik’s Cube”. The z-coordinate is how “high” ( or “low” ) a box is in the cube. Make sense?
Getting Our Coordinates
In our previous program we used the “mc” variable from the “mcpi” library to write something to the screen. We can also use it to tell us where we are in the Minecraft World. Assuming that you still have the Python Shell and Minecraft Pi running let’s go straight to Step 4 and create a new program.
For Step 5 type the following into the Text Editor and save it as “get-position-minecraft.py”.
from mcpi import minecraft

mc = minecraft.Minecraft.create()
pos = mc.player.getPos()
mc.postToChat(pos)
Now run the application like you did in Step 6 above. Your position in the Minecraft World will be displayed as three numbers seperated by commas. The middle number is the z-coordinate, or how “high” you are. The other two numbers are the x and y coordinates – or where you are on the “checkerboard”.
Teleport Up
Now let’s teleport. Let’s create another application called “teleport-minecraft.py”. I’m not going to go through the steps again as we should be “pros” at this by now. The program should look like this:
from mcpi import minecraft

mc = minecraft.Minecraft.create()
pos = mc.player.getPos()
mc.postToChat(pos)
mc.player.setPos(pos.x, 20, pos.y)
What happened? You should have fallen from the sky? How far? 20. The setPos() function allows you to set your x, y, and z coordinates in the Minecraft World. You are calling the getPos() function to get your position in the Minecraft World and setting it to a variable called pos. The pos variable stores three numbers – your x, y, and z coordinates in Minecraft. You can use these coordinates to set your position.
Teleport Sideways
Now change the last line in your program, save it, and run it again :
from mcpi import minecraft

mc = minecraft.Minecraft.create()
pos = mc.player.getPos()
mc.postToChat(pos)
mc.player.setPos(pos.x+10, pos.z, pos.y)
Your position in the Minecraft World should change by 10 – but “sideways” this time. Remember, the x and y coordinates are used to determine your location on a flat “checkerboard”.
Create a Block
Now that we know a little about coordinates let’s write one last program. Let’s create a block in front of us. Assuming that you still have the Python Shell and Minecraft Pi running let’s go straight to Step 4 and create a new program.
Type the following into the Text Editor and save it as “create-a-brick-minecraft.py”.
mc = minecraft.Minecraft.create()

x, y, z = mc.player.getPos()
mc.setBlock(x+1, y, z, 1)
Now select “Run” and “Run Module”. Poof! a block will appear in front of you. Okay, maybe not right in front of you. I had to use my mouse to look around for it – but rest assured it will very close to you. How close? 1 unit away. We used the setBlock() function to do this.
You can use the setBlock() function to create blocks in mid-air as well by changing the z-coordinate. Remember the z-coordinate is “height” or how far up something is on the “Rubik’s Cube”.
A Wall of Blocks using a Loop
Single blocks are so boring. Let’s use our knowledge of loops from earlier to create an entire wall of blocks. Remember, you can use a loop to repeat the same code over and over again.
Assuming that you still have the Python Shell and Minecraft Pi running let’s go straight to Step 4 and create a new program.
Type the following into the Text Editor and save it as “create-a-wall-minecraft.py”.
from mcpi import minecraft

mc = minecraft.Minecraft.create()
x, y, z = mc.player.getPos()
counter = 0
while counter < 100:
	mc.setBlock(x+counter, y, z, 1)
	counter = counter + 1
Now select “Run” and “Run Module”. Cool wall, huh? We’re using the setBlock() function and a loop to place blocks in a line. Each time the loop runs it’s code it creats a block 1 space in front of the prior block.
That’s All Folks…
Please let me know if this lesson was helpful. And stay tuned … I plan to create more lessons like this one as time permits.
I’m not a fan of football. In fact, I drew this comic on the couch at a friend’s house during a Fantasy Football party. It was hard to draw, too, with all of the boisterous cheering and jostling. What I DO appreciate, however, is the chance to hang out with some good friends. So, I may not be a fan – but I love the game.
Congratulations to the Olmsted Family for making the winning bid on a custom comic at the 2nd Annual Westwood Elementary Gala. They are big pop culture fans. Fortunately, so am I …
The new Nintendo Switch is the NES of my youth. Personally, I still prefer the blocky, pixilated 8-bit graphics and rectangular controllers. Up Up Down Down Left Right Left Right B A Start, right?