
About six months ago I read about a very cool project called RetroPie. RetroPie allows you to play classic arcade and console games on a Raspberry Pi. It is a distribution of emulators for Mame, Nintendo, Genesis, Neo Geo, etc… that run on the Raspberry Pi.
Being the nerd I am I quickly purchased a Raspberry PI 2 and a USB Super Nintendo Controller to see if I could make it work. After downloading some game ROMS off of the internet and following some instructions I was able to play my favorite video games of yesteryear. I bought a second controller and unleashed my 4 and 6 year old daughters on Bubble Bobble and the original Super Mario Brothers and Sonic the Hedgehog. Life was good.
…and then I turned 40 and had a rush of nostalgia. I realized what I needed to do to complete the classic video game experience. I needed to build a cabinet.

The marquee and coin slot both light up thanks to LED lights. The iCade came with the joystick and buttons but I still needed to buy a small board so that they could “talk” to the Raspberry Pi as a game controller. The LCD is protected it from quarters by a plexiglass panel. 
No surprises here. It’s just like the right side – but mirrored. 
The Raspberry Pi is mounted vertically on the right. Ironically, it is one of the smallest components – and the hardest worker. On the left side are two circuit boards for the LED. You can see its HDMI cable string to the Raspberry Pi. The power supply is on the bottom and by far the biggest component. To the right of the power supply is a small amplifier which powers the speakers. Lastly, on the right there’s a small black rectangular component. This is a USB Sound Adapter. I bought it during testing after realizing the Raspberry Pi’s horrible sound quality from it’s 3.5mm speaker output. 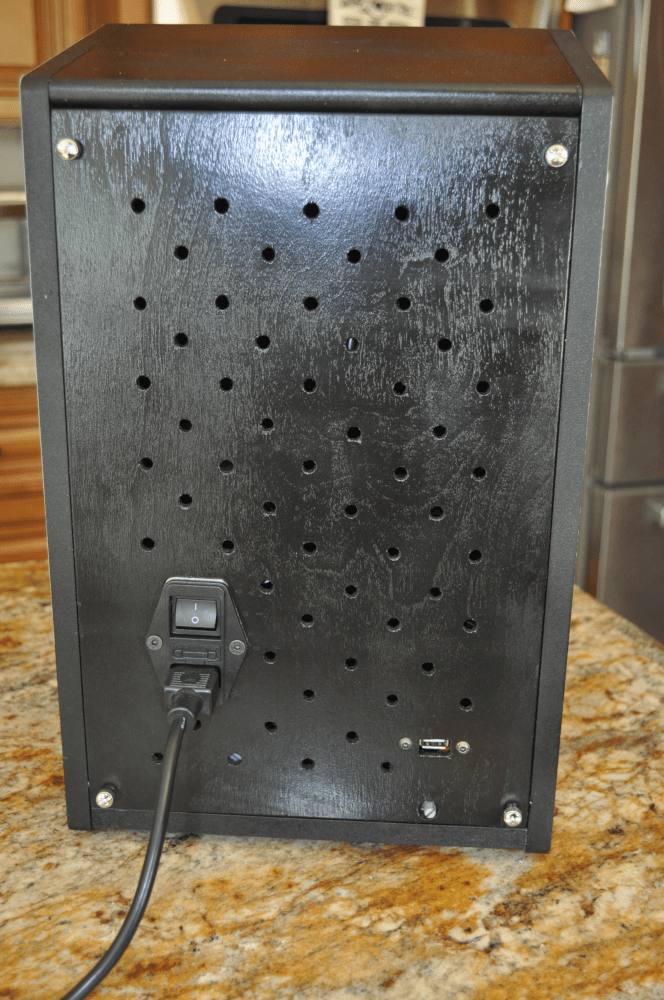
On the bottom right is a USB adapter so that I can quickly plug a keyboard, mouse, or USB Memory into the Raspberry Pi without having to take off the back plate. To remove the back plate I installed 4 thumb screws for quick access. The holes provide passive cooling to the components inside. 
I fabricated a custom speaker grill and wired up small 5 watt speakers to the power supply. The glowing LED light backlights the marquee. 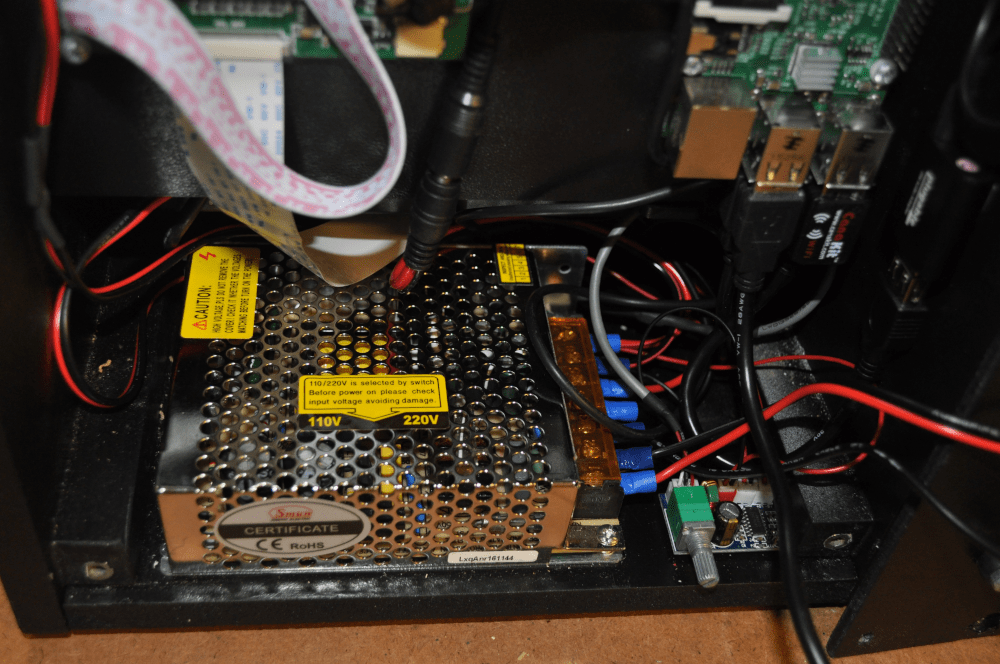
I probably went overboard with the power supply. It was the largest component and made for a tight fit for everything else. It powers the Raspberry Pi, the LED lights, a small amplifier, two 2 1/2″ speakers, and the LCD Panel. 
The side decal is part Super Smash Brothers, part my own design. Since I wanted my tabletop arcade to cover arcade as well as most 80’s and 90’s video games I wanted to display as many recognizable characters as possible.
Kits and Custom Builds
Due to budgetary constraints and the fact that I didn’t want a enormous arcade cabinet clogging my garage I decided to go small. I found numerous custom builds on the internet such as these by Rasmus Kønig Sørensen. And this, this, and this from Instructables. There are kits available as well: Haruman Customs has cabinets of all shapes and sizes, Game Room Solutions has a nice configurable 2 player tabletop. The PortaPi and the Picade are two more well designed one-player kits.
My Build
I decided to go single-player and retrofit a used iCade to reduce cost, size, and complexity. My build was based on this tutorial from Instructables. I did take some creative liberties, however …
First, I used a single 12v/5v switching power supply to power everything. I did this because I wanted a single on/off switch and I didn’t want a bunch of ac/dc adapters clutering the inside of the already small iCade cabinet. The LCD screen, coin slot LED, and marquee LED are all 12v. The Raspberry PI and sound amplifier are both 5v. The downside of using a single power supply is the sound produced by the amplifier generated a lot of feedback. After reading a few articles on ground loops I solved the problem by installing one of these.
Second, I built in an LED back-lit marquee. An arcade cabinet just seemed naked without one. I also enclosed two small 2″ stereo speakers in the marquee box.
Third, I diverted the Raspberry PI’s sound to a USB sound adapter to bypass the horrendous static that is generated through the standard 3.5mm jack. I used this adapter. Instructions on how to configure the Raspberry PI to use a USB sound can be found here.
Fourth, I used threaded wood inserts throughout the cabinet so that the whole thing can be “easily” disassembled and reassembled. Ideally, this will allow a bigger screen to be swapped in. Someday.
Fifth, I exposed a USB port and volume control on the back cover plate. I didn’t want to have to crack open the case every time I needed to plug in a keyboard or external controller.
Last is the cabinet art. Most of the artwork was pulled from a Nintendo Super Smash Brothers poster that I split in half and modified. The other stuff I ripped liberally from the Internet. I used Gimp to pull everything together and used this cool font to add a nice 80’s/90’s arcade vibe. My sister-in-law works for HP and printed the artwork for me for free. Thanks, Jayme!
Cost
Expect to spend between $250 and $300 for a similar build. That’s assuming you have all of the necessary tools, too. As far as power tools you will need a circular saw, jig saw, drill, and a soldering iron. You will also need a wide assortment of hand tools as well including allen wrenches, screwdrivers, wood files, and clamps.
Component Breakdown
Here’s a pretty good breakdown of the components, where you can find them (typically Ebay), and how much they cost. Most of my stuff shipped from China. I was half expecting some dudes in black suits to show up at my door to question me about all of the little packages that trickled in from China during the project. Fortunately, my fears never manifested.
| $36.99 | Raspberry PI 2 |
| $39.75 | Used iCade Cabinet |
| $48.00 | 8″ LCD Display 1027×769; HJ080IA-01E |
| $14.13 | 30w 5v/12v switching power supply |
| $5.48 | 5v amplifier |
| $6.29 | 2″ 4ohm 3w speakers |
| $8.99 | 3.5mm Ground Loop Isolator |
| $7.95 | USB Sound Adapter |
| $8.99 | Zero Delay Aracde USB Encoder |
| $1.70 | 12v LED Marquee Light |
| $9.95 | Power switch |
| $2.50 | 7″ USB 2.0 Male to Female Extender |
| $1.79 | USB 2.0 Adapter for back panel |
| $2.11 | 10x 12v DC Pigtails (for wiring LCD display) |
| $3.97 | Screw Head Covers (for screen) |
| $6.99 | Super Nintendo USB Controller |
| Free | Plexiglass Sheet; Leftover gifted to me by neighbor. |
| 3/8″ plywood; Used for speaker tray, LCD frame, and back panel | |
| 1/2″ furniture board; Used for bottom of arcade cabinet | |
| Spray can of primer | |
| Spray can of satin black paint | |
| Epoxy; To set threaded wood inserts (and fix stripped ones in the used iCade cabinet) | |
| Double Sided Mountin Tape; To adhere stuff where screws just wouldn’t work | |
| 22 gauge wire (for 5v) | |
| 18 gauge wire (for 12v and AC) | |
| Assorted M4 screws, nuts, and bolts | |
| Assorted wiring connectors |
Conclusion
In retrospect it would have been a lot cheaper and easier to buy a kit. But where is the fun in that? Now if I can just get the quarter slot to work I can start making money …
Please let me know if you have any questions.
-Scott
#RetroPie #RaspberryPi #PiCade #8BitGames #RetroGames #ArcadeCabinets #TabletopArcade #Arcade #RaspberryPi #DIY #DrawnAndCoded
