Introduction
So, I really want my girls ( 7 and 9 ) to learn how to program. At the very least it will make them more comfortable with computers. At best it will spark their imaginative spirit and inspire them to create something cool. Just last weekend we were going to play a board game together before we discovered the spinner missing. I told them that we could write a program to mimic the spinner on a computer. My oldest immediately got excited – and so did I.
I’ve taken my girls to STEM fairs and realized very quickly that although there are countless after school programs willing to teach programming they all change exorbitant rates. Being a software engineer ( and a “frugal” one at that ) I decided that the only way my girls were going to learn is if I teach them myself.
This is my first of lesson on how to teach my girls to program.
Enjoy!
What is Programming?
Today I’m going to teach you how to be programmers. Programmers create “programs” that are run on “computers”.
Some examples of programs are :
- Games : All of the games that you play are programs – Minecraft, Pokemon Go, Roblox, …
- Singing birthday cards : A programmer wrote a program to play “Happy Birthday” when you open a birthday card.
- Wrist watches : Even something as simple as a wrist watch has a program that keeps track of and display the time.
Machine Language
Computers don’t understand your language – they understand machine language. Machine language looks like a bunch of numbers and letters. This program is written using a machine language. It tells the computer to write “Hello World” :

Programming Languages
Programmers can’t read or write machine language. Instead, they use a Programming Language to tell a computer what to do. A programming languages is a special languages that you can understand that is “translated” to machine language. Translating a program written in a programming language to machine language is called compiling.
Programming Languages are not spoken like English – they are written. We are going to be writting our programs using the Python programming language. Here’s what a very simple program written in the Python langauge looks likes :
print("This line will be printed.")
This program writes “This line will be printed” to the screen. Pretty simple, right? Python isn’t the only programming language. There are many many others and just like the languages that we speak they all look a little different.
The Raspberry Pi
This is the Raspberry Pi – the computer that we’ll be creating programs for.

The Raspberry Pi is a cheap yet powerful computer that runs an operating system called “Rasbian Linux”.
Operating Systems
An operating system is special type of program upon which other programs can be run. Usually a programmer will create a program that runs on an operating system rather than directly on the computer itself. Why? To save time. An operating system can already do a bunch of things that a programmer might want to do. For example : it “knows” how to listen to your keyboard and your mouse. As a programmer why would you want to create another program to do this?
Getting Started
To get started you will need :
- A Raspberry Pi 3.
- A power adapter. Some Raspberry Pi’s come with an adapter included.
- A keyboard and mouse.
- A 16 GB Micro SD Card.
- An HDMI-enabled monitor.
- An internet connection. The Rasberry Pi supports Wifi as well as an ethernet cable.

The first step is to get the Rasbian Operating System on the Micro SD Card. Follow these instruction to do that. After Raspbian has been copied onto the Micro SD Card you can slide it into the slot on the Raspberry Pi and power it on.

The Rasbian OS will lead you through some initial setup stuff. After that we can finally get coding …
Hello World
As a programmer your first application when learning a programming langauge is “Hello World”. What does it do? It prints “Hello World” onto the monitor. That’s it. Drum roll. Boring? Maybe. But as simple as it may seem its a good test to make sure everything is working properly before getting your hands dirty with anything more complicated.
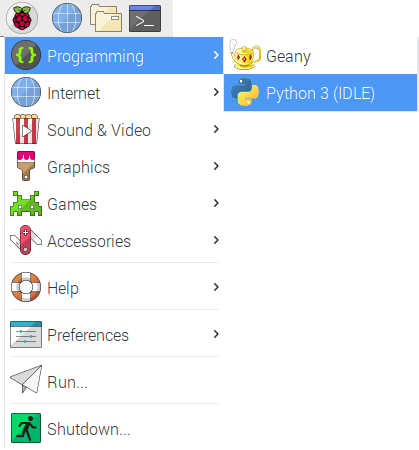
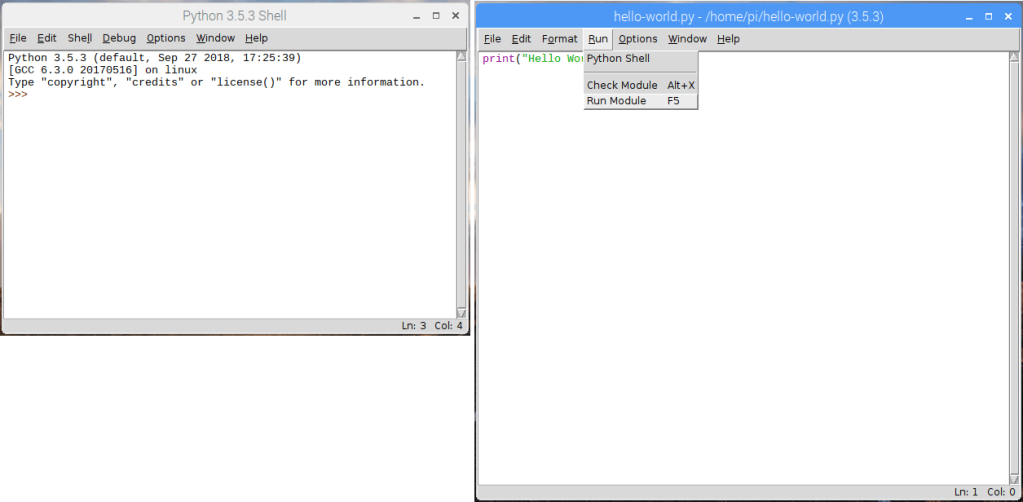
Step 1 : Start Python
Click on the “Raspberry” button at the top-right of your screen. Select “Programming” and “Python 3”.
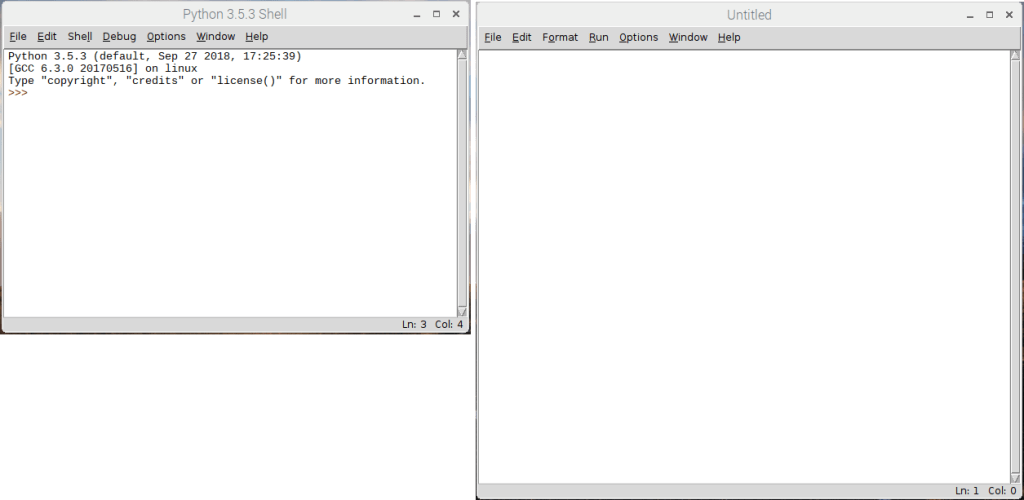
Step 2 : The Python Shell
This will bring up the Python Shell. You can run Python programs through the shell. The >>> is called a cursor. You can write stuff on the cursor in the Python language to tell the computer to do something cool.
Step 3 : Create a Program File
Programs can be very long. Having to type a program in by hand every time you run it is boring. If I had to do this every time I wouldn’t be a programmer! Fortunately, the Python Shell allows you to to create a “file”. The Python Shell will “read” from this file when running your program. On the Python Shell click “File” and “New File”.

Step 4 : The Text Editor
You will create your program “file” in a text editor.
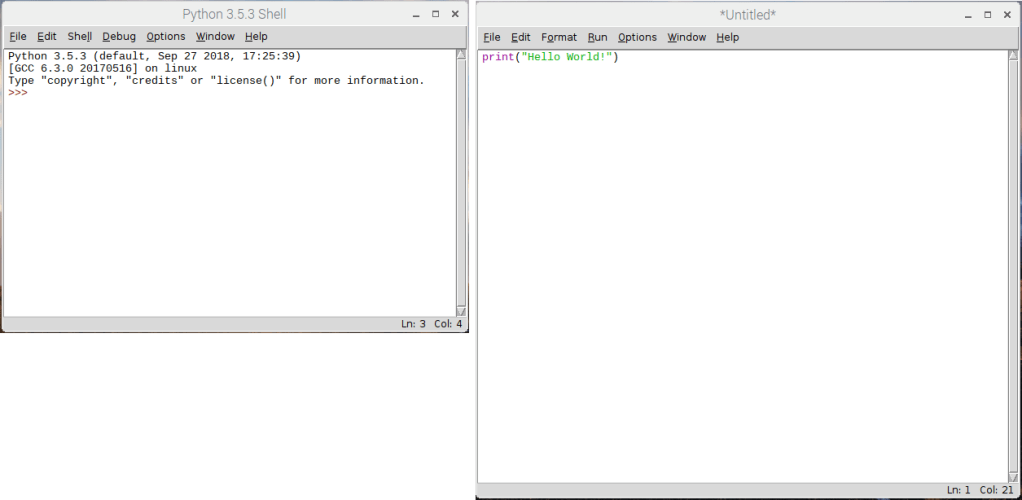
Step 5 : Type in the Program
Type this into the text editor :
print("Hello World!")
Step 6 : Save the Program
Now click “File” and “Save As” to save your first program as a file.

Step 7 : Give the Program File a Name
You need to give your program file a name. We’re going to call it “hello-world.py”. Why the “.py”? It’s called an extension. File extensions tell the operating system ( and us programmers ) what a file is used for. Python programs always have the extension “.py”.
Step 8 : Run the Program
Now that you have a program “file” you can run it in the Python Shell by clicking “Run” and selecting “Run Module”.
Step 9 : Hello World!
In you see “Hello World” in the Python Shell – congratulations! You just created your first program using Python!

Pretty boring, right? Programming langauges like Python would be pretty useless if all they did was say “Hello World”. Let’s try something a little different.
Hello “You”
Let’s create another program. This program will allows you to type in your name and it will write “Hello You!”. And by by “you” I mean your name…
Create a new file using the Python Shell again by following Steps 3-7.
For Step 5 type in this :
print("Enter your name:")
myName = input()
print("Hello " + myName)
For Step 7 save the file as “hello-name.py”.
Now, if you click “Run” and “Run Module” from the Python Shell it will ask you for your name. If you type in your name and click the ENTER button it will write out “Hello, Scott”.

So how does this work?
input() “reads” whatever you type with the keyboard. When you click the ENTER button whatever you typed is saved to a variable called myName.
Variables
A variable is a way of storing stuff in a program that you want to use again. You can store sentences ( also known as “strings” in programmer-speak ) in variables as well as a bunch of other things. Without variables the program would have to keep asking you for your name.
print() “writes” the variable to the screen. If you typed “Scott” it will write “Scott”.
Still pretty boring, right? One more thing before we move on to something way cooler. Loops.
Loops
What if I wanted to do something over and over again?
Create a new file using the Python Shell again by following Steps 3-7.
For Step 5 type in this :
print("Enter your name :")
myName = input()
counter = 0

while counter < 100:
   print("Hello " + myName)
   counter = counter + 1
For Step 7 save the file as “hello-name-100.py”.
Now, if you click “Run” and “Run Module” in the Python Shell it will ask you for your name. If you type in your name and click the ENTER button it will do write out “Hello, Scott” 100 times.

Can you guess why this happened?
while causes this code to repeat over and over again.
print("Hello " + myName)
counter = counter + 1
counter is a variable. It is set to 0 at the beginning of the program – before the while loop starts.
counter = 0
Each time the code is repeated 1 is added to the counter variable. So, the first time counter is 0. The next time it’s 1. The next time it’s 2…
counter = counter + 1
The code will be run again and again as long as the counter variable is less than 100.
Minecraft Pi
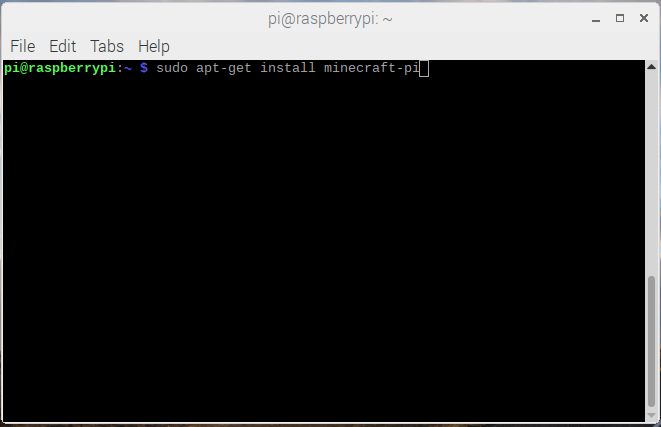
The Rasbian Operating System running on the Rasperry Pi supports a “special” version of Minecraft that you can program using the Python programming language. First things first – we need to install it! You will need to use the Terminal ( also Command Line, Command Prompt ) to install Minecraft.
The Terminal
The terminal allows a programmer to type in commands to tell the computer to do things. Before there were laptops, tablets, phones, and home computers with fancy touch screens and pretty buttons there was only the terminal. The terminal originally wasn’t even a computer. It was just a screen and a keyboard that would “talk to” a computer. The computer could be in the next room or even in another country.
The terminal that we are going to use to install Minecraft Pi can be run by clicking the black box icon on the top-left of the screen. This terminal talks directly to your Raspberry Pi.

Installing Minecraft
To install Minecraft Pi you will need to type the following in the Terminal:
Step 1 : Check for updates for stuff that is already installed.
Type in “sudo apt-get update” and click the ENTER button.

Step 2 : Install Minecraft Pi.
Type in “sudo apt-get install minecraft-pi” and click the ENTER button.
Sudo
You’re probably wondering what all that stuff you typed into the Terminal means. Well, sudo is one of many commands that you can use. It means “superuser do”. A “super user” is someone who has the highest permissions on the computer. So, you’re telling the computer to do something as the “super” user. Why? Well the next command is apt-get. apt-get is a another command that installs stuff onto the computer. Only “super” users have permissions to “do” this.
Hello, Minecraft
Now that we have Minecraft Pi installed can you guess what we need to next? That’s right! We’re going to write a another “Hello World” program to make sure that everything works properly.
Step 1 : Start Minecraft Pi.
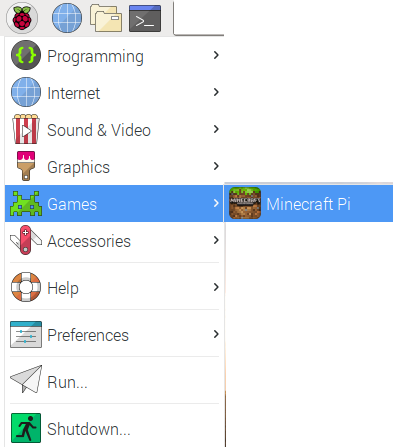
Step 2 : Start a Game.
Next, from the Minecraft Pi menu click on “Start Game” and “Create new” to start a new game.


Step 3 : Start the Python Shell
Next we need to start the Python Shell. If you move your mouse you will notice that it is kind of “glued” to Minecraft. If you click the “Tab” button Minecraft will “let go” of it and allow you to do other things. This is called toggling. You will need to toggle the mouse on and off in Minecraft to play with the Python Shell. Go ahead an click the “Tab” button to free up the mouse. This will allow you to Click on the “Raspberry” button at the top-right of your screen. Select “Programming” and “Python 3”.

Step 4 : Create a Program File.
Next let’s create a file to store our program so we don’t have to re-write it each time. On the Python Shell click “File” and “New File”.
Step 5 : Type in the Program and Save.
Next, type this into the text editor. When you’re done click “File” and “Save As” and save your program as “hello-minecraft.py”.
from mcpi import minecraft
mc = minecraft.Minecraft.create()
mc.postToChat("Hello world!")

Step 6 : Run the Program.
Finally, click “Run” and select “Run Module” in the Text Editor. You should see “Hello World” displayed in Minecraft.

Libraries
In order for you to do stuff in Minecraft using Python you need to import a library called “mcpi”.
from mcpi import minecraft
In real life a library is a building where a bunch of books are stored. You can check books out and read them to learn new things. In programming a library is a bunch of applications and code that is kept together. The programs that you write can import the stuff stored in a library. The “mcpi” library has a bunch of code that allows you to program Minecraft through the Python Shell. We’re going to use this code in all of our Minecraft programs. Creating the “mcpi” library on our own would take a lot of time. You can look through the library here. That’s a lot of code, right? See? We’re being smart by reusing stuff that is already written
We can program Minecraft Pi using the “mc” variable that we get from the “mcpi” library.
from mcpi import minecraft

mc = minecraft.Minecraft.create()
Functions
Can you guess what postToChat() does? It’s called a function and it prints “Hello World” to the Minecraft screen. Functions do different things – this one prints a sentence to the screen. The “mc” variable that we imported from the “mcpi” library has a bunch of useful functions that we can use to do cool stuff in Minecraft Pi.
mc.postToChat("Hello world!")
Minecraft Pi Controls
I am going to assume that you have played Minecraft before. The Pi version isn’t much different other than it is lacking some features. The mouse moves you character’s “head” around. To move your character ( and more ) you will need to use the keyboard as follows:
| Key | Action |
| W | Forward |
| A | Left |
| S | Backward |
| D | Right |
| E | Inventory |
| Space | Jump |
| Double Space | Fly / Fall |
| ESC | Pause / Game Menu |
| Tab | Release/Toggle Mouse |
Teleporting
For our next program let’s “teleport” – or move ourselves somewhere else in the Minecraft world. In order to do this we first need to know where we are.
The X, Y, and Z Coordinates
Our location in the Minecraft world – and any first-person video game for that matter is made up of three numbers identified by the letters – X, Y, and Z. These are called coordinates. If you think of the Minecraft world as a checkerboard – the X and Y coordinates are used to determine which “box” you are in.

What about the Z coordinate? Well, if you go up a mountain the z-coordinate will increase. So, instead of a “checkerboard” think of a “Rubik’s Cube”. The z-coordinate is how “high” ( or “low” ) a box is in the cube. Make sense?

Getting Our Coordinates
In our previous program we used the “mc” variable from the “mcpi” library to write something to the screen. We can also use it to tell us where we are in the Minecraft World. Assuming that you still have the Python Shell and Minecraft Pi running let’s go straight to Step 4 and create a new program.
For Step 5 type the following into the Text Editor and save it as “get-position-minecraft.py”.
from mcpi import minecraft

mc = minecraft.Minecraft.create()
pos = mc.player.getPos()
mc.postToChat(pos)
Now run the application like you did in Step 6 above. Your position in the Minecraft World will be displayed as three numbers seperated by commas. The middle number is the z-coordinate, or how “high” you are. The other two numbers are the x and y coordinates – or where you are on the “checkerboard”.

Teleport Up
Now let’s teleport. Let’s create another application called “teleport-minecraft.py”. I’m not going to go through the steps again as we should be “pros” at this by now. The program should look like this:
from mcpi import minecraft

mc = minecraft.Minecraft.create()
pos = mc.player.getPos()
mc.postToChat(pos)
mc.player.setPos(pos.x, 20, pos.y)
What happened? You should have fallen from the sky? How far? 20. The setPos() function allows you to set your x, y, and z coordinates in the Minecraft World. You are calling the getPos() function to get your position in the Minecraft World and setting it to a variable called pos. The pos variable stores three numbers – your x, y, and z coordinates in Minecraft. You can use these coordinates to set your position.
Teleport Sideways
Now change the last line in your program, save it, and run it again :
from mcpi import minecraft

mc = minecraft.Minecraft.create()
pos = mc.player.getPos()
mc.postToChat(pos)
mc.player.setPos(pos.x+10, pos.z, pos.y)
Your position in the Minecraft World should change by 10 – but “sideways” this time. Remember, the x and y coordinates are used to determine your location on a flat “checkerboard”.
Create a Block
Now that we know a little about coordinates let’s write one last program. Let’s create a block in front of us. Assuming that you still have the Python Shell and Minecraft Pi running let’s go straight to Step 4 and create a new program.
Type the following into the Text Editor and save it as “create-a-brick-minecraft.py”.
mc = minecraft.Minecraft.create()

x, y, z = mc.player.getPos()
mc.setBlock(x+1, y, z, 1)
Now select “Run” and “Run Module”. Poof! a block will appear in front of you. Okay, maybe not right in front of you. I had to use my mouse to look around for it – but rest assured it will very close to you. How close? 1 unit away. We used the setBlock() function to do this.
You can use the setBlock() function to create blocks in mid-air as well by changing the z-coordinate. Remember the z-coordinate is “height” or how far up something is on the “Rubik’s Cube”.

A Wall of Blocks using a Loop
Single blocks are so boring. Let’s use our knowledge of loops from earlier to create an entire wall of blocks. Remember, you can use a loop to repeat the same code over and over again.
Assuming that you still have the Python Shell and Minecraft Pi running let’s go straight to Step 4 and create a new program.
Type the following into the Text Editor and save it as “create-a-wall-minecraft.py”.
from mcpi import minecraft

mc = minecraft.Minecraft.create()
x, y, z = mc.player.getPos()
counter = 0
while counter < 100:
	mc.setBlock(x+counter, y, z, 1)
	counter = counter + 1
Now select “Run” and “Run Module”. Cool wall, huh? We’re using the setBlock() function and a loop to place blocks in a line. Each time the loop runs it’s code it creats a block 1 space in front of the prior block.

That’s All Folks…
Please let me know if this lesson was helpful. And stay tuned … I plan to create more lessons like this one as time permits.
-Scott
#ProgrammingWithKids #KidsProgramming #LearningPython #MinecraftPython #BeginningProgramming #TeachingMyGirlsToProgram #RaspberryPi #Minecraft #Programming #DrawnAndCoded