
#carpool #expresslanes #rideshare #borrow #pencil #runninglate #traffic #drawnandcoded #comic
#carpool #expresslanes #rideshare #borrow #pencil #runninglate #traffic #drawnandcoded #comic

#winter #freezing #thermodynamics #heater #furnace #kids #drawnandcoded #comic

#amazon #alexa #lawsuit #copyright #humor #drawnandcoded #comic

#amazon #alexa #parentingfail #parenting #kids #shopaholic #drawnandcoded #comic

#makeamericangreatagain #presidenttrump #trump #borderwall #monuments #presidentialmonuments #drawnandcoded #comic

About six months ago I read about a very cool project called RetroPie. RetroPie allows you to play classic arcade and console games on a Raspberry Pi. It is a distribution of emulators for Mame, Nintendo, Genesis, Neo Geo, etc… that run on the Raspberry Pi.
Being the nerd I am I quickly purchased a Raspberry PI 2 and a USB Super Nintendo Controller to see if I could make it work. After downloading some game ROMS off of the internet and following some instructions I was able to play my favorite video games of yesteryear. I bought a second controller and unleashed my 4 and 6 year old daughters on Bubble Bobble and the original Super Mario Brothers and Sonic the Hedgehog. Life was good.
…and then I turned 40 and had a rush of nostalgia. I realized what I needed to do to complete the classic video game experience. I needed to build a cabinet.


Due to budgetary constraints and the fact that I didn’t want a enormous arcade cabinet clogging my garage I decided to go small. I found numerous custom builds on the internet such as these by Rasmus Kønig Sørensen. And this, this, and this from Instructables. There are kits available as well: Haruman Customs has cabinets of all shapes and sizes, Game Room Solutions has a nice configurable 2 player tabletop. The PortaPi and the Picade are two more well designed one-player kits.
I decided to go single-player and retrofit a used iCade to reduce cost, size, and complexity. My build was based on this tutorial from Instructables. I did take some creative liberties, however …
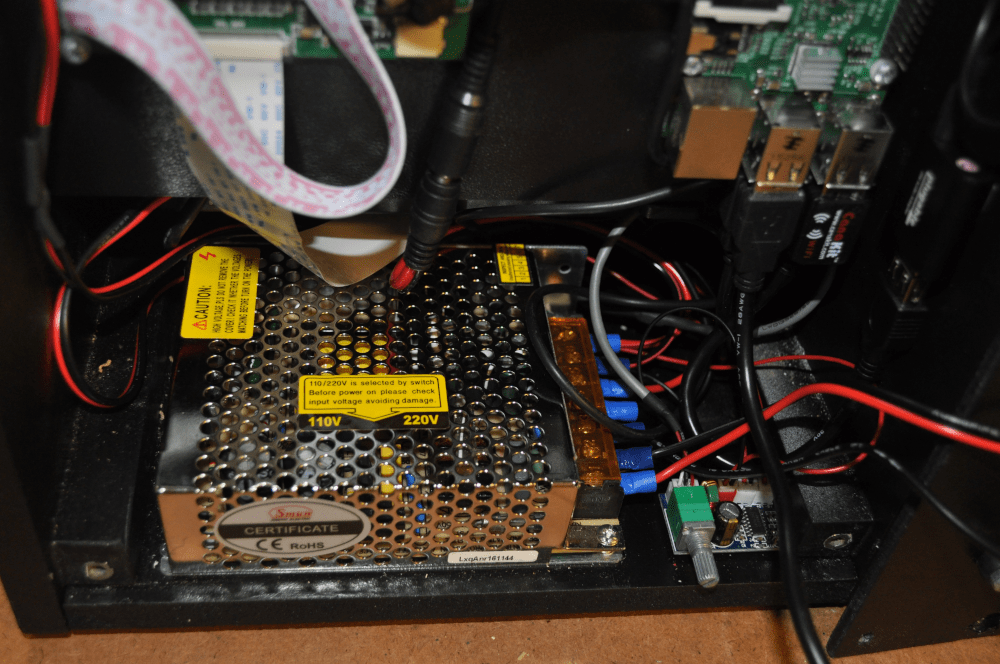
First, I used a single 12v/5v switching power supply to power everything. I did this because I wanted a single on/off switch and I didn’t want a bunch of ac/dc adapters clutering the inside of the already small iCade cabinet. The LCD screen, coin slot LED, and marquee LED are all 12v. The Raspberry PI and sound amplifier are both 5v. The downside of using a single power supply is the sound produced by the amplifier generated a lot of feedback. After reading a few articles on ground loops I solved the problem by installing one of these.
Second, I built in an LED back-lit marquee. An arcade cabinet just seemed naked without one. I also enclosed two small 2″ stereo speakers in the marquee box.
Third, I diverted the Raspberry PI’s sound to a USB sound adapter to bypass the horrendous static that is generated through the standard 3.5mm jack. I used this adapter. Instructions on how to configure the Raspberry PI to use a USB sound can be found here.
Fourth, I used threaded wood inserts throughout the cabinet so that the whole thing can be “easily” disassembled and reassembled. Ideally, this will allow a bigger screen to be swapped in. Someday.
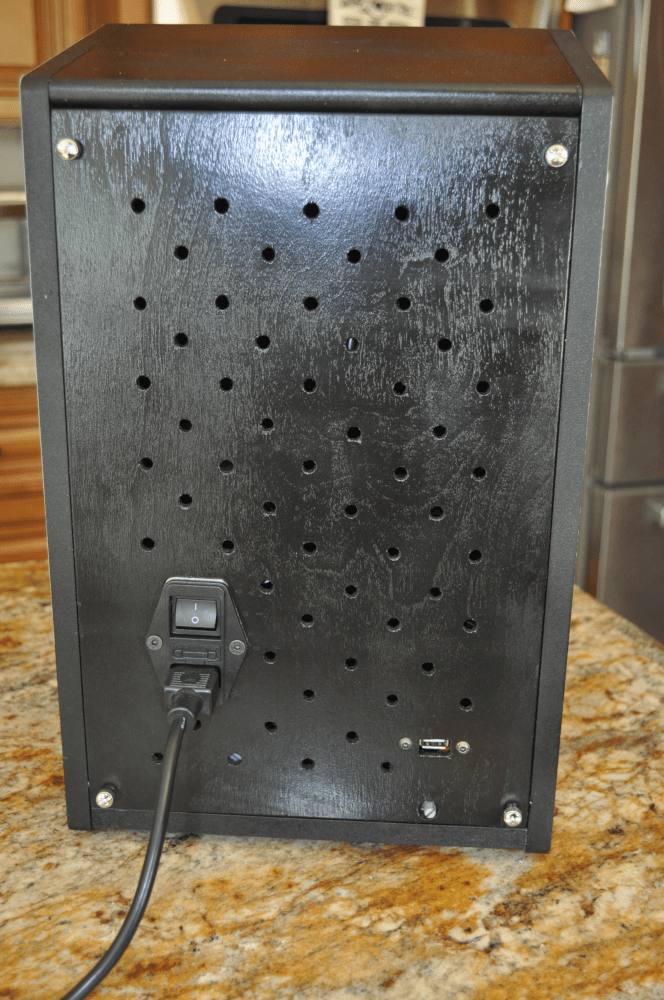
Fifth, I exposed a USB port and volume control on the back cover plate. I didn’t want to have to crack open the case every time I needed to plug in a keyboard or external controller.
Last is the cabinet art. Most of the artwork was pulled from a Nintendo Super Smash Brothers poster that I split in half and modified. The other stuff I ripped liberally from the Internet. I used Gimp to pull everything together and used this cool font to add a nice 80’s/90’s arcade vibe. My sister-in-law works for HP and printed the artwork for me for free. Thanks, Jayme!
Expect to spend between $250 and $300 for a similar build. That’s assuming you have all of the necessary tools, too. As far as power tools you will need a circular saw, jig saw, drill, and a soldering iron. You will also need a wide assortment of hand tools as well including allen wrenches, screwdrivers, wood files, and clamps.
Here’s a pretty good breakdown of the components, where you can find them (typically Ebay), and how much they cost. Most of my stuff shipped from China. I was half expecting some dudes in black suits to show up at my door to question me about all of the little packages that trickled in from China during the project. Fortunately, my fears never manifested.
| $36.99 | Raspberry PI 2 |
| $39.75 | Used iCade Cabinet |
| $48.00 | 8″ LCD Display 1027×769; HJ080IA-01E |
| $14.13 | 30w 5v/12v switching power supply |
| $5.48 | 5v amplifier |
| $6.29 | 2″ 4ohm 3w speakers |
| $8.99 | 3.5mm Ground Loop Isolator |
| $7.95 | USB Sound Adapter |
| $8.99 | Zero Delay Aracde USB Encoder |
| $1.70 | 12v LED Marquee Light |
| $9.95 | Power switch |
| $2.50 | 7″ USB 2.0 Male to Female Extender |
| $1.79 | USB 2.0 Adapter for back panel |
| $2.11 | 10x 12v DC Pigtails (for wiring LCD display) |
| $3.97 | Screw Head Covers (for screen) |
| $6.99 | Super Nintendo USB Controller |
| Free | Plexiglass Sheet; Leftover gifted to me by neighbor. |
| 3/8″ plywood; Used for speaker tray, LCD frame, and back panel | |
| 1/2″ furniture board; Used for bottom of arcade cabinet | |
| Spray can of primer | |
| Spray can of satin black paint | |
| Epoxy; To set threaded wood inserts (and fix stripped ones in the used iCade cabinet) | |
| Double Sided Mountin Tape; To adhere stuff where screws just wouldn’t work | |
| 22 gauge wire (for 5v) | |
| 18 gauge wire (for 12v and AC) | |
| Assorted M4 screws, nuts, and bolts | |
| Assorted wiring connectors |
In retrospect it would have been a lot cheaper and easier to buy a kit. But where is the fun in that? Now if I can just get the quarter slot to work I can start making money …
Please let me know if you have any questions.
-Scott
#RetroPie #RaspberryPi #PiCade #8BitGames #RetroGames #ArcadeCabinets #TabletopArcade #Arcade #RaspberryPi #DIY #DrawnAndCoded

I have kids that are now of Disney-watching age. They love their DVD’s but do not know how to take care of them. A DVD is a frisbee, coaster, and also just happens to play movies, too. To correct this I have been backing up their DVD’s to .mp4/.mv4 files and playing them instead.
Handbrake has been my go-to choice for backing up DRM-protected movies but I have had problems running it directly in Windows 7. For starters I cannot get the 64-bit version to run and the 32-bit version renders at an abysmal 7 frames per second.
I had a few hours of play time the other day and I decided to attack DVD backups from a different direction. I decided to try running Handbrake in Ubuntu (Linux) using Oracle’s Virtual Box on Windows 7. It took a while to piece together but these are my step-by-step instructions on how to configure the VM. Oh, and as it turns out Handbrake runs much much faster in Ubuntu …
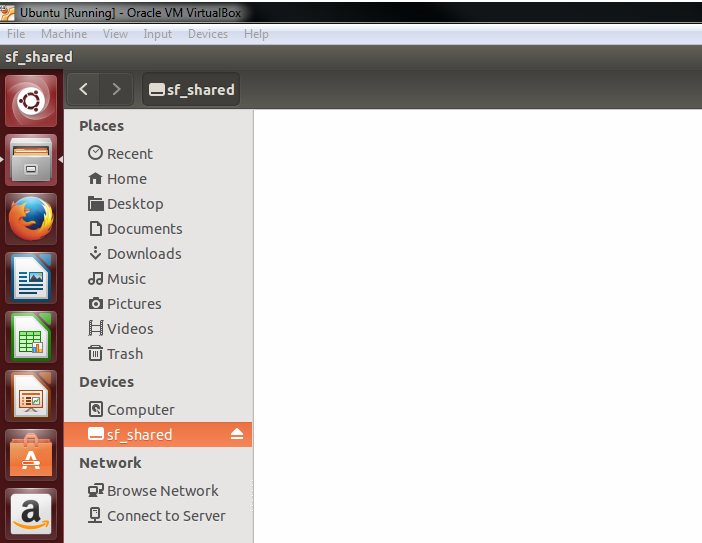
Guest additions will allow us to run Ubuntu full screen from within VirtualBox and share folders between Windows (host) and Ubuntu (Client).
cd /media/scott/VBOXADDITIONS_5.0.16_105871
Now, install guest additions.
sudo ./VBoxLinuxAdditions.run
Ubuntu should now be able to run full screen. Goodbye tiny window.
Guest additions also allows you to share folder between your Windows Host and Ubuntu Client.
cut -d: -f1 /etc/group
Next, list which groups you are a member of; You shouldn’t see yourself.
groups
Finally, add your account to vboxsf shared folder group. “scott” is the account you will be logging into Ubuntu with.
sudo usermod -a -G vboxsf scott
The “shared” folder is now mounted as media/sf_shared.
This will enable Ubuntu to read from the hosts drive; Not doing this will result in region errors when reading from the drive.
sudo add-apt-repository ppa:stebbins/handbrake-releases
Next, get gets package info from internet.
sudo apt-get update
Finally, install handbrake gui and command-line interface.
sudo apt-get install handbrake-gtk handbrake-cli
This installs libdvdcss, an open source library for decrypting DVD’s. These instructions are specific to Ubuntu 14.04 and might change.
sudo apt-get install libdvdread4
Register libdvdcss
sudo /usr/share/doc/libdvdread4/install-css.sh
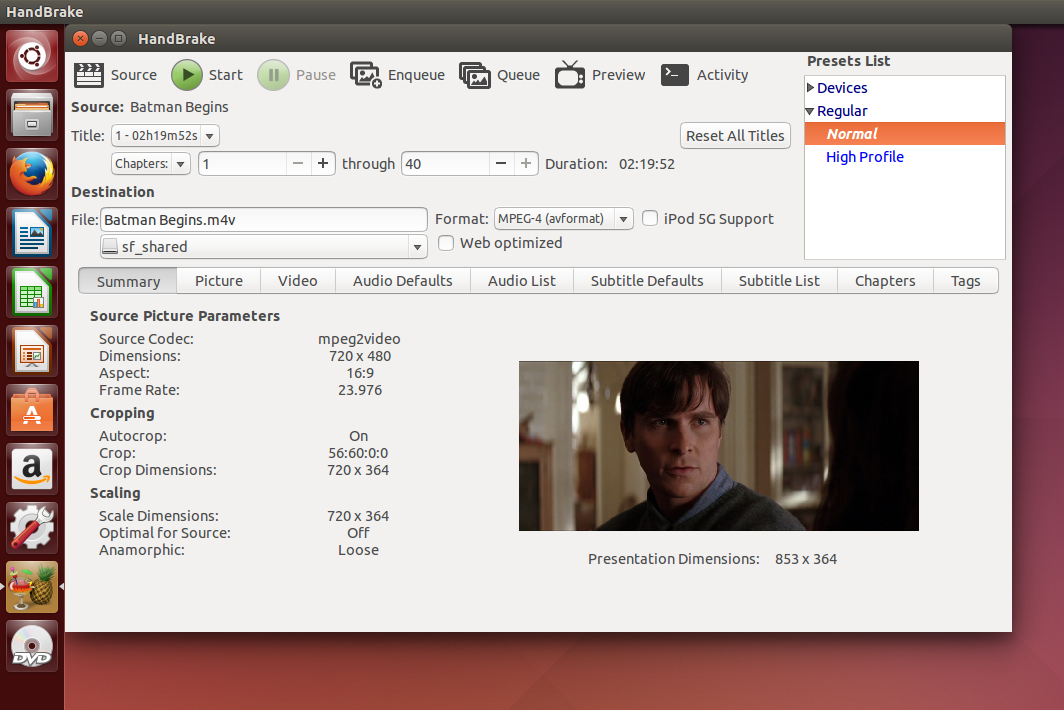
Handbrake should now be able to rip movies to your shared drive! Okay you got me. Batman Begins is definitely not a movie I show my kids – but it’s the only DVD I had on hand for this example.
#HandBrake #VirtualBox #Ubuntu #CopyMovies #SoftwareDevelopment #SoftwareEngineer #DrawnAndCoded

The JQuery UI Autocomplete Widget allows you to return a list of suggestions based upon a query string. The widget works great unless the user does not know what to search for. For example, if the user wants to search through a large database of people using only a single letter (presumably the first letter of the last name) the Autocomplete Widget quickly becomes unwieldy. Either the suggestions need to be truncated or the list of suggestions becomes so large as to be unusable.
To resolve this problem I have extended the JQuery UI Autocomplete Widget and added pagination. Arrows allow the user to cycle through pages of suggestions. Each page of is retrieved using AJAX. Click here for a jsFiddle sample. The sample uses MockJax to simulate the AJAX calls. A complete end-to-end example using ASP.NET MVC is available here.
The Paginated Autocomplete Widget inherits the same API as the Autocomplete Widget from which it is derived. However, there are some differences to be aware of …
First, the web server endpoint that handles the AJAX GET must support three parameters – search, pageSize, and pageIndex. search is the query string provided by the user. pageSize is the number of items to return per page. pageIndex is the page to return.
[HttpGet]
public JsonResult SearchCars(string search, int pageSize=20, int pageIndex=0)
{
   // Your logic here.
}
Second, the Paginated Autocomplete expects a JSON response from the web server in a specific format. The Widget requires this format to facilitate pagination. data is an array of text/value objects that will get bound to to the list of suggestions. total is the total number of unpaginated suggestions that the search query returned.
{
   data : [
      { text : "Item 1", value : 0 },
      { text : "Item 2", value : 1 },
      { text : "Item 3", value : 2 }
   ],
   total : 1000
}
Third, when using the Paginated Autocomplete Widget in Javascript you need to specify sourceUrl. The Widget will automatically generate an AJAX GET to the sourceUrl and retrieve paginated suggestions as necessary. This is different than the Autocomplete Widget where you need to define the source method as well as the underlying AJAX GET. The obfuscation is necessary to facilitate pagination. In addition pageSize is an optional parameter that determines the number of suggestions per page.
<input id="myFilter" type="text" />

<script type="text/javascript">

   $(document).ready(function() {

      $("#myFilter").paginatedAutocomplete({
         pageSize: 10,
         sourceUrl: '/Simpsons/SearchCharacters'
      });
   });

</script>
The Paginated Autocomplete Widget requires JQuery 1.9.1 or newer and JQuery UI 1.10.3 or newer. I have tested it against Internet Explorer 7/8/9/10, Firefox 21, and Chrome 27. It will probably run in other permutations as well. Please let me know if you have any comments or questions.
#JQuery #Javascript #Programming #SoftwareDevelopment #SoftwareEngineer #DrawnAndCoded

Javascript is garbage collected but it can still leak memory. The majority of these leaks are caused by Javascript “hooks” into the DOM. There are numerous articles on the internet that provide Javascript memory leak patterns to avoid. Here is a real-world example that I encountered while working with Telerik’s Kendo Grid.
My implementation of the Kendo Grid has a 30 seconds refresh interval. When an interval elapses the Kendo Grid’s Datasource is refreshed from the web server and a dataBound() event handler is triggered. The dataBound() event handler creates elements for the newly fetched data and binds them to the DOM. In the dataBound() event handler we attach several event handlers to these newly created DOM elements. I use these event handlers to show dialogs and such when the user clicks on a cell in the Kendo Grid.
The memory leak occurs when the Kendo Grid is refreshed. On a refresh the Kendo Grid removes the elements from the DOM that were previously added during the last dataBound() invocation. Kendo does not dispose of these elements as expected. Specifically, the event handlers that were previously attached to these elements are not “told” that the elements were removed. This causes a memory leak because the event handlers are retained in memory indefinitely. Every refresh of the Kendo Grid causes another generation of these event handlers to be retained.
Fortunately, fixing the leak is easy. You just need to detach every event handler prior to removing the DOM element to which it is bound. Wen using the Kendo Grid you want to attach your event handlers in the dataBound() event. You want to detach your event handlers in the dataBinding() event. If you use JQuery’s .on() to attach an event handler ( this includes .click(), change(), etc…) you need to use .off() to detach it. If you use JQuery’s .bind() to attach an event handler you need to use .unbind() to detach it.
I’ve created a couple of examples to demonstrate the before and after effects of properly handling this memory leak. The initial source code is taken directly from Kendo’s Demo Site. I have attached a .click() event handler in the Kendo Grid’s dataBound() event handler. The .click() event simply displays an alert pop-up whenever a user clicks on a cell in the table. This is the jsFiddle portraying the memory leak. If I detach the .click() event handler in the Kendo Grid’s dataBinding() event handler the memory leak disappears. This is a jsFiddle with the “fix” applied.
This is the memory footprint of each jsFiddle over a 20 minute period. The green line portrays the memory leak. The red line portrays the “fix”. The memory leakage is around 100-200 kb every 10 minutes.

For a long-running single-page application this is not good. Moving forward I now make memory profiling part of my testing regime. Please let me know if you have any questions.
#JQuery #C #Telerik #Kendo #KendoGrid #Javascript #Programming #SoftwareDevelopment #SoftwareEngineer #DrawnAndCoded

Nothing says, “I am a conscientous developer!” more than properly Unit Testing all of your code.
…yes, even your client-side stuff.
…yes, that means Javascript.
Let me help you get started with this noble task…
Unit Testing Javascript only requires a couple of things …
Javascript Interpretters come in two flavors …
Javascript Interpretters are not commonly found in the wild – they are built into a Web Browser. Javascript interpretters hosted within a Web Browser expose an API to interact with the DOM.
There are, of course, exceptions. Rhino, V8, and Windows Script Host run outside of a Web Browser on a command-line. Command-Line Javascript Interpretters are not bound to a Web Browser and as such they do not have a DOM API – as there is no DOM.
There are many different flavors of Unit Test Frameworks. When running a Unit Test each of these Frameworks follows one of two methodologies …
An “In-Browser” Unit Test is run directly within a Web Browser. The Unit Test leverages the Web Browser’s Interpretter and DOM API. The Test Result is displayed as a web page and must be visually inspected – or programatically scraped. This can make automation difficult.
JsUnit and QUnit are two commonly used In-Browser Test Frameworks.
A “Headless” Unit Test is run using a Command-Line Javascript Interpretter. “Headless” means “No monitor”. The Test Result can theoretically be piped anywhere. This makes it easier to automate.
PhantomJs is a Headless Test Framework that utilizes JavaScriptCore and WebKit. JavaScriptCore is the Javascript Interpretter used by Safari. WebKit is the DOM API / Rendering Engine used by Safari and Chrome.
Keep in mind that although Headless Unit Tests are run outside of a Web Browser they are not really Web Browser agnostic. A Headless Unit Test Framework is only as good as the libraries that it depends on. For example, a passing Unit Test in PhantomJs could theoretically fail in Internet Explorer or Firefox simply because the later use entirely different Javascript and DOM API’s.
Moving forward I am going to show you how to use QUnit to write In-Browser Unit Tests. Other In-Browser Testing Frameworks are very similar.
Writting QUnit Unit Tests requires three things …
A Test Runner is just a Web Page that links together your Unit Tests and your Production Scripts. When opened in a Web Browser the Test Runner will run the Unit Tests and display the results. Mocked-up HTML Markup can be applied to the Test Runner if the Production Scripts being tested require it. The Mocked-up HTML is reset after each Unit Test is run.
This is what the Test Runner’s markup looks like …
<!DOCTYPE html>
<html>
<head>
   <meta charset="UTF-8" />
   <title>QUnit Test Suite</title>

   <!-- QUnit Dependencies -->
   <link rel="stylesheet" href="http://code.jquery.com/qunit/qunit-1.5.0.css">
   <script src="http://code.jquery.com/qunit/qunit-1.5.0.js" type="text/javascript"></script>
   <script src="http://code.jquery.com/jquery-1.5.min.js" type="text/javascript"></script>

   <!-- Production Script(s) . -->
   <script src="myScript.js"></script>

   <!-- Unit Test(s) --->
   <script src="myUnitTest.js"></script>

</head>
<body>
   <div id="qunit"></div>
   <div id="qunit-fixture">

      <!-- Mocked-up HTML Markup. -->

   </div>
</body>
</html>
This is what the Test Runner looks like in a Web Browser …

A Unit Test verifies the functionality of Production Scripts. As your Production Scripts change during development it is the Unit Test’s job to verify that proper functionality is maintained. Each Unit Test invokes a function exposed by your Production Scripts and then Asserts that the outcome is correct. The Assertion could be as simple as verifying a return value or as complicated as verifying that the DOM has been modified apporpriately. Unit Tests are grouped into Modules. Multiple Modules can exist within a single Javascript file. A Unit Test can have any number of Assertions. The number of expected Assertions must be declared.
This is a simple example of a Unit Test. No Production Script is invoked – the Unit Test just asserts that “Hello” is not equal to “World”. “MyUnitTest – Group 1” is an arbitrary name to associate with the Unit Test. The name is displayed in the Test Runner when the Unit Test is run. “1” corresponds to the number of Assertions that are performed by the Unit Test. QUnit supports a handful of different Assertions…
QUnit.module( "MyUnitTest - Group 1",
{  setup     : function() {},
   teardown  : function() {}
});

QUnit.test( "test()", 1, function() {

   notEqual("Hello","World");

});
These are the scripts that you want to test. They should be identical to whatever gets deployed in your Production environment.
If you’re lucky your Production Scripts do not have any external dependencies and do not interact with the DOM.
For example, on a recent project I needed the ability to move an element in an Array from one index to another. To do this I extended the Javascript Array object with two functions – move() and indexOf().
The Production Scripts look like this. First, I check to see if the functions already exist for the Array object. If they don’t I simply add them …
if (!Array.prototype.move) {

   // Description : Moves an element in an array.
   // Params:       old_index - The old index of element.
   //               new_index - The new index of element.
   // http://stackoverflow.com/questions/5306680/move-an-array-element-from-one-array-position-to-another
   Array.prototype.move = function (old_index, new_index) {
      if (new_index >= this.length) {
         var k = new_index - this.length;
         while ((k--) + 1) {
            this.push(undefined);
         }
      }
      this.splice(new_index, 0, this.splice(old_index, 1)[0]);
      return this; // for testing purposes
   };
}

if (!Array.prototype.indexOf) {

   // Description : Finds the index of an object in the specified array
   // Params:       obj - The object.
   //                    start - The index to start looking for the object in the aray.
   // http: //stackoverflow.com/questions/1744310/how-to-fix-array-indexof-in-javascript-for-ie-browsers
   Array.prototype.indexOf = function (obj, start) {
      for (var i = (start || 0), j = this.length; i < j; i++) {
         if (this[i] === obj) { return i; }
      }
      return -1;
   }
}
As for Unit Testing there are two things that I want to verify. First, I want to make sure that the Production Scripts extended the Array object. Here is what the Unit Test for move() looks like …
QUnit.module(	"Extensions",
{    setup     : function() {},
      teardown  : function() {}
});

QUnit.test( "move() extends Array", 2, function() {
   notEqual(Array.prototype.move, undefined);
   notEqual(Array.prototype.move, null);
});
Next, I want to make sure that the new Array functions work correctly. To do this I simply create an array, invoke the new Array functions against it, and then use QUnit Assertions to verify the result …
QUnit.module( "Extensions",
{    setup   : function() {},
     teardown: function() {}
});

QUnit.test( "Array.move to first", 5 , function() {

   var array = [ "Homer", "Bart", "Maggie", "Lisa", "Marge" ];

   array.move(4,0);

   equal( array[0], "Marge" );
   notEqual( array[1], "Marge" );
   notEqual( array[2], "Marge" );
   notEqual( array[3], "Marge" );
   notEqual( array[4], "Marge" );
});

QUnit.test( "Array.move to last", 5 , function() {

   var array = [ "Homer", "Bart", "Maggie", "Lisa", "Marge" ];

   array.move(0,4);

   equal( array[4], "Homer" );
   notEqual( array[3], "Homer" );
   notEqual( array[2], "Homer" );
   notEqual( array[1], "Homer" );
   notEqual( array[0], "Homer" );
});

QUnit.test( "Array.move to arbitrary", 5 , function() {

   var array = [ "Homer", "Bart", "Maggie", "Lisa", "Marge" ];

   array.move(2,3);

   equal( array[3], "Maggie" );
   notEqual( array[0], "Maggie" );
   notEqual( array[1], "Maggie" );
   notEqual( array[2], "Maggie" );
   notEqual( array[4], "Maggie" );
});
The QUnit Test Runner links everything together. Notice that that the Unit Tests are referenced after the Production Scripts. The QUnit Test Runner loads and processes scripts in order of their appearance. It’s important to not reference your Unit Tests first as the Production Scripts that they are testing may not be loaded yet …
<!DOCTYPE html>
<html>
<head>
   <meta charset="UTF-8" />
   <title>QUnit Test Suite</title>

   <!-- QUnit Dependencies -->
   <link rel="stylesheet" href="http://code.jquery.com/qunit/qunit-1.5.0.css">
   <script src="http://code.jquery.com/qunit/qunit-1.5.0.js" type="text/javascript"></script>

   <!-- JQuery -->
   <script src="http://code.jquery.com/jquery-1.5.min.js" type="text/javascript"></script>
   <script src="http://code.jquery.com/ui/1.8.13/jquery-ui.min.js" type="text/javascript"></script>

   <!-- Your Production Script(s) -->
   <script src="Extensions.js"></script>

   <!-- Your Unit Test Script(s) --->
   <script src="Extensions.UnitTest.js"></script>

</head>
<body>
   <div id="qunit"></div>

   <div id="qunit-fixture">
      <!-- The HTML Markup that your Production Script(s) Target -->
   </div>

</body>
</html>
This is what the Test Runner looks like in a Web Browser when running …
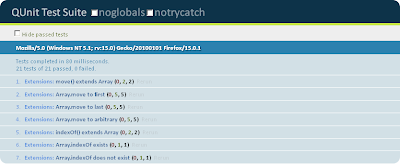
Click here to download this example.
Unit Testing becomes more complicated when the Production Scripts manipulate the DOM and/or reference external API’s.
For example, let’s pretend that Marketing has provided the following requirements for a new Inventory Management Web Application …
A Web Designer has provided the HTML Markup and CSS for the application. This is a picture of what the web application looks like in a Web Browser …
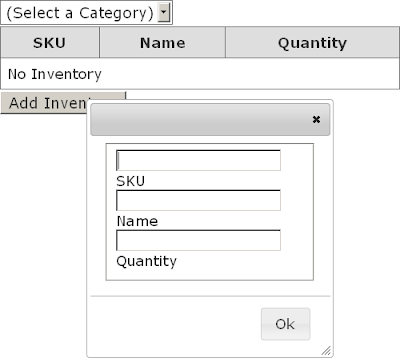
And this is the HTML Markup …
<!DOCTYPE html>
<html>
<head>
   <link rel="stylesheet" href="InventoryManagement.css">
</head>
<body>
   <div class="manage-inventory">

      <select id="selectInventoryCategory">
         <option value="" selected="selected">(Select a Category)</option>
         <option value="Drinks">Drinks</option>
         <option value="Food">Food</option>
         <option value="Dessert">Desssrt</option>
      </select>

      <table id="tableInventory">
         <thead>
            <tr>
               <th>SKU</th>
               <th>Name</th>
               <th>Quantity</th>
            </tr>
         </thead>
         <tbody>
            <tr>
               <td colspan="3" >No Inventory</td>
            </tr>
         </tbody>
      </table>

      <button id="buttonShowAddInventory" type="button">Add Inventory</button>

      <form id="formAddInventory" class="hidden" action="http://localhost/Merchandise/UpdateMerchandise" method="post">
         <fieldset>
            <input type="text" id="inputSKU" name="sku">
            <label for="inputSKU">SKU</label>
            <input type="text" id="inputName" name="name">
            <label for="inputName">Name</label>
            <input type="text" id="inputQuantity" name="quantity">
            <label for="inputQuantity">Quantity</label>
         </fieldset>
      </form>
   </div>
</body>
</html>
We have been tasked with creating Production Scripts and corresponding Unit Tests to support the required functionality. To do this we’re going to take a Test-Driven approach. Specifically, we’re going to …
As a rule of thumb it is very important to keep your Production Script functions as specific as possible. The more complicated the function the more difficult the Unit Test will be to write. You do not want a function that singlehandedly scrapes the DOM, performs a JQuery Ajax POST, and then updates the DOM. Instead, you will want to break down the function into discrete operations.
The application’s functionality can be broken into the following stubbed out functions …
function selectInventoryOnChange (event) {
   // TODO : Get Category from selectInventoryCategory <select> and invoke getInventoryFromServer().
}

function getInventoryFromServer ( inventoryCategory ) {
   // TODO : Make AJAX GET Request to Web Server for Category and invoke refreshInventoryTable() with retreived Data.
}

function refreshInventoryTable ( jsonInventoryData ) {
   // TODO : Refresh <table> with Inventory Data.
}

function showAddInventoryForm () {
   // TODO : Display the formAddInventory <form> in a JQuery UI Dialog.
}

function addNewInventoryClick () {
   // TODO : Retreive data from formAddInventory <form>, invoke addNewInventory(), and hide JQuery UI Dialog.
}

function addNewInventory ( formData ) {
   // TODO : Make AJAX POST to Web Server with <form> data.
}
As these functions are going to be leveraged by our Unit Tests and the web application we should apply some best practices to make them more portable …
First, lets encapsulate the functions into a Namespace. Global functions are a no-no as the can overwrite (or be overwritten) by any other Javascript that your application might reference …
var ScottsJewels = ScottsJewels || {};
ScottsJewels.InventoryManagement = ScottsJewels.InventoryManagement || {};

ScottsJewels.InventoryManagement.selectInventoryOnChange = function (event) {
   // TODO : Get Category from selectInventoryCategory <select> and invoke getInventoryFromServer().
}

ScottsJewels.InventoryManagement.getInventoryFromServer = function ( inventoryCategory ) {
   // TODO : Make AJAX GET Request to Web Server for Category and invoke refreshInventoryTable() with retreived Data.
}

ScottsJewels.InventoryManagement.refreshInventoryTable = function( jsonInventoryData ) {
   // TODO : Refresh <table> with Inventory Data.
}

ScottsJewels.InventoryManagement.showAddInventoryForm = function () {
   // TODO : Display the formAddInventory <form> in a JQuery UI Dialog.
}

ScottsJewels.InventoryManagement.addNewInventoryClick = function () {
   // TODO : Retreive data from formAddInventory <form>, invoke addNewInventory(), and hide JQuery UI Dialog.
}

ScottsJewels.InventoryManagement.addNewInventory = function ( formData ) {
   // TODO : Make AJAX POST to Web Server with <form> data.
}
Now instead of invoking our Production Scripts as a global function like this …
addNewInventory ();
We can invoke them through their namespace like this …
ScottsJewels.InventoryManagement.addNewInventory ();
Next, let’s restrict access to the functions using the Module Pattern. The Module Pattern permits encapsulation of our functions …
var ScottsJewels = ScottsJewels || {};
ScottsJewels.InventoryManagement = ScottsJewels.InventoryManagement || {};

ScottsJewels.InventoryManagement = (function () {

   return {
      selectInventoryOnChange : function (event) {

         // TODO : Get Category from selectInventoryCategory <select> and invoke getInventoryFromServer().
      },
      getInventoryFromServer : function ( inventoryCategory ) {
         // TODO : Make AJAX GET Request to Web Server for Category and invoke refreshInventoryTable() with retreived Data.
      },
      refreshInventoryTable : function ( jsonInventoryData ) {
         // TODO : Refresh <table> with Inventory Data.
      },
      showAddInventoryForm : function () {
         // TODO : Display the formAddInventory <form> in a JQuery UI Dialog.
      },
      addNewInventoryClick : function () {
         // TODO : Retreive data from formAddInventory <form>, invoke addNewInventory(), and hide JQuery UI Dialog.
      },
      addNewInventory : function ( formData ) {
         // TODO : Make AJAX POST to Web Server with <form> data.
      }
   };
});
Notice that all of the above functions are publically accessible in this Module …
var module = ScottsJewels.InventoryManagement();
module.addNewInventory();
The Module pattern also allows for private functions and data members …
var ScottsJewels = ScottsJewels || {};
ScottsJewels.MyModule = ScottsJewels.MyModule || {};

ScottsJewels.MyModule = (function () {

   var myPrivateDataMember = "";

   function myPrivateFunction () {
      alert(myPrivateDataMember);
   }

   return {
      myPublicFunction : function ( message ) {

         myPrivateDataMember = message;
         myPrivateFunction();
      }
   }
});
You can do this …
var module = new ScottsJewels.MyModule();
module.myPublicFunction(“Hello World”); // Alerts “Hello”.
But not this …
var module = new ScottsJewels.MyModule();
module.myPrivateFunction();
Finally, let’s make the Module a Singleton. The Singleton Pattern provides a common context for all Production Script invocations as well as a smaller memory footprint. It’s as easy as adding () onto the end of the Module declaration. Essentially you are invoking the Module once when it is parsed and loaded …
var ScottsJewels = ScottsJewels || {};
ScottsJewels.InventoryManagement = ScottsJewels.InventoryManagement || {};

ScottsJewels.InventoryManagement = (function () {
   return {
      selectInventoryOnChange : function (event) {
         // TODO : Get Category from selectInventoryCategory <select> and invoke getInventoryFromServer().
      },
      getInventoryFromServer : function ( inventoryCategory ) {
         // TODO : Make AJAX GET Request to Web Server for Category and invoke refreshInventoryTable() with retreived Data.
      },
      refreshInventoryTable : function ( jsonInventoryData ) {
         // TODO : Refresh <table> with Inventory Data.
      },
      showAddInventoryForm : function () {
         // TODO : Display the formAddInventory <form> in a JQuery UI Dialog.
      },
      addNewInventoryClick : function () {
         // TODO : Retreive data from formAddInventory <form>, invoke addNewInventory(), and hide JQuery UI Dialog.
      },
      addNewInventory : function ( formData ) {
         // TODO : Make AJAX POST to Web Server with <form> data.
      }
   };
})();
Now you can access the singleton Module now without having to instantiate it …
ScottsJewels.InventoryManagement.addNewInventory();
To allow our Production Scripts to interact with the HTML Markup the HTML Markup needs to be added to the Test Runner’s <div id=”qunit-fixture”> element. Here is the Test Runner with the Production Scripts and HTML Markup added. A reference to the Unit Tests exists as well (although we still need to implement them) …
<!DOCTYPE html>
<html>
<head>
   <meta charset="UTF-8" />
   <title>QUnit Test Suite</title>

   <!-- QUnit Dependencies -->
   <link rel="stylesheet" href="http://code.jquery.com/qunit/qunit-1.5.0.css">
   <script src="http://code.jquery.com/qunit/qunit-1.5.0.js" type="text/javascript"></script>

   <!-- JQuery -->
   <script src="http://code.jquery.com/jquery-1.5.min.js" type="text/javascript"></script>
   <script src="http://code.jquery.com/ui/1.8.13/jquery-ui.min.js" type="text/javascript"></script>

   <!-- Your Production Script(s) -->
   <script src="InventoryManagement.js"></script>

   <!-- Your Unit Test Script(s) --->
   <script src="InventoryManagement.Test.js"></script>

</head>
<body>
   <div id="qunit"></div>
   <div id="qunit-fixture">
      <!-- The HTML Markup that your Production Script(s) Target -->
      <div class="manage-inventory">
         <select id="selectInventoryCategory">
            <option value="" selected="selected">(Select a Category)</option>
            <option value="Drinks">Drinks</option>
            <option value="Food">Food</option>
            <option value="Dessert">Desssrt</option>
         </select>
         <table id="tableInventory">
            <thead>
               <tr>
                  <th>SKU</th>
                  <th>Name</th>
                  <th>Quantity</th>
               </tr>
            </thead>
            <tbody/>
               <tr>
                  <td colspan="3" >No Inventory</td>
               </tr>
            </tbody>
         </table>

         <button type="button">Add Inventory</button>

         <form id="formAddInventory" class="hidden" action="http://localhost/Merchandise/UpdateMerchandise" method="post">
            <fieldset>
               <input type="text" id="inputSKU" name="sku">
               <label for="inputSKU">SKU</label>
               <input type="text" id="inputName" name="name">
               <label for="inputName">Name</label>
               <input type="text" id="inputQuantity" name="quantity">
               <label for="inputQuantity">Quantity</label>
            </fieldset>
         </form>
      </div>
   </div>
</body>
As always there are a couple of “gotchas” that you need to look out for. Specifically …
In Production HTML Markup is served by a Web Server. A Unit Test must operate in isolation of the Web Server and all HTML Markup must be hard-coded in the Test Runner. The downside of this is that you must be vigilant to keep the HTML Markup in your Test Runner synchronized with whatever is generated by your Web Server.
A Singleton Javascript Module and the QUnit Test Runner’s <div id=”qunit-fixture”> are not entirely compatible. If your Module selects elements from the DOM during initialization the elements will point to stale references after the first Unit Test is run.
For example, given the following HTML Markup …
<!DOCTYPE html>
<html>
<head/>
<body>
<div/>
</body>
</html>
Production Script …
var MyModule = (function () {
   var $myDiv = null;

   $(document).ready(function () {
      $myDiv = $("div");
   });

   return {
      writeToDiv : function (message) {
         $myDiv.html(message)
      }
   }

})();
and Unit Tests …
QUnit.module( "Planets Test",
{
   setup     : function() {},
   teardown  : function() {}
});

QUnit.test( "Hello Earth", 1, function() {
   MyModule.writeToDiv("Hello Earth");
   equal( "Hello Earth", $("div").html() );
});

QUnit.test( "Hello Mars", 1, function() {
   MyModule.writeToDiv("Hello Mars");
   equal( "Hello Mars", $("div").html() );
});
The 2nd Unit Test will fail because the Test Runner refreshes the HTML Markup in <div id=”qunit-fixture”> after every Unit Test. This will cause $myDiv to point at a stale DOM element.
Next we’re going to create the Unit Tests. To keep it simple we are just going to write a single Unit Test for each Production Script function. Each Unit Test will invoke it’s corresponding Production Script function and assert the results.
Here are the stubbed out Unit Tests along with what they need to assert …
QUnit.module( "ScottsJewels.InventoryManagement",
{
   setup     : function() {},
   teardown  : function() {}
});

QUnit.test( "selectInventoryOnChange()", 0, function() {
   // Test : Verify that getInventoryaFromServer() is called with the selected inventory as a parameter.
});

QUnit.test( "getInventoryFromServer()", 0, function() {
   // Test : Verify the AJAX HTTP GET Request is correct.
   // Test : Verify that refreshInventoryTable() is called.
});

QUnit.test( "refreshInventoryTable()", 0, function() {
   // Test : Verify the <table> is correctly refreshed in DOM.
});

QUnit.test( "showAddInventoryForm()", 0, function() {
   // Test : Verify that the appropriate <form> is displayed.
   // Test : Verify that the <form> fields are empty.
});

QUnit.test( "addNewInventoryClick()", 0, function() {
   // Test : Verify that the <form> is hidden.
   // Test : Verify that addNewInventory() is called with the appropriate data from the <form>.
});

QUnit.test( "addNewInventory()", 0, function() {
   // Test : Verify the AJAX HTTP POST Request is correct.
});
Let’s take a look at the first couple of Unit Tests …
The Unit Test for selectInventoryOnChange() must verify that getInventoryFromServer() is invoked properly.
The Unit Test for getInventoryFromServer() needs to verify that JQuery ajax() was invoked and that it, in turn, invokes refreshInventoryTable().
Fleshing out these two Unit Tests poses a couple of problems …
The same solution can be applied to all three : Mocking.
Mocking is when you create a new object that mimics the behavior of another object. A “mock” object is oftentimes substituted when the object that it is simulating is unavailable. In Unit Testing dependencies are mocked up when it is not practical to use the actual dependency.
In Javascript functions are objects and easily mockable. This comes in handly when verifying a JQuery ajax() call or asserting the invocation of a nested function. As an example, this is how you might mock up JQuery’s dialog() function for a Unit Test. It’s important to restore the original function implementation after you have conducted you tests …
var jQueryDialog_Orginal;

try {
   // Backup.
   jQueryDialog_Orginal = jQuery.fn.dialog;

   // Implement your own.
   jQuery.fn.dialog = function () {
      // QUnit assertions...
   };

   // Run test(s) that implement jQuery Dialog.
}
finally {
   // Restore.
   jQuery.fn.dialog = jQueryDialog_Orginal;
}
Keep in mind that there are (much) more sophisticated 3rd Party mocking/stubbing Javascript libraries that you can use such as SinonJs and JSMock. This is how you would use mocking to flesh out the Unit Tests for selectInventoryOnChange() …
QUnit.test( "selectInventoryOnChange()", 1, function() {

   // Test : Verify that getInventoryaFromServer() is called with the selected inventory as a parameter.

   var	$event,
         $selectInventoryCategory,
         original_getInventoryFromServer;

   // Set the Inventory Category <select> with "Food" <option>.
   $selectInventoryCategory = $("#selectInventoryCategory");
   $selectInventoryCategory.val("Food");

   // Create a "change" event.
   $event = $.Event("change");
   $event.target = $selectInventoryCategory;

   try {
      // Save a reference to getInventoryFromServer() so that it can be restored after the test has completed.
      original_getInventoryFromServer = ScottsJewels.InventoryManagement.getInventoryFromServer;

      // Now, assign a new function to getInventoryFromServer().
      ScottsJewels.InventoryManagement.getInventoryFromServer = function ( inventoryCategory ) {
         // Verify that getInventoryFromServer is invoked with the "Food" <option>.
         equal( inventoryCategory, "Food" );
      }

      // Invoke selectInventoryOnChange() and send in the "change" event.
      // selectInventoryOnChange() should invoke getInventoryFromServer which was (temporarily) redefined above.
      ScottsJewels.InventoryManagement.selectInventoryOnChange ($event);
   }
   finally {
      // Restore getInventoryFromServer().
      ScottsJewels.InventoryManagement.getInventoryFromServer = original_getInventoryFromServer;
   }
});
… and getInventoryFromServer() …
QUnit.test( "getInventoryFromServer()", 3, function() {

   // Test : Verify the AJAX HTTP GET Request is correct.
   // Test : Verify that refreshInventoryTable() is called.

   var original_ajax;

   try {
      // Save a reference to JQuery's ajax() so that it can be restored after the test is complete.
      original_ajax = $.ajax;

      // Now, assign a new funtion to JQuery's ajax().
      $.ajax = function (request) {

         // Verify that "Food" was supplied as the ajax "data" parameter.
         equal(request.data.inventoryCategory, "Food");

         // Verify that the ajax is a GET.
         equal(request.type, "GET");

         // Verify that refreshInventoryTable() will be invoked if ajax is successful.
         equal(request.success, ScottsJewels.InventoryManagement.refreshInventoryTable);
      }

      // Invoke JQuery's ajax(). This should invoke the (temporarily) re-defined ajax() above.
      ScottsJewels.InventoryManagement.getInventoryFromServer ( "Food" );
   }
   finally {
      // Restore JQuery's ajax().
      $.ajax = original_ajax;
   }
});
Executing the Test Runner at this time will inevitably lead to lots of failures. This is expected as our Production Scripts are merely stubbed out …

The last thing to do is to flesh out the Production Script functions. Ironically, the Production Scripts are a lot smaller (and less complicated) than their corresponding Unit Tests. This goes to show that Unit Testing Javascript is not a trivial task …
var ScottsJewels = ScottsJewels || {};
ScottsJewels.InventoryManagement = ScottsJewels.InventoryManagement || {};

ScottsJewels.InventoryManagement = (function () {

   $(document).ready(function () {

      var $selectInventoryCategory,
          $buttonShowAddInventory;

      $selectInventoryCategory = $("#selectInventoryCategory");
      $buttonShowAddInventory = $("#buttonShowAddInventory");

      // Hook up event handlers.
      $selectInventoryCategory.bind ( "change", ScottsJewels.InventoryManagement.selectInventoryOnChange);
      $buttonShowAddInventory.bind ( "click", ScottsJewels.InventoryManagement.showAddInventoryForm);
   });

   return {

      selectInventoryOnChange : function (event) {

         // Get Category from selectInventoryCategory <select> and invoke getInventoryFromServer().
         var inventoryCategory;

         inventoryCategory = $(event.target).val();

         if (inventoryCategory !== "") {

            ScottsJewels.InventoryManagement.getInventoryFromServer(inventoryCategory);
         }
      },
      getInventoryFromServer : function ( inventoryCategory ) {

         // Make AJAX GET Request to Web Server for Category and invoke refreshInventoryTable() with retreived Data.
         $.ajax({
            type: "GET",
            url : "http://ScottsJewels/InventoryManagement/GetInventory",
            data: { inventoryCategory : inventoryCategory },
            success: ScottsJewels.InventoryManagement.refreshInventoryTable
         });
      },
      refreshInventoryTable : function ( jsonInventoryData ) {

         // Refresh <table> with Inventory Data.
         var $tableInventoryBody,
             html;

         $tableInventoryBody = $("#tableInventory tbody");
         html = "";

         $(jsonInventoryData).each( function ( index, value ) {
            html += 	"<tr>";
            html += 		"<td class='sku'>" + value.SKU + "</td>";
            html += 		"<td class='name'>" + value.Name + "</td>";
            html += 		"<td class='quanity'>" + value.Quantity + "</td>";
            html +=	"</tr>";
         });

         $tableInventoryBody
            .empty()
            .append(html);
      },
      showAddInventoryForm : function () {

         // Display the formAddInventory <form> in a JQuery UI Dialog.

         var $formAddInventory;

         $formAddInventory = $("#formAddInventory");

         $formAddInventory[0].reset();

         $formAddInventory.dialog({
            buttons: [{	text: "Ok",
            click: ScottsJewels.InventoryManagement.addNewInventoryClick
         }]});
      },
      addNewInventoryClick : function () {

         // Retreive data from formAddInventory <form>, invoke addNewInventory(), and hide JQuery UI Dialog.

         var $formAddInventory,
             formData;

         $formAddInventory = $("#formAddInventory");

         formData = $formAddInventory.serialize();

         $formAddInventory.dialog("close");

         ScottsJewels.InventoryManagement.addNewInventory( formData );
      },
      addNewInventory : function ( formData ) {

         // Make AJAX POST to Web Server with <form> data.

         $.ajax({
            type			: "POST",
            contentType	: "application/x-www-form-urlencoded",
            url 			: "http://ScottsJewels/InventoryManagement/AddInventory",
            data			: formData
            });
      }
   };
})();
Executing the Test Runner at this point should result in a bunch of Passing Tests. Your Test Runner should look something like this …

Click here to download this example.
Your responsibility as a conscientous Developer doesn’t end here. You should re-run your Unit Tests and verify complicance when …
There is also a fair share of maintenance that comes along with the Unit Testing. If the above causes any of your Unit Tests to fail you might have to revise your Unit Tests to accommodate the failure. This could be as simple as updating the HTML Markup in your Test Runner or as complicated as refactoring an entire Unit Test.
#JQuery #Javascript #Programming #SoftwareDevelopment #SoftwareEngineer #DrawnAndCoded
