Recently I have started working with Drupal 7. Drupal is a CMS built on top of PHP, MySQL, and jQuery. In Drupal, a website layout is managed by a Theme. Boostrap Themes can be plugged in – or, you can roll your own. At Qualcomm, my group created a custom theme that required a newer version of JQuery (1.11) than Drupal 7 provided (1.4).
Initially, our custom theme loaded the newer version of jQuery. Drupal 7 allows this as it uses jQuery’s .noConflict() function. .noConflict() is frees up jQuery’s $ alias for other frameworks to use. In this case the “other” framework … was just a newer version of jQuery.
There were two problems with this …
We were loading jQuery TWICE. When visiting the site Drupal would load jQuery 1.4 – and then our custom theme would load jQuery 1.11.
We discovered that any jQuery plugins loaded by Drupal for jQuery 1.4 needed to be reloaded by our custom theme after it loaded jQuery 1.11.
I found this out the hard way. I kept getting TypeError: $(…).once is not a function” errors. This was because our custom theme required the jquery.once.js plugin. This plugin was initially loaded by Drupal when it loaded JQuery 1.4 – but subsequentally wiped out by our custom theme’s newer JQuery.
To fix this we did the following …
We added the desired version of JQuery to our custom theme :
Notice that jQuery is injected rather than its $ alias. As I mentioned earlier this is because Drupal invokes jQuery’s .noConflict() function. To tidy things up a bit I inject jQuery as $.
We stopped our custom theme from loading its own version of jQuery. It is no longer necessary as (1) and (2) above will force Drupal to use whatever version of jQuery you desire.
About six months ago I read about a very cool project called RetroPie. RetroPie allows you to play classic arcade and console games on a Raspberry Pi. It is a distribution of emulators for Mame, Nintendo, Genesis, Neo Geo, etc… that run on the Raspberry Pi.
Being the nerd I am I quickly purchased a Raspberry PI 2 and a USB Super Nintendo Controller to see if I could make it work. After downloading some game ROMS off of the internet and following some instructions I was able to play my favorite video games of yesteryear. I bought a second controller and unleashed my 4 and 6 year old daughters on Bubble Bobble and the original Super Mario Brothers and Sonic the Hedgehog. Life was good.
…and then I turned 40 and had a rush of nostalgia. I realized what I needed to do to complete the classic video game experience. I needed to build a cabinet.
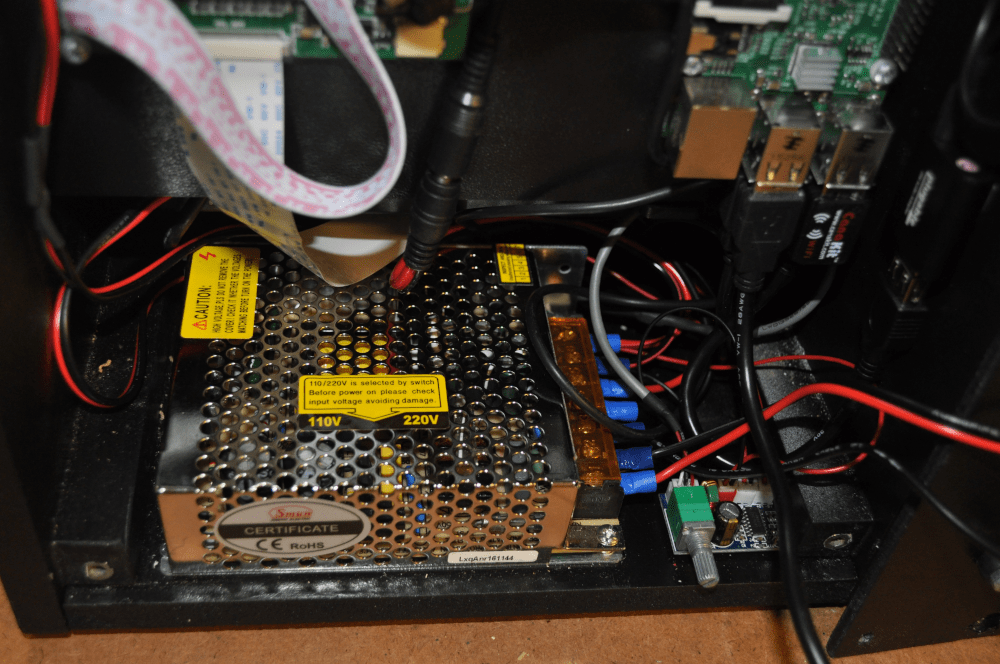
The marquee and coin slot both light up thanks to LED lights. The iCade came with the joystick and buttons but I still needed to buy a small board so that they could “talk” to the Raspberry Pi as a game controller. The LCD is protected it from quarters by a plexiglass panel.
No surprises here. It’s just like the right side – but mirrored.
The Raspberry Pi is mounted vertically on the right. Ironically, it is one of the smallest components – and the hardest worker. On the left side are two circuit boards for the LED. You can see its HDMI cable string to the Raspberry Pi. The power supply is on the bottom and by far the biggest component. To the right of the power supply is a small amplifier which powers the speakers. Lastly, on the right there’s a small black rectangular component. This is a USB Sound Adapter. I bought it during testing after realizing the Raspberry Pi’s horrible sound quality from it’s 3.5mm speaker output.
On the bottom right is a USB adapter so that I can quickly plug a keyboard, mouse, or USB Memory into the Raspberry Pi without having to take off the back plate. To remove the back plate I installed 4 thumb screws for quick access. The holes provide passive cooling to the components inside.
I fabricated a custom speaker grill and wired up small 5 watt speakers to the power supply. The glowing LED light backlights the marquee.
I probably went overboard with the power supply. It was the largest component and made for a tight fit for everything else. It powers the Raspberry Pi, the LED lights, a small amplifier, two 2 1/2″ speakers, and the LCD Panel.
The side decal is part Super Smash Brothers, part my own design. Since I wanted my tabletop arcade to cover arcade as well as most 80’s and 90’s video games I wanted to display as many recognizable characters as possible.
Kits and Custom Builds
Due to budgetary constraints and the fact that I didn’t want a enormous arcade cabinet clogging my garage I decided to go small. I found numerous custom builds on the internet such as these by Rasmus Kønig Sørensen. And this, this, and this from Instructables. There are kits available as well: Haruman Customs has cabinets of all shapes and sizes, Game Room Solutions has a nice configurable 2 player tabletop. The PortaPi and the Picade are two more well designed one-player kits.
My Build
I decided to go single-player and retrofit a used iCade to reduce cost, size, and complexity. My build was based on this tutorial from Instructables. I did take some creative liberties, however …
First, I used a single 12v/5v switching power supply to power everything. I did this because I wanted a single on/off switch and I didn’t want a bunch of ac/dc adapters clutering the inside of the already small iCade cabinet. The LCD screen, coin slot LED, and marquee LED are all 12v. The Raspberry PI and sound amplifier are both 5v. The downside of using a single power supply is the sound produced by the amplifier generated a lot of feedback. After reading a few articles on ground loops I solved the problem by installing one of these.
Second, I built in an LED back-lit marquee. An arcade cabinet just seemed naked without one. I also enclosed two small 2″ stereo speakers in the marquee box.
Third, I diverted the Raspberry PI’s sound to a USB sound adapter to bypass the horrendous static that is generated through the standard 3.5mm jack. I used this adapter. Instructions on how to configure the Raspberry PI to use a USB sound can be found here.
Fourth, I used threaded wood inserts throughout the cabinet so that the whole thing can be “easily” disassembled and reassembled. Ideally, this will allow a bigger screen to be swapped in. Someday.
Fifth, I exposed a USB port and volume control on the back cover plate. I didn’t want to have to crack open the case every time I needed to plug in a keyboard or external controller.
Last is the cabinet art. Most of the artwork was pulled from a Nintendo Super Smash Brothers poster that I split in half and modified. The other stuff I ripped liberally from the Internet. I used Gimp to pull everything together and used this cool font to add a nice 80’s/90’s arcade vibe. My sister-in-law works for HP and printed the artwork for me for free. Thanks, Jayme!
Cost
Expect to spend between $250 and $300 for a similar build. That’s assuming you have all of the necessary tools, too. As far as power tools you will need a circular saw, jig saw, drill, and a soldering iron. You will also need a wide assortment of hand tools as well including allen wrenches, screwdrivers, wood files, and clamps.
Component Breakdown
Here’s a pretty good breakdown of the components, where you can find them (typically Ebay), and how much they cost. Most of my stuff shipped from China. I was half expecting some dudes in black suits to show up at my door to question me about all of the little packages that trickled in from China during the project. Fortunately, my fears never manifested.
Plexiglass Sheet; Leftover gifted to me by neighbor.
3/8″ plywood; Used for speaker tray, LCD frame, and back panel
1/2″ furniture board; Used for bottom of arcade cabinet
Spray can of primer
Spray can of satin black paint
Epoxy; To set threaded wood inserts (and fix stripped ones in the used iCade cabinet)
Double Sided Mountin Tape; To adhere stuff where screws just wouldn’t work
22 gauge wire (for 5v)
18 gauge wire (for 12v and AC)
Assorted M4 screws, nuts, and bolts
Assorted wiring connectors
Conclusion
In retrospect it would have been a lot cheaper and easier to buy a kit. But where is the fun in that? Now if I can just get the quarter slot to work I can start making money …
I have kids that are now of Disney-watching age. They love their DVD’s but do not know how to take care of them. A DVD is a frisbee, coaster, and also just happens to play movies, too. To correct this I have been backing up their DVD’s to .mp4/.mv4 files and playing them instead.
Handbrake has been my go-to choice for backing up DRM-protected movies but I have had problems running it directly in Windows 7. For starters I cannot get the 64-bit version to run and the 32-bit version renders at an abysmal 7 frames per second.
I had a few hours of play time the other day and I decided to attack DVD backups from a different direction. I decided to try running Handbrake in Ubuntu (Linux) using Oracle’s Virtual Box on Windows 7. It took a while to piece together but these are my step-by-step instructions on how to configure the VM. Oh, and as it turns out Handbrake runs much much faster in Ubuntu …
Requirements:
8 GB RAM (or more)
Windows 7 (or newer)
20GB of free hard drive space
DVD-ROM Drive
Install Virtual Box
Install Oracle VirtualBox. VirtualBox can be downloaded here. I am using VirtualBox 5.0.16 installed on a Windows 7 host computer for this walk through
Create Ubuntu Client on VirtualBox
Download an .iso (disk image) of Ubuntu. I downloaded a copy of 64-bit Ubuntu Desktop 14.04 from here.
Start VirtualBox; Click “New”; Select Type: Linux and Version: Ubuntu (64-bit)
Memory size should be at least 3000 MB
Virtual Hard Disk should be at least 20 GB
Click “Start”
Select .iso file from (1).
Click “Start”.
Follow the wizard to install Ubuntu.
Install Guest Additions
Guest additions will allow us to run Ubuntu full screen from within VirtualBox and share folders between Windows (host) and Ubuntu (Client).
Select Devices -> “Insert Guest Additions CD Image” from the VirtualBox window. This will mount VirtualBox guest additions so that it might be installed into your Ubuntu client.
Press CTRL+ALT+T to bring up a terminal.
cd /media/scott/VBOXADDITIONS_5.0.16_105871
Now, install guest additions.
sudo ./VBoxLinuxAdditions.run
Restart Ubuntu.
Ubuntu should now be able to run full screen. Goodbye tiny window.
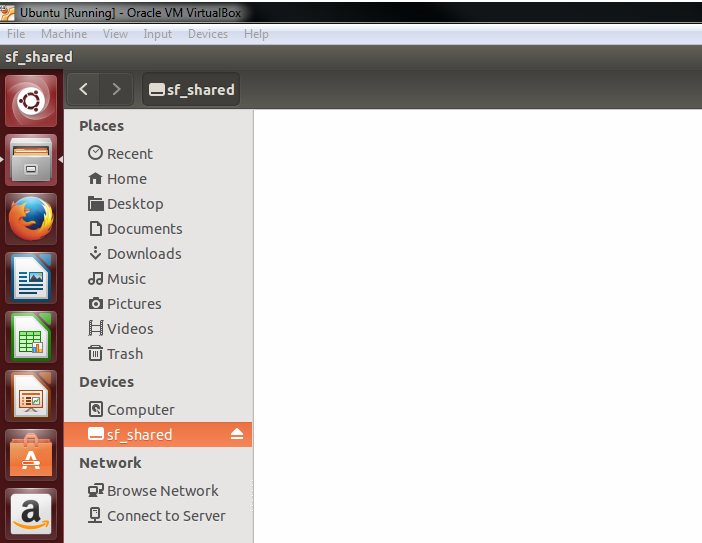
Enable shared folder
Guest additions also allows you to share folder between your Windows Host and Ubuntu Client.
Create a folder “C:\shared” in Windows (your host machine)
Select Devices -> Shared Folders -> Shared Folder Settings from the VirtualBox window.
Clicked “Shared Folders” in left menu.
Click the Add Folder icon on the right margin.
Select the location of the “shared” Windows folder for “Folder Path”.
Set “Folder Name” to “shared”.
Check “Auto-mount” and “Make Permanent”.
Click “OK”.
Press CTRL+ALT+T to bring up a terminal.
cut -d: -f1 /etc/group
Next, list which groups you are a member of; You shouldn’t see yourself.
groups
Finally, add your account to vboxsf shared folder group. “scott” is the account you will be logging into Ubuntu with.
sudo usermod -a -G vboxsf scott
Restart Ubuntu.
The “shared” folder is now mounted as media/sf_shared.
Configure DVD-ROM Passthrough
This will enable Ubuntu to read from the hosts drive; Not doing this will result in region errors when reading from the drive.
Shut down Ubuntu if it is running.
In Oracle VM Virtual Box Manager Window right-click on “Ubuntu” in left pane and select “Settings”.
Select “Storage” from the left pane.
Select your DVD-ROM and click the “Passthrough” checkbox.
Finally, install handbrake gui and command-line interface.
sudo apt-get install handbrake-gtk handbrake-cli
Enable DVD decryption
This installs libdvdcss, an open source library for decrypting DVD’s. These instructions are specific to Ubuntu 14.04 and might change.
Press CTRL+ALT+T to bring up a terminal.
sudo apt-get install libdvdread4
Register libdvdcss
sudo /usr/share/doc/libdvdread4/install-css.sh
Restart Ubuntu.
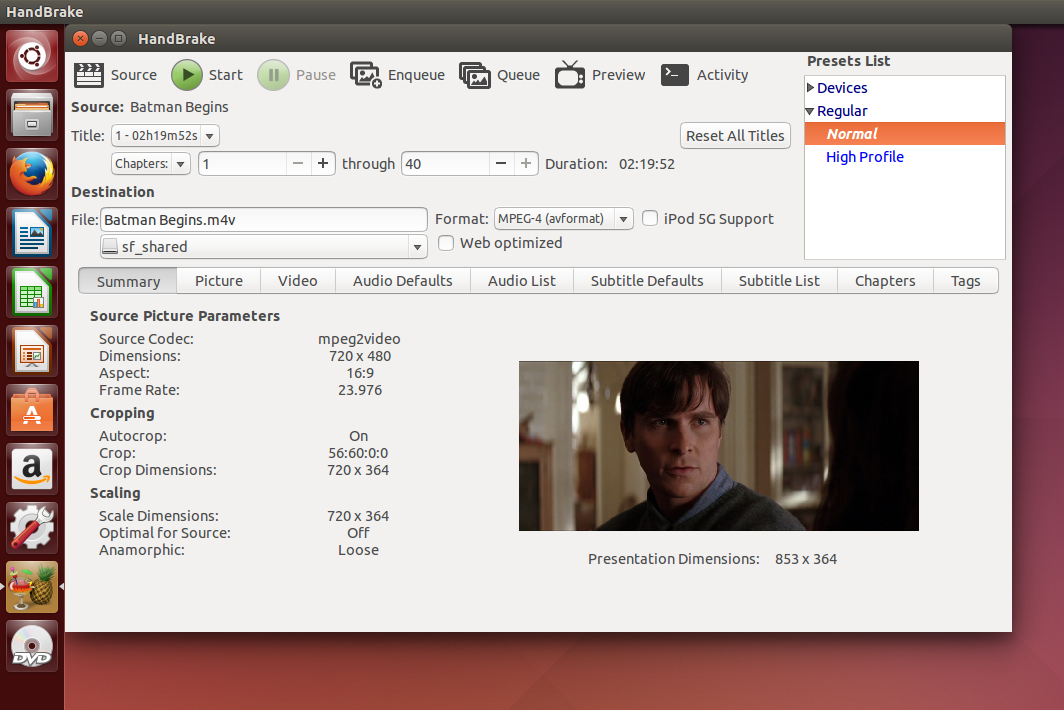
Handbrake should now be able to rip movies to your shared drive! Okay you got me. Batman Begins is definitely not a movie I show my kids – but it’s the only DVD I had on hand for this example.
The JQuery UI Autocomplete Widget allows you to return a list of suggestions based upon a query string. The widget works great unless the user does not know what to search for. For example, if the user wants to search through a large database of people using only a single letter (presumably the first letter of the last name) the Autocomplete Widget quickly becomes unwieldy. Either the suggestions need to be truncated or the list of suggestions becomes so large as to be unusable.
To resolve this problem I have extended the JQuery UI Autocomplete Widget and added pagination. Arrows allow the user to cycle through pages of suggestions. Each page of is retrieved using AJAX. Click here for a jsFiddle sample. The sample uses MockJax to simulate the AJAX calls. A complete end-to-end example using ASP.NET MVC is available here.
The Paginated Autocomplete Widget inherits the same API as the Autocomplete Widget from which it is derived. However, there are some differences to be aware of …
First, the web server endpoint that handles the AJAX GET must support three parameters – search, pageSize, and pageIndex. search is the query string provided by the user. pageSize is the number of items to return per page. pageIndex is the page to return.
[HttpGet]
public JsonResult SearchCars(string search, int pageSize=20, int pageIndex=0)
{
   // Your logic here.
}
ASP.NET MVC Controller ActionMethod to support the Paginated Autocomplete Widget.
Second, the Paginated Autocomplete expects a JSON response from the web server in a specific format. The Widget requires this format to facilitate pagination. data is an array of text/value objects that will get bound to to the list of suggestions. total is the total number of unpaginated suggestions that the search query returned.
{
   data : [
      { text : "Item 1", value : 0 },
      { text : "Item 2", value : 1 },
      { text : "Item 3", value : 2 }
   ],
   total : 1000
}
JSON result expected by the Paginated Autocomplete Widget.
Third, when using the Paginated Autocomplete Widget in Javascript you need to specify sourceUrl. The Widget will automatically generate an AJAX GET to the sourceUrl and retrieve paginated suggestions as necessary. This is different than the Autocomplete Widget where you need to define the source method as well as the underlying AJAX GET. The obfuscation is necessary to facilitate pagination. In addition pageSize is an optional parameter that determines the number of suggestions per page.
Using the Paginated Autocomplete Widget in Javascript.
The Paginated Autocomplete Widget requires JQuery 1.9.1 or newer and JQuery UI 1.10.3 or newer. I have tested it against Internet Explorer 7/8/9/10, Firefox 21, and Chrome 27. It will probably run in other permutations as well. Please let me know if you have any comments or questions.
Javascript is garbage collected but it can still leak memory. The majority of these leaks are caused by Javascript “hooks” into the DOM. There are numerous articles on the internet that provide Javascript memory leak patterns to avoid. Here is a real-world example that I encountered while working with Telerik’s Kendo Grid.
My implementation of the Kendo Grid has a 30 seconds refresh interval. When an interval elapses the Kendo Grid’s Datasource is refreshed from the web server and a dataBound() event handler is triggered. The dataBound() event handler creates elements for the newly fetched data and binds them to the DOM. In the dataBound() event handler we attach several event handlers to these newly created DOM elements. I use these event handlers to show dialogs and such when the user clicks on a cell in the Kendo Grid.
The memory leak occurs when the Kendo Grid is refreshed. On a refresh the Kendo Grid removes the elements from the DOM that were previously added during the last dataBound() invocation. Kendo does not dispose of these elements as expected. Specifically, the event handlers that were previously attached to these elements are not “told” that the elements were removed. This causes a memory leak because the event handlers are retained in memory indefinitely. Every refresh of the Kendo Grid causes another generation of these event handlers to be retained.
Fortunately, fixing the leak is easy. You just need to detach every event handler prior to removing the DOM element to which it is bound. Wen using the Kendo Grid you want to attach your event handlers in the dataBound() event. You want to detach your event handlers in the dataBinding() event. If you use JQuery’s .on() to attach an event handler ( this includes .click(), change(), etc…) you need to use .off() to detach it. If you use JQuery’s .bind() to attach an event handler you need to use .unbind() to detach it.
I’ve created a couple of examples to demonstrate the before and after effects of properly handling this memory leak. The initial source code is taken directly from Kendo’s Demo Site. I have attached a .click() event handler in the Kendo Grid’s dataBound() event handler. The .click() event simply displays an alert pop-up whenever a user clicks on a cell in the table. This is the jsFiddle portraying the memory leak. If I detach the .click() event handler in the Kendo Grid’s dataBinding() event handler the memory leak disappears. This is a jsFiddle with the “fix” applied.
This is the memory footprint of each jsFiddle over a 20 minute period. The green line portrays the memory leak. The red line portrays the “fix”. The memory leakage is around 100-200 kb every 10 minutes.
For a long-running single-page application this is not good. Moving forward I now make memory profiling part of my testing regime. Please let me know if you have any questions.
Notes
The JQuery .empty() function is supposed to recursively remove all child elements as well as detach all event handlers. I have not looked at the Kendo Grid source code. However, if .empty() were being called to dispose of obsolete elements upon a Datasource refresh I would expect this memory leak to not occur.
Javascript Interpretters are not commonly found in the wild – they are built into a Web Browser. Javascript interpretters hosted within a Web Browser expose an API to interact with the DOM.
Command-Line Interpretters
There are, of course, exceptions. Rhino, V8, and Windows Script Host run outside of a Web Browser on a command-line. Command-Line Javascript Interpretters are not bound to a Web Browser and as such they do not have a DOM API – as there is no DOM.
Unit Test Frameworks
There are many different flavors of Unit Test Frameworks. When running a Unit Test each of these Frameworks follows one of two methodologies …
In-Browser
An “In-Browser” Unit Test is run directly within a Web Browser. The Unit Test leverages the Web Browser’s Interpretter and DOM API. The Test Result is displayed as a web page and must be visually inspected – or programatically scraped. This can make automation difficult.
JsUnit and QUnit are two commonly used In-Browser Test Frameworks.
Headless
A “Headless” Unit Test is run using a Command-Line Javascript Interpretter. “Headless” means “No monitor”. The Test Result can theoretically be piped anywhere. This makes it easier to automate.
PhantomJs is a Headless Test Framework that utilizes JavaScriptCore and WebKit. JavaScriptCore is the Javascript Interpretter used by Safari. WebKit is the DOM API / Rendering Engine used by Safari and Chrome.
Keep in mind that although Headless Unit Tests are run outside of a Web Browser they are not really Web Browser agnostic. A Headless Unit Test Framework is only as good as the libraries that it depends on. For example, a passing Unit Test in PhantomJs could theoretically fail in Internet Explorer or Firefox simply because the later use entirely different Javascript and DOM API’s.
How to Write an In-Browser Unit Test
Moving forward I am going to show you how to use QUnit to write In-Browser Unit Tests. Other In-Browser Testing Frameworks are very similar.
Components of a QUnit Unit Test
Writting QUnit Unit Tests requires three things …
QUnit Test Runner (.html)
Unit Tests (.js)
Production Scripts (.js)
QUnit Test Runner
A Test Runner is just a Web Page that links together your Unit Tests and your Production Scripts. When opened in a Web Browser the Test Runner will run the Unit Tests and display the results. Mocked-up HTML Markup can be applied to the Test Runner if the Production Scripts being tested require it. The Mocked-up HTML is reset after each Unit Test is run.
This is what the Test Runner’s markup looks like …
This is what the Test Runner looks like in a Web Browser …
Unit Tests
A Unit Test verifies the functionality of Production Scripts. As your Production Scripts change during development it is the Unit Test’s job to verify that proper functionality is maintained. Each Unit Test invokes a function exposed by your Production Scripts and then Asserts that the outcome is correct. The Assertion could be as simple as verifying a return value or as complicated as verifying that the DOM has been modified apporpriately. Unit Tests are grouped into Modules. Multiple Modules can exist within a single Javascript file. A Unit Test can have any number of Assertions. The number of expected Assertions must be declared.
This is a simple example of a Unit Test. No Production Script is invoked – the Unit Test just asserts that “Hello” is not equal to “World”. “MyUnitTest – Group 1” is an arbitrary name to associate with the Unit Test. The name is displayed in the Test Runner when the Unit Test is run. “1” corresponds to the number of Assertions that are performed by the Unit Test. QUnit supports a handful of different Assertions…
These are the scripts that you want to test. They should be identical to whatever gets deployed in your Production environment.
A Simple Unit Test
If you’re lucky your Production Scripts do not have any external dependencies and do not interact with the DOM.
For example, on a recent project I needed the ability to move an element in an Array from one index to another. To do this I extended the Javascript Array object with two functions – move() and indexOf().
The Production Scripts look like this. First, I check to see if the functions already exist for the Array object. If they don’t I simply add them …
if (!Array.prototype.move) {

   // Description : Moves an element in an array.
   // Params:       old_index - The old index of element.
   //               new_index - The new index of element.
   // http://stackoverflow.com/questions/5306680/move-an-array-element-from-one-array-position-to-another
   Array.prototype.move = function (old_index, new_index) {
      if (new_index >= this.length) {
         var k = new_index - this.length;
         while ((k--) + 1) {
            this.push(undefined);
         }
      }
      this.splice(new_index, 0, this.splice(old_index, 1)[0]);
      return this; // for testing purposes
   };
}

if (!Array.prototype.indexOf) {

   // Description : Finds the index of an object in the specified array
   // Params:       obj - The object.
   //                    start - The index to start looking for the object in the aray.
   // http: //stackoverflow.com/questions/1744310/how-to-fix-array-indexof-in-javascript-for-ie-browsers
   Array.prototype.indexOf = function (obj, start) {
      for (var i = (start || 0), j = this.length; i < j; i++) {
         if (this[i] === obj) { return i; }
      }
      return -1;
   }
}
Extensions.js
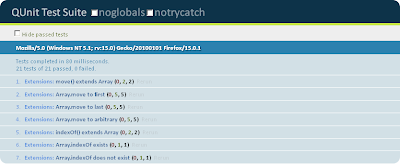
As for Unit Testing there are two things that I want to verify. First, I want to make sure that the Production Scripts extended the Array object. Here is what the Unit Test for move() looks like …
Next, I want to make sure that the new Array functions work correctly. To do this I simply create an array, invoke the new Array functions against it, and then use QUnit Assertions to verify the result …
The QUnit Test Runner links everything together. Notice that that the Unit Tests are referenced after the Production Scripts. The QUnit Test Runner loads and processes scripts in order of their appearance. It’s important to not reference your Unit Tests first as the Production Scripts that they are testing may not be loaded yet …
<!DOCTYPE html>
<html>
<head>
   <meta charset="UTF-8" />
   <title>QUnit Test Suite</title>

   <!-- QUnit Dependencies -->
   <link rel="stylesheet" href="http://code.jquery.com/qunit/qunit-1.5.0.css">
   <script src="http://code.jquery.com/qunit/qunit-1.5.0.js" type="text/javascript"></script>

   <!-- JQuery -->
   <script src="http://code.jquery.com/jquery-1.5.min.js" type="text/javascript"></script>
   <script src="http://code.jquery.com/ui/1.8.13/jquery-ui.min.js" type="text/javascript"></script>

   <!-- Your Production Script(s) -->
   <script src="Extensions.js"></script>

   <!-- Your Unit Test Script(s) --->
   <script src="Extensions.UnitTest.js"></script>

</head>
<body>
   <div id="qunit"></div>

   <div id="qunit-fixture">
      <!-- The HTML Markup that your Production Script(s) Target -->
   </div>

</body>
</html>
TestRunner.html
This is what the Test Runner looks like in a Web Browser when running …
We have been tasked with creating Production Scripts and corresponding Unit Tests to support the required functionality. To do this we’re going to take a Test-Driven approach. Specifically, we’re going to …
Stub out the Production Scripts.
Create the Test Runner.
Create the (Failing) Unit Tests.
Finish the Production Scripts (to Satisfy the Failing Unit Tests).
Stub Out Production Scripts
As a rule of thumb it is very important to keep your Production Script functions as specific as possible. The more complicated the function the more difficult the Unit Test will be to write. You do not want a function that singlehandedly scrapes the DOM, performs a JQuery Ajax POST, and then updates the DOM. Instead, you will want to break down the function into discrete operations.
The application’s functionality can be broken into the following stubbed out functions …
function selectInventoryOnChange (event) {
   // TODO : Get Category from selectInventoryCategory <select> and invoke getInventoryFromServer().
}

function getInventoryFromServer ( inventoryCategory ) {
   // TODO : Make AJAX GET Request to Web Server for Category and invoke refreshInventoryTable() with retreived Data.
}

function refreshInventoryTable ( jsonInventoryData ) {
   // TODO : Refresh <table> with Inventory Data.
}

function showAddInventoryForm () {
   // TODO : Display the formAddInventory <form> in a JQuery UI Dialog.
}

function addNewInventoryClick () {
   // TODO : Retreive data from formAddInventory <form>, invoke addNewInventory(), and hide JQuery UI Dialog.
}

function addNewInventory ( formData ) {
   // TODO : Make AJAX POST to Web Server with <form> data.
}
InventoryManagement.js (Stubbed Out)
As these functions are going to be leveraged by our Unit Tests and the web application we should apply some best practices to make them more portable …
Production Script Best Practices
Namespacing
First, lets encapsulate the functions into a Namespace. Global functions are a no-no as the can overwrite (or be overwritten) by any other Javascript that your application might reference …
var ScottsJewels = ScottsJewels || {};
ScottsJewels.InventoryManagement = ScottsJewels.InventoryManagement || {};

ScottsJewels.InventoryManagement.selectInventoryOnChange = function (event) {
   // TODO : Get Category from selectInventoryCategory <select> and invoke getInventoryFromServer().
}

ScottsJewels.InventoryManagement.getInventoryFromServer = function ( inventoryCategory ) {
   // TODO : Make AJAX GET Request to Web Server for Category and invoke refreshInventoryTable() with retreived Data.
}

ScottsJewels.InventoryManagement.refreshInventoryTable = function( jsonInventoryData ) {
   // TODO : Refresh <table> with Inventory Data.
}

ScottsJewels.InventoryManagement.showAddInventoryForm = function () {
   // TODO : Display the formAddInventory <form> in a JQuery UI Dialog.
}

ScottsJewels.InventoryManagement.addNewInventoryClick = function () {
   // TODO : Retreive data from formAddInventory <form>, invoke addNewInventory(), and hide JQuery UI Dialog.
}

ScottsJewels.InventoryManagement.addNewInventory = function ( formData ) {
   // TODO : Make AJAX POST to Web Server with <form> data.
}
InventoryManagement.js (Stubbed Out using Namespace)
Now instead of invoking our Production Scripts as a global function like this …
addNewInventory ();
We can invoke them through their namespace like this …
Next, let’s restrict access to the functions using the Module Pattern. The Module Pattern permits encapsulation of our functions …
var ScottsJewels = ScottsJewels || {};
ScottsJewels.InventoryManagement = ScottsJewels.InventoryManagement || {};

ScottsJewels.InventoryManagement = (function () {

   return {
      selectInventoryOnChange : function (event) {

         // TODO : Get Category from selectInventoryCategory <select> and invoke getInventoryFromServer().
      },
      getInventoryFromServer : function ( inventoryCategory ) {
         // TODO : Make AJAX GET Request to Web Server for Category and invoke refreshInventoryTable() with retreived Data.
      },
      refreshInventoryTable : function ( jsonInventoryData ) {
         // TODO : Refresh <table> with Inventory Data.
      },
      showAddInventoryForm : function () {
         // TODO : Display the formAddInventory <form> in a JQuery UI Dialog.
      },
      addNewInventoryClick : function () {
         // TODO : Retreive data from formAddInventory <form>, invoke addNewInventory(), and hide JQuery UI Dialog.
      },
      addNewInventory : function ( formData ) {
         // TODO : Make AJAX POST to Web Server with <form> data.
      }
   };
});
InventoryManagement.js (Stubbed Out using Module Pattern)
Notice that all of the above functions are publically accessible in this Module …
var module = ScottsJewels.InventoryManagement();
module.addNewInventory();
The Module pattern also allows for private functions and data members …
Finally, let’s make the Module a Singleton. The Singleton Pattern provides a common context for all Production Script invocations as well as a smaller memory footprint. It’s as easy as adding () onto the end of the Module declaration. Essentially you are invoking the Module once when it is parsed and loaded …
var ScottsJewels = ScottsJewels || {};
ScottsJewels.InventoryManagement = ScottsJewels.InventoryManagement || {};

ScottsJewels.InventoryManagement = (function () {
   return {
      selectInventoryOnChange : function (event) {
         // TODO : Get Category from selectInventoryCategory <select> and invoke getInventoryFromServer().
      },
      getInventoryFromServer : function ( inventoryCategory ) {
         // TODO : Make AJAX GET Request to Web Server for Category and invoke refreshInventoryTable() with retreived Data.
      },
      refreshInventoryTable : function ( jsonInventoryData ) {
         // TODO : Refresh <table> with Inventory Data.
      },
      showAddInventoryForm : function () {
         // TODO : Display the formAddInventory <form> in a JQuery UI Dialog.
      },
      addNewInventoryClick : function () {
         // TODO : Retreive data from formAddInventory <form>, invoke addNewInventory(), and hide JQuery UI Dialog.
      },
      addNewInventory : function ( formData ) {
         // TODO : Make AJAX POST to Web Server with <form> data.
      }
   };
})();
InventoryManagement.js (Stubbed Out using Singleton Pattern)
Now you can access the singleton Module now without having to instantiate it …
To allow our Production Scripts to interact with the HTML Markup the HTML Markup needs to be added to the Test Runner’s <div id=”qunit-fixture”> element. Here is the Test Runner with the Production Scripts and HTML Markup added. A reference to the Unit Tests exists as well (although we still need to implement them) …
<!DOCTYPE html>
<html>
<head>
<meta charset="UTF-8" />
<title>QUnit Test Suite</title>
<!-- QUnit Dependencies -->
<link rel="stylesheet" href="http://code.jquery.com/qunit/qunit-1.5.0.css">
<script src="http://code.jquery.com/qunit/qunit-1.5.0.js" type="text/javascript"></script>
<!-- JQuery -->
<script src="http://code.jquery.com/jquery-1.5.min.js" type="text/javascript"></script>
<script src="http://code.jquery.com/ui/1.8.13/jquery-ui.min.js" type="text/javascript"></script>
<!-- Your Production Script(s) -->
<script src="InventoryManagement.js"></script>
<!-- Your Unit Test Script(s) --->
<script src="InventoryManagement.Test.js"></script>
</head>
<body>
<div id="qunit"></div>
<div id="qunit-fixture">
<!-- The HTML Markup that your Production Script(s) Target -->
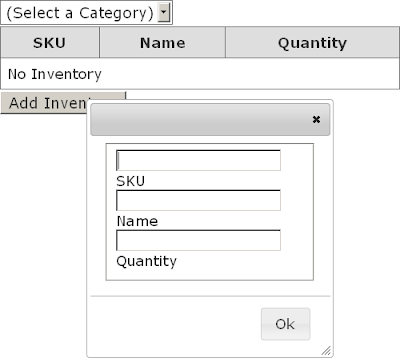
<div class="manage-inventory">
<select id="selectInventoryCategory">
<option value="" selected="selected">(Select a Category)</option>
<option value="Drinks">Drinks</option>
<option value="Food">Food</option>
<option value="Dessert">Desssrt</option>
</select>
<table id="tableInventory">
<thead>
<tr>
<th>SKU</th>
<th>Name</th>
<th>Quantity</th>
</tr>
</thead>
<tbody/>
<tr>
<td colspan="3" >No Inventory</td>
</tr>
</tbody>
</table>
<button type="button">Add Inventory</button>
<form id="formAddInventory" class="hidden" action="http://localhost/Merchandise/UpdateMerchandise" method="post">
<fieldset>
<input type="text" id="inputSKU" name="sku">
<label for="inputSKU">SKU</label>
<input type="text" id="inputName" name="name">
<label for="inputName">Name</label>
<input type="text" id="inputQuantity" name="quantity">
<label for="inputQuantity">Quantity</label>
</fieldset>
</form>
</div>
</div>
</body>
TestRunner.html
As always there are a couple of “gotchas” that you need to look out for. Specifically …
HTML Markup Synchronization
In Production HTML Markup is served by a Web Server. A Unit Test must operate in isolation of the Web Server and all HTML Markup must be hard-coded in the Test Runner. The downside of this is that you must be vigilant to keep the HTML Markup in your Test Runner synchronized with whatever is generated by your Web Server.
Singleton Module and QUnit Problems
A Singleton Javascript Module and the QUnit Test Runner’s <div id=”qunit-fixture”> are not entirely compatible. If your Module selects elements from the DOM during initialization the elements will point to stale references after the first Unit Test is run.
The 2nd Unit Test will fail because the Test Runner refreshes the HTML Markup in <div id=”qunit-fixture”> after every Unit Test. This will cause $myDiv to point at a stale DOM element.
Create Unit Tests
Next we’re going to create the Unit Tests. To keep it simple we are just going to write a single Unit Test for each Production Script function. Each Unit Test will invoke it’s corresponding Production Script function and assert the results.
Here are the stubbed out Unit Tests along with what they need to assert …
QUnit.module( "ScottsJewels.InventoryManagement",
{
   setup     : function() {},
   teardown  : function() {}
});

QUnit.test( "selectInventoryOnChange()", 0, function() {
   // Test : Verify that getInventoryaFromServer() is called with the selected inventory as a parameter.
});

QUnit.test( "getInventoryFromServer()", 0, function() {
   // Test : Verify the AJAX HTTP GET Request is correct.
   // Test : Verify that refreshInventoryTable() is called.
});

QUnit.test( "refreshInventoryTable()", 0, function() {
   // Test : Verify the <table> is correctly refreshed in DOM.
});

QUnit.test( "showAddInventoryForm()", 0, function() {
   // Test : Verify that the appropriate <form> is displayed.
   // Test : Verify that the <form> fields are empty.
});

QUnit.test( "addNewInventoryClick()", 0, function() {
   // Test : Verify that the <form> is hidden.
   // Test : Verify that addNewInventory() is called with the appropriate data from the <form>.
});

QUnit.test( "addNewInventory()", 0, function() {
   // Test : Verify the AJAX HTTP POST Request is correct.
});
InventoryManagement.UnitTest.js (Stubbed Out)
Let’s take a look at the first couple of Unit Tests …
The Unit Test for selectInventoryOnChange() must verify that getInventoryFromServer() is invoked properly.
The Unit Test for getInventoryFromServer() needs to verify that JQuery ajax() was invoked and that it, in turn, invokes refreshInventoryTable().
Fleshing out these two Unit Tests poses a couple of problems …
How does my Unit Test I verify that a Production Script function invokes another function?
How do I verify that JQuery ajax() was invoked correctly?
The same solution can be applied to all three : Mocking.
Mocking Dependenices
Mocking is when you create a new object that mimics the behavior of another object. A “mock” object is oftentimes substituted when the object that it is simulating is unavailable. In Unit Testing dependencies are mocked up when it is not practical to use the actual dependency.
In Javascript functions are objects and easily mockable. This comes in handly when verifying a JQuery ajax() call or asserting the invocation of a nested function. As an example, this is how you might mock up JQuery’s dialog() function for a Unit Test. It’s important to restore the original function implementation after you have conducted you tests …
var jQueryDialog_Orginal;

try {
   // Backup.
   jQueryDialog_Orginal = jQuery.fn.dialog;

   // Implement your own.
   jQuery.fn.dialog = function () {
      // QUnit assertions...
   };

   // Run test(s) that implement jQuery Dialog.
}
finally {
   // Restore.
   jQuery.fn.dialog = jQueryDialog_Orginal;
}
Keep in mind that there are (much) more sophisticated 3rd Party mocking/stubbing Javascript libraries that you can use such as SinonJs and JSMock. This is how you would use mocking to flesh out the Unit Tests for selectInventoryOnChange() …
QUnit.test( "selectInventoryOnChange()", 1, function() {

   // Test : Verify that getInventoryaFromServer() is called with the selected inventory as a parameter.

   var	$event,
         $selectInventoryCategory,
         original_getInventoryFromServer;

   // Set the Inventory Category <select> with "Food" <option>.
   $selectInventoryCategory = $("#selectInventoryCategory");
   $selectInventoryCategory.val("Food");

   // Create a "change" event.
   $event = $.Event("change");
   $event.target = $selectInventoryCategory;

   try {
      // Save a reference to getInventoryFromServer() so that it can be restored after the test has completed.
      original_getInventoryFromServer = ScottsJewels.InventoryManagement.getInventoryFromServer;

      // Now, assign a new function to getInventoryFromServer().
      ScottsJewels.InventoryManagement.getInventoryFromServer = function ( inventoryCategory ) {
         // Verify that getInventoryFromServer is invoked with the "Food" <option>.
         equal( inventoryCategory, "Food" );
      }

      // Invoke selectInventoryOnChange() and send in the "change" event.
      // selectInventoryOnChange() should invoke getInventoryFromServer which was (temporarily) redefined above.
      ScottsJewels.InventoryManagement.selectInventoryOnChange ($event);
   }
   finally {
      // Restore getInventoryFromServer().
      ScottsJewels.InventoryManagement.getInventoryFromServer = original_getInventoryFromServer;
   }
});
InventoryManagement.UnitTest.js
… and getInventoryFromServer() …
QUnit.test( "getInventoryFromServer()", 3, function() {

   // Test : Verify the AJAX HTTP GET Request is correct.
   // Test : Verify that refreshInventoryTable() is called.

   var original_ajax;

   try {
      // Save a reference to JQuery's ajax() so that it can be restored after the test is complete.
      original_ajax = $.ajax;

      // Now, assign a new funtion to JQuery's ajax().
      $.ajax = function (request) {

         // Verify that "Food" was supplied as the ajax "data" parameter.
         equal(request.data.inventoryCategory, "Food");

         // Verify that the ajax is a GET.
         equal(request.type, "GET");

         // Verify that refreshInventoryTable() will be invoked if ajax is successful.
         equal(request.success, ScottsJewels.InventoryManagement.refreshInventoryTable);
      }

      // Invoke JQuery's ajax(). This should invoke the (temporarily) re-defined ajax() above.
      ScottsJewels.InventoryManagement.getInventoryFromServer ( "Food" );
   }
   finally {
      // Restore JQuery's ajax().
      $.ajax = original_ajax;
   }
});
InventoryManagement.UnitTest.js
Executing the Test Runner at this time will inevitably lead to lots of failures. This is expected as our Production Scripts are merely stubbed out …
Finish Production Scripts
The last thing to do is to flesh out the Production Script functions. Ironically, the Production Scripts are a lot smaller (and less complicated) than their corresponding Unit Tests. This goes to show that Unit Testing Javascript is not a trivial task …
var ScottsJewels = ScottsJewels || {};
ScottsJewels.InventoryManagement = ScottsJewels.InventoryManagement || {};

ScottsJewels.InventoryManagement = (function () {

   $(document).ready(function () {

      var $selectInventoryCategory,
          $buttonShowAddInventory;

      $selectInventoryCategory = $("#selectInventoryCategory");
      $buttonShowAddInventory = $("#buttonShowAddInventory");

      // Hook up event handlers.
      $selectInventoryCategory.bind ( "change", ScottsJewels.InventoryManagement.selectInventoryOnChange);
      $buttonShowAddInventory.bind ( "click", ScottsJewels.InventoryManagement.showAddInventoryForm);
   });

   return {

      selectInventoryOnChange : function (event) {

         // Get Category from selectInventoryCategory <select> and invoke getInventoryFromServer().
         var inventoryCategory;

         inventoryCategory = $(event.target).val();

         if (inventoryCategory !== "") {

            ScottsJewels.InventoryManagement.getInventoryFromServer(inventoryCategory);
         }
      },
      getInventoryFromServer : function ( inventoryCategory ) {

         // Make AJAX GET Request to Web Server for Category and invoke refreshInventoryTable() with retreived Data.
         $.ajax({
            type: "GET",
            url : "http://ScottsJewels/InventoryManagement/GetInventory",
            data: { inventoryCategory : inventoryCategory },
            success: ScottsJewels.InventoryManagement.refreshInventoryTable
         });
      },
      refreshInventoryTable : function ( jsonInventoryData ) {

         // Refresh <table> with Inventory Data.
         var $tableInventoryBody,
             html;

         $tableInventoryBody = $("#tableInventory tbody");
         html = "";

         $(jsonInventoryData).each( function ( index, value ) {
            html += 	"<tr>";
            html += 		"<td class='sku'>" + value.SKU + "</td>";
            html += 		"<td class='name'>" + value.Name + "</td>";
            html += 		"<td class='quanity'>" + value.Quantity + "</td>";
            html +=	"</tr>";
         });

         $tableInventoryBody
            .empty()
            .append(html);
      },
      showAddInventoryForm : function () {

         // Display the formAddInventory <form> in a JQuery UI Dialog.

         var $formAddInventory;

         $formAddInventory = $("#formAddInventory");

         $formAddInventory[0].reset();

         $formAddInventory.dialog({
            buttons: [{	text: "Ok",
            click: ScottsJewels.InventoryManagement.addNewInventoryClick
         }]});
      },
      addNewInventoryClick : function () {

         // Retreive data from formAddInventory <form>, invoke addNewInventory(), and hide JQuery UI Dialog.

         var $formAddInventory,
             formData;

         $formAddInventory = $("#formAddInventory");

         formData = $formAddInventory.serialize();

         $formAddInventory.dialog("close");

         ScottsJewels.InventoryManagement.addNewInventory( formData );
      },
      addNewInventory : function ( formData ) {

         // Make AJAX POST to Web Server with <form> data.

         $.ajax({
            type			: "POST",
            contentType	: "application/x-www-form-urlencoded",
            url 			: "http://ScottsJewels/InventoryManagement/AddInventory",
            data			: formData
            });
      }
   };
})();
InventoryManagement.js
Executing the Test Runner at this point should result in a bunch of Passing Tests. Your Test Runner should look something like this …
Your responsibility as a conscientous Developer doesn’t end here. You should re-run your Unit Tests and verify complicance when …
Your Production Scripts interact with the DOM and the HTML structure is modified.
Your Production Scripts change.
A dependency that your Production Scripts use changes.
There is also a fair share of maintenance that comes along with the Unit Testing. If the above causes any of your Unit Tests to fail you might have to revise your Unit Tests to accommodate the failure. This could be as simple as updating the HTML Markup in your Test Runner or as complicated as refactoring an entire Unit Test.
This article was written when ASP.NET MVC 2 was fresh off the assembly line. Since then MVC 3 (and 4) have been released. One improvement is that the “application/json” MIME type is now fully supported. This means that you can now POST and return JSON to your hearts content.
ASP.NET MVC is Microsoft’s latest entry into the world of web application development. It was introduced in 2009 as an alternative to ASP.NET Web Forms.
Microsoft’s evangelists have positioned ASP.NET MVC as next big step in web development. Maybe it is. However, to keep it in perspective remember that MVC is just a design pattern. ASP.NET MVC is Microsoft’s implementation of the MVC design pattern for serving up web pages. MVC stands for Model View Controller. A better ancronym would be MVC-R as Routing is an essential part to Microsoft’s implementation.
ASP.NET MVC and ASP.NET Web Forms take very different approaches to achieve the same goal. Neither is a panacea. In this article I will compare and contrast both frameworks and enable you to make an educated decision as to which to use.
First, we’ll go over how ASP.NET Web Forms and ASP.NET MVC process a request from a Web Browser. Next, we’ll look at the major design patterns used by each framework. After that we’ll work through a couple of common programming scenarios. Finally, we’ll sum up the pros and cons of each framework.
Okay, so let’s get started…
How Requests Are Processed
Let’s get started by describing how each framework processes a request from the Web Browser. Keep in mind that what follows is by no means comprehensive and is just a profile of the default processing inherent to each framework…
ASP.NET MVC
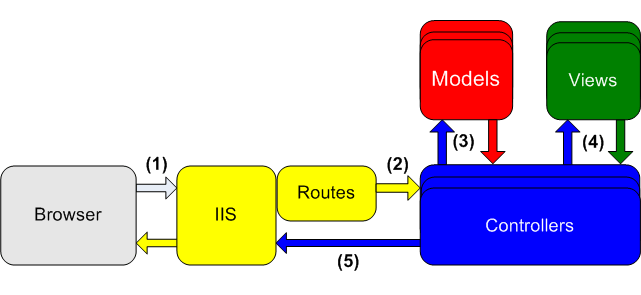
The ASP.NET MVC processes requests from a Web Browser like this …
The Web Browser submits a request to IIS. IIS passes the request to the ASP.NET pipeline where it is processed by the Router.
The Router interprets the request and passes it on to the appropriate Controller.
The Controller retrieves the appropriate data for the request. The data is referred to as a Model.
The Controller retrieves the appropriate View for the request.
The Controller binds the View to the Model to generate an HTML document. This document is sent back to the Web Browser.
The ASP.NET MVC Request Lifecycle
ASP.NET Web Forms
In comparison, ASP.NET Web Forms processes requests from a Web Browser like this …
The Web Browser submits a request to IIS. IIS passes the request to the ASP.NET pipeline.
The ASP.NET pipeline passes the request to the appropriate Page.
The Page retrieves the appropriate data for the request and generates an HTML document. The document is sent back to the Web Browser.
The ASP.NET Web Forms Request Lifecycle
Similarities and Differences
In ASP.NET MVC a Controller determines what should be returned to the Web Browser. The Controller binds a View and a Model together to create an HTML document. There is a one-to-many relationship between a Controller and the Views and Models available to it. As such a Controller can produce many different types of HTML documents.
In comparison, an ASP.NET Web Forms Page consists of server side code (.aspx.cs) and HTML markup (.aspx). The code binds data to the markup to produce an HTML document. There is a one-to-one relationship between a Page’s markup and it’s code. A Page can only produce one type of HTML document.
In ASP.NET MVC data is encapsulated into a Model. Only one Model can be bound to a View. ASP.NET Web Forms has no such restrictions. A Page can be bound to multiple data sources.
Design Patterns
There are three core design patterns used by ASP.NET Web Forms and ASP.NET MVC. These are the MVC Pattern, the Front Controller Pattern, and the Page Controller Pattern. When you think “MVC” you should think of the Front Controller and MVC patterns. When you think “Web Forms” you should think of the Page Controller pattern.
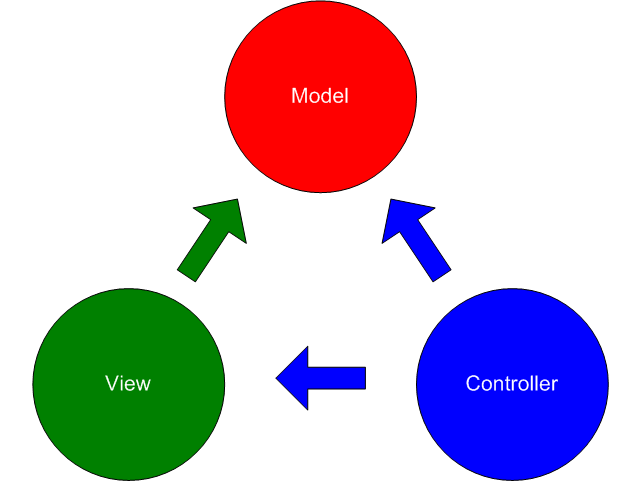
Model View Controller
The MVC pattern describes how the entities of ASP.NET MVC relate and interact with one another.
The Model does not know about the View or Controller. The Model just exposes data. The Controller knows about the View and Model. This is because the Controller needs to be able to retrieve data from the Model and return the approrpiate View. The View only knows about the Model. This is because the View needs to be able to bind to the data exposed by the Model. The View never makes requests against the Controller.
Requests are always made against the Web Server, which passes it on to the Router, which passes it on to the proper the Controller.
The Model View Controller (MVC) Pattern
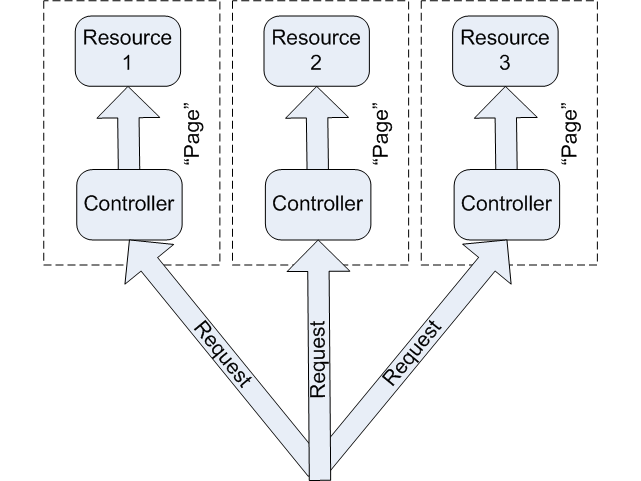
Front Controller
ASP.NET MVC uses the Front Controller pattern to determine how to handle requests from a Web Browser.
In a Front Controller there is no direct mapping between a request and a resource. Instead, the request is interpretted by the Front Controller and routed to the appropriate resource.
In ASP.NET MVC the Router acts as a Front Controller. Requests made to it are interpretted and routed to the appropriate Controller. The Controller also acts as a Front Controller. When a request is routed to it by the Router it determines the appropriate View to return to the Web Browser.
The Front Controller Pattern
Page Controller
ASP.NET Web Forms uses the Page Controller pattern to determine how to handle requests from a Web Browser.
In a Page Controller there is a direct mapping between a request and a resource. The Web Browser’s request corresponds directly to a resource. There is no interpretation.
In ASP.NET Web Forms the Web Forms Page being requested is the Controller – and it only knows how to return itself.
Keep in mind that it is plausible for an ASP.NET Web Forms application to use a routing mechanism like the one used in MVC. In this scenario the application would use the Front Controller pattern and the Page Controller pattern.
The Page Controller Pattern
Code Samples
I have created a sample ASP.NET Web Application called Notepad for the sake of this article. It implements both an MVC version and a Web Forms version of a simple note taking interface. Each version implements a synchronous Form POST for retrieving Notes and an asynchronous Form POST for adding new Notes. By evaluating each version of Notepad we can get a better idea of the differences between Web Forms and MVC…
ASP.NET MVC Form POST
Performing a Form POST in ASP.NET MVC is suprisingly straightforward if you ignore everything you learned about ASP.NET Web Forms.
The MVC Notepad has a Form for searching authors. Submitting the Form performs a POST of the Form’s data against a URL. ASP.NET Routing evaluates the URL and routes the request to the appropriate Controller. The Controller retreives the desired Notes, binds them to a new View, and returns the resulting HTML document.
ASP.NET Routing is configurable. This is what the Route looks like for the “Search By Author” Form in the MVC Notepad.
/Views/Notepad/Notepad.aspx in ScottsJewels.Samples.Notepad
When the Form is submitted the action of the Form is compared to the Routes mapped in ASP.NET Routing. In this case the “GetNotes” function is called on the “Notepad” Controller. Somewhat confusingly ASP.NET MVC implies that the class name for the Controller is “NotebookController” (the Controller part is tacked on automatically). The “GetNotes” function is referred to as an ActionMethod. This is what the “GetNotes” ActionMethod looks like.
[HttpPost]
public ActionResult GetNotes(string button, string searchAuthor)
{
   ActionResult result;

   switch (button)
   {
      case "GetNotesByAuthor":
         if (searchAuthor != null && !string.IsNullOrEmpty(searchAuthor.Trim()))
         {
            result = View("Notepad", NotepadDataAccess.GetInstance().GetNotesByAuthor(searchAuthor));
         }
         else
         {
            result = View("Notepad", NotepadDataAccess.GetInstance().GetNotes());
         }
         break;

      default:
         result = IndexNote();
         break;
   }

   return result;
}
/Controllers/NotepadController.cs in ScottsJewels.Samples.Notepad
The ActionMethod accepts parameters. The parameters are implicilty mapped to the request’s payload by name. In this scenario the “button” parameter will contain the value of the HTML button that submitted the form.
The ActionMethod also returns an ActionResult. There are various types of ActionResults that you can return from a ActionMethod. In this scenario we are returning a ViewResult. The ViewResult binds a View and a Model together to create an HTML document. This particular ViewResult is binding a list of “Note” Models to the “Notepad” View.
The [HttpPost] attribute decorating the “GetNotes” ActionMethod restricts it to HTTP POST requests. If desired you can restrict your ActionMethod to specific HTTP verbs such as GET, PUT, and DELETE using similar attributes.
This is what the “Note” Model looks like.
[Serializable]
public class Note
{
   [Required]
   [DisplayName("Author")]
   public string Author { get; set; }

   [Required]
   [DisplayName("Title")]
   public string Title { get; set; }

   [Required]
   [DisplayName("Text")]
   public string Text { get; set; }
}
Note.cs in ScottsJewels.Samples.Notepad.DataModels
/Views/Notepad/Notepad.aspx in ScottsJewels.Samples.Notepad
Notice the Page directive at the top of the View specifies which type of Model the View can be bound to. A View can only be bound to a single Model type. For complicated Views requring multiple data sources this might require composite ViewModels to be created. Also, notice that there is no code-behind (.aspx.cs) for an ASP.NET MVC View. All of the logic takes place in either the View’s markup or the Controller. When this View loads it will display all of the “Note” objects contained within it’s bound Model.
ASP.NET MVC Form POST using AJAX
In ASP.NET MVC there are two ways to handle an AJAX Form POST. You can either expose a Web Service. Or, you can leverage an ASP.NET MVC Controller. A Web Service is more familiar and allows you to set up a standalone “data tier” (with a little bit of work). However, if you want to adhere to Microsoft’s implementation of MVC you should probably use a Controller. Web Services do not fit very well into the MVC pattern. In addition, Web Services can not be routed to by ASP.NET Routing and will result in a Resource Not Found (404) error.
For the sake of this example I am going to implement AJAX using the ASP.NET MVC Controller.
/Views/Notepad/Notepad.aspx in ScottsJewels.Samples.Notepad
At first glance it may seem like clicking the “Add Note” button will perform a synchronous POST to the the Web Server. However, if you take a look at the client-side Javascript you will see that the Form’s submit event has been overridden. Instead of performing a synchronous POST the Form will be submitted asynchronously using JQuery’s .ajax() method.
/Scripts/Notepad.js in ScottsJewels.Samples.Notepad
The Javascript blocks the default behavior of the submit event and extracts the Form’s information from the HTML DOM. It then populates a JSON representation of the “Note” Model and submits it to the Web Server. Where did the “Note” come from? It was rendered to the View when the following Javascript was processed by ASP.NET. For more information on how to do this (and why) check out my previous post.
<script type="text/javascript" language ="javascript">
   var jsonNote = <%= (new Note().ToJson() ) %>
</script>
/Views/Notepad/Notepad.aspx in ScottsJewels.Samples.Notepad
This is what the Route looks like for the “Add Note” form. Routing treats all requests the same regardless if they are synchronous or asynchronous.
The URL requested by the “Add Note” Form is mapped to the “AddNote” ActionMethod on the “Notepad” Controller. The “AddNote” ActionMethod looks a little different than the one used in the ASP.NET MVC Form POST example. For starters it returns a JSONResult – not a View. JSONResult is just that – a JSON result, or pure data. It also accepts a “Note” object as a parameter. The parameter is bound to the requests payload with a little bit of help from JQuery.
[HttpPost]
public JsonResult AddNote(Note note)
{
   JsonResult result = new JsonResult();

   if ((!string.IsNullOrEmpty(note.Author)) &&
      (!string.IsNullOrEmpty(note.Title)) &&
      (!string.IsNullOrEmpty(note.Text)))
   {
      NotepadDataAccess.GetInstance().SubmitNote(
         new Note
         {
            Author = note.Author,
            Text = note.Text,
            Title = note.Title
         }
      );

      result.Data = new ClientResponse(true, true, string.Empty);
   }
   else
   {
      result.Data = new ClientResponse(false, false, "Author, Title, and Text must not be empty!");
   }

   return result;
}
/Controller/NotepadController.cs in ScottsJewels.Samples.Notepad
How to Link the Form’s Fields
The JSON “Note” fields are linked to those on the Form using JQuery DataLinking. Datalinking is a new JQuery Plugin that allows you to link a Javascript object to a DOM field using the .link() and .unlink() methods. Keep in mind that DataLinking is still in Beta and still has the occasional hiccup. For example, when performing an .ajax() post you need to make sure that you .unlink() your Javascript object or JQuery will throw a nasty error.
An MVC Controller does an admirable job mapping a request’s payload to an ActionMethod’s parameters. However, it doesn’t support all HTTP content types. Suprisingly, JSON which is quickly becoming an intergral part of web development due to it’s small footprint and easy integration into client-side Javascript – is not supported! Naturally, there are a couple of workarounds. You could create a custom binding mechanism which does support JSON. A Controller’s parameters are bound to the request’s payload by the DefaultModelBinder. By implementing and registering a new version of IModelBinder you can supplement the default binder and add support for additional content types. Or, you could just leverage JQuery…
JQuery implicitly converts your payload for you. JQuery’s .ajax() method allows you to specify a “data” parameter and a “contentType” parameter. Typically, if I were performing a JSON post to a Web Service I would specify a “contentType” of “application/json; charset=utf-8” and supply a JSON object for “data”. However, given the Controller’s JSON limitations we can specify “application/x-www-form-urlencoded” instead. JQuery is smart enough to convert the JSON object to a name/value pair compatible with a Form POST.
/Scripts/Notepad.js in ScottsJewels.Samples.Notepad
ASP.NET Web Forms Form POST
An ASP.NET Web Forms Page can be integrated into your ASP.NET MVC web application. ASP.NET Routing allows you to Route a URL to a Page just as easily as a Controller. MapPageRoute() allows you to map a URL request to an ASP.NET Web Forms Page. This Route configures a URL request for “Notepad/WebFormsNotepad” to invoke the WebFormsNotepad.aspx Page for a response.
The Page contains a server-aware Form for retrieving “Notes”. The Form contains a server-aware Button named “getNotesByAuthor”. The Button specifies a server-side event handler named “OnSearchAuthor” to handle OnClick events. When the Button is clicked a POST will be submitted against the Web Server for “NotePad/WebFormsNotepad”. The POST will contain data for the server-aware Form. ASP.NET Routing will route the request to the WebFormsNotepad.aspx Page. The OnLoad event of the Page will then fire followed by the “OnSearchAuthor” method.
WebFormsNotePad.aspx in ScottsJewels.Samples.Notepad
public partial class WebFormsNotepad : System.Web.UI.Page
{
   protected List<Note> Model;

   protected void OnSearchAuthor(object sender, EventArgs e)
   {
      if (searchAuthor.Text != null && !string.IsNullOrEmpty(searchAuthor.Text.Trim()))
      {
         Model = NotepadDataAccess.GetInstance().GetNotesByAuthor(searchAuthor.Text);
      }
      else
      {
         Model = NotepadDataAccess.GetInstance().GetNotes();
      }
   }

...
WebFormsNotePad.aspx.cs in ScottsJewels.Samples.Notepad
This is what the rest of the Page’s markup looks like. As you can see it looks very similar to it’s ASP.NET MVC View counterpart. This was done intentionally on my part to simplify the comparison to ASP.NET MVC. Keep in mind that an ASP.NET Web Forms Page is a very different beast than an ASP.NET MVC View. Although not shown in “Notepad” a Page can be bound to multiple data sources of various types. A Page also has vastly superior server controls. These server controls expose a rich server side coding experience and can preserve state through the ViewState.
WebFormsNotePad.aspx.cs in ScottsJewels.Samples.Notepad
ASP.NET Web Forms Form POST using AJAX
In a ASP.NET Web Forms Application there are two ways to handle an AJAX Form POST on the Web Server. You can either expose a Web Service. Or, you can expose a Web Method on the Page itself.
This is where it gets interesting.
If you host a Web Form Page within an ASP.NET MVC Application you have the ability to handle the AJAX Form POST using an MVC Controller. This allows us to leverage the code base from the previous ASP.NET MVC Form POST using AJAX example. If you think about how this works it’s pretty simple. The AJAX Form POST requests for a resource. The resource is mapped to a Controller by ASP.NET Routing. The Form does not care what processes it’s request – only that a JSON response is returned. The Controller does not care about where the request came from – just how to handle it.
And this is where it gets really interesting.
By leveraging the Controller and client-side Javascript of the ASP.NET MVC Form POST using AJAX example there is very little left to do. This is what the “addNoteForm” Form looks like on the Web Forms Notepad. Submitting it will POST to the same URL as the MVC Notepad’s “addNoteForm” Form. ASP.NET Routing will route the request to the same Controller and ActionMethod used by the MVC Notepad. The ActionMethod will return a JSONResult. Neat, huh? We’re all done!
WebFormsNotePad.aspx in ScottsJewels.Samples.Notepad
Content Type Limitations of a WCF Service
In all honestly my reasons for using an MVC Controller over a Web Service or Page Web Method hides some underlying problems. I was unable to get a Page Web Method to work within the confines of ASP.NET Routing and kept getting a Resource Not Found (404) error. I had a little more luck when using a WCF Web Service except that it was unable to parse the Form data in the request. Previously I stated how an ASP.NET MVC Controller is unable to parse JSON content but can parse Form content. Well, ironically WCF is capable of the exact opposite. Bummer. Rather than reinvent the wheel and introduce some new JSON-specific Javascript I decided to “go with it” and leverage what was already available – the MVC Controller.
Pros and Cons
No comparison would be complete without a list of the Pros and Cons of each technology, right? At first glance it may seem that ASP.NET MVC is vastly superior simply because it has more Pros and less Cons when compared to ASP.NET Web Forms. This is not the case. The items in the following list should be weighted based upon three things …
Initial complexity of the web application.
Desired scalability of the web application.
Your skillset.
Only after taking these factors into consideration should you make a judegment call on which framework to use.
ASP.NET MVC
Pros
Good design is baked-in. MVC promotes good design out-of-the-box. It forces you to group similar functionality into entities whereas each entity has as little overlap as possible. This is known as Seperation of Concerns. Specifically, ASP.NET MVC forces you to separate your presentation (the “View”), business logic (the “Controller”), and data (the “Model”) into separate classes.
Easier testing. It is easier to test components when they do not rely upon one another. Dependencies suck.
Scalability.By extension good design and testability make an application more scalable.
Elimination of ViewState, Server Controls, and Postbacks. ASP.NET MVC forces you to adhere to the stateless nature of HTTP with the elimination of these faculties. A lack of ViewState decreases the usefulness of the “rich” Server Controls used in ASP.NET Web Forms. As such ASP.NET MVC relies heavily upon client-side development using Javascript and JQuery. ASP.NET Web Forms allowed you to hook up events for control events that would trigger a postback to the server. In ASP.NET MVC there is no such thing as an event-driven postback. All posts in ASP.NET MVC must occur from within an HTML Form and utilize the standard HTTP GET and POST verbs.
Supports multiple HTML Forms. An ASP.NET MVC Controller can support POST’s from multiple HTML Forms. An ASP.NET Web Form Page can only support POST’s from a single (server-aware) HTML Form.
Cons
Unnecessary complexity. Not all web applications need to be scalable. Sometimes you just need a very simple application.
Steeper learning curve. Need to be savy in client-side development using Javascript and JQuery in order to maintain rich client experience.
Lackluster support for JSON. ASP.NET MVC doesn’t like JSON too much. An MVC Controller can return JSON but cannot receive it. This puts ASP.NET MVC at a disadvantage when using AJAX as all requests containing JSON content must be converted.
Elimination of ViewState, Server Controls, and Postbacks. Why is this also a con? Because in all honesty these faculties do allow you to develop quicker.
ASP.NET Web Forms
Pros
Easier to transition from Windows Forms style development. Windows development is stateful and event driven. In comparison HTTP is stateless and form based. The Web Form’s ViewState makes web development stateful. Furthermore, Web Form Server Controls simulate event driven development through Postbacks.
Large 3rd Party Support. Rich drag-and-drop controls are offered from many companies such as Telerik, Infragistics, etc…
Cons
No abstraction between an HTTP Request and a Page. By default an HTTP Request maps directly to a Page. URL Rewritting and Routing (which provide such an abstraction) are not baked-in. Microsoft has made MVC’s routing mechanism available to Web Forms in ASP.NET 4.0.
Larger page footprint. The ViewState can be a hog. Preserving state on a Page increases the page size. ASP.NET 4.0 has exposed new ways to control the ViewState. For example, the Control.ViewStateMode property now allows you to disable ViewState for an entire Page and subsequently enable it for just the controls that require it.
Subject to Poor Design.Unless your ASP.NET Web Forms application is designed properly it lends itself to a tighly coupled architecture where data access, presentation, and business logic are all merged into a Page’s code behind.
Difficult to Test.Testing requires spooling up the entire ASP.NET runtime to support the ViewState, Postbacks, and Server Control rendering.
More difficult client-side Javascript and CSS.Server control tags are not always rendered appropriately. ASP.NET 4.0 has exposed new ways to control tag rendering. For example, the Control.ClientIDMode property provides more control over how ID’s are generated.
Conclusion
Phew! Well there you have it – a comparison of Microsoft’s premier web development frameworks.
Feel free to download the sample Notepad source code here.
If you have any questions, comments, or suggestions please let me know.
The web’s biggest asset is also it’s biggest problem. The web provides an infinite amount of information – but it all needs to be retrieved from remote web servers.
Web browsers (clients) are completely dependent on web servers for their content. This content must be retrieved from a web server through one or more HTTP Requests. Depending on how resource intensive a web site is this can lead to be big latency issues. Every single script, stylesheet, and image is retrieved using a seperate HTTP “GET” Request. Impacting the problem even more is that most web browsers will only make a handful of HTTP “GET” Requests at a time.
Resource Handling Guidelines
There are a few things we can do to improve a web browser’s performance. Steven Sounders offers four suggestions in his book, “High Performance Web Sites”…
Consolidate HTTP Requests
Javascript (and stylesheets) can easily be merged into a single resource file. A merged resource file consolidates multiple HTTP Requests into one.
Ensure that Javascript is retrieved as late as possible
A web browser will fully render a web page prior to retrieving and processing Javascript if the scripts are located at the end of the HTML document. Putting Javascript as “far down” as possible will defer processing and result in a faster load time.
Ensure that stylesheets are retrieved as early as possible
A web browser will retrieve and process all stylesheets prior to rendering a web page. As such stylesheets should be put as “far up” in an HTML document as possible.
Eliminate Redundant Resources
This one should be obvious. Never request the same resource twice.
Content Handling Using a Resource Manager
Given the guidelines above it makes sense to automate the processing of resources through a “Resource Manager”. Microsoft has realized such a necessity and provided us with the ASP.NET ScriptManager.
Microsoft ASP.NET ScriptManager
Microsoft’s ASP.NET ScriptManager automates resource handling with varying degrees of success. As our own “improved” implementation will closely follow the ScriptManager’s design it’s important to understand how it works.
The ScriptManager is an ASP.NET Web Control which optimizes how Javascript is rendered to a web page. The ScriptManager eliminates redundant Javascript and consolidates rendering to a single location in the HTML document. To do this the ScriptManager follows the singleton pattern – only one can exist per page heirarchy.
The ScriptManagerProxy is an ASP.NET Web Control which supplements th ScriptManager. Multiple instances of the ScriptManagerProxy can exist within a page heirarchy. The ScriptManagerProxy should be used in places where a reference to the ScriptManager is unavailable such as nested UserControl’s and MasterPage’s. Any Javascript resources registered to the ScriptManagerProxy are managed and rendered by the ScriptManager. It is essentially a pass-through.
When a ScriptManager is rendered to a web page it’s Javascript resources are injected into the HTML as standard <script> elements – with a twist. The <script> element’s “src” attribute points to a special ASP.NET HttpHandler. When the web browser encounters the <script> element it makes an HTTP Request against the web server which in turn invokes the HttpHandler. The HttpHandler processes the request and returns the desired Javascript back to to the web browser.
HTML <script> elements injected by am ASP.NET ScriptManager. WebResource.axd is a custom HttpHandler.
Why Re-Invent the Wheel?
Microsoft’s ASP.NET ScriptManager is good but could be made better. Here is a list of shortcomings that I would like to improve upon …
It Only Supports Javascript
The ScriptManager only supports Javascript. The same resource handling guidelines that apply to Javascript also apply to stylesheets. Redundant stylsheets should be eliminated and unique stylesheets merged to reduce the number of HTTP Requests. The ScriptManager does a great job with Javascript – why can’t it do the same with stylesheets?
All Javascript is Deferred (or Not)
The ScriptManager does a horrible job with Javascript deferment. It takes an all-or-nothing approach. What happens if you don’t want to defer all of your Javascript resources to the end of the web page? Sometimes Javascript needs to be executed prior to rendering.
Note: The ScriptManager’s LoadScriptsBeforeUI=”false” option defers all scripts to the end of the page.
AJAX Javascript Libraries? No Thanks
The ScriptManager automatically includes Microsoft’s robust AJAX Javascript library. The problem? Although most web pages require Javascript not all of them need AJAX. Unfortunately, there’s no way to get the cake without the icing.
The (Improved) Resource Manager
The ResourceManager consists of three main components – the ResourceManager, the ResourceManagerProxy, and the ResourceHttpHandler. Sound familiar? The functionality of the ResourceManager’s components closely resembles that of their (similarly named) ScriptManager counterpart. The biggest difference? The ResourceManager’s components are all generic. This allows them to be custom-tailored for any resource type.
Within the ScottsJewels.Web.UI namespace you will find the ResourceManager as well as a StyleManager (for managing stylesheets) and a ScriptManager (for managing Javascript). In retrospect, ScriptManager was a poor name choice as it overlaps with Microsoft’s own implementation. Please make sure that you refer to the ScottsJewels.Web.UI namespace when using it to avoid conflicts.
Resource Manager Control
The ResourceManager Control is very similar to Microsoft’s ScriptManager Control. Both are singleton controls responsible for organizing and rendering resources to a web page. Unlike Microsoft’s ScriptManager the ResourceManager allows you more granularity when configuring where a resource should render on a web page. Resources contained within a <DeferredResources> container are rendered at the end of a web page. All other resources are rendered in the web page’s <head>.
Here is an example of how to register some Javascript resources using the “improved” ScriptManager in ScottsJewels.Web.UI.
Registering scripts using the ScottsJewels.Web.UI.ScriptManager
Here is an example of the HTML output produced by the “improved” ScriptManager. Notice that the location of the <script> elements corresponds to how the scripts were registered in the ScriptManager. Also notice that the <script> elements’ “src” points to ScriptHttpHandler.ashx. The web server will invoke the ScriptHttpHandler when the web browser makes an HTTP Request for the Javascript resource.
HTML Output produced by ScottsJewels.Web.UI.ScriptManager
The “improved” ResourceManager was created from scratch and does not derive from Microsoft’s ScriptManager. As my experience with custom ASP.NET Web Controls was relatively sparse up until this experiment it was only natural that I would ecounter some new problems and forge (at least for me) some new solutions. For example …
How do I enforce the singleton pattern on an ASP.NET Web Control?
The ResourceManager needs to follow the singleton pattern. Resource management and rendering needs to be consolidated to a single control to eliminate redundancy.
The secret to implementing the singleton pattern in an ASP.NET Web Control lies in the HttpContext object. Every time an HTTP Request is made against the web server an HttpContext object is created. This object is unique to the request and accessible through the static HttpContext.Current property. HttpContext exposes an Items property bag. By checking the bag for an instance of the ResourceManager within the ResourceManger’s own constructor we can enforce the singleton pattern. If a ResourceManager doesn’t exist in the bag we will add it. Otherwise we will throw an exception notifying the user that more than once ResourceManager exists in the Page heirarchy.
Declaring a unique identifier for the ResourceManager (ResourceManager.cs)
protected ResourceManager()
{
	...

	if (HttpContext.Current != null)
	{
		if (HttpContext.Current.Items.Contains(CachIdentifier))
		{
			throw new InvalidOperationException(string.Format("Only one {0} is allowed per page!", GetType()));
		}
		HttpContext.Current.Items[CachIdentifier] = this;
	}
}
Checking to see if the ResourceManager already exists in HttpContext.Current.Items (ResourceManager.cs)
By providing a static Current property on the ResourceManager we can expose it’s singleton instance everywhere.
internal static ResourceManager<TResource, TResourceComparer> Current
{
	get
	{
		ResourceManager<TResource, TResourceComparer> result = null;

		if (((HttpContext.Current != null) && (HttpContext.Current.Items[CachIdentifier] != null)) &&
			(HttpContext.Current.Items[CachIdentifier] is ResourceManager<TResource, TResourceComparer>))
		{
			result = HttpContext.Current.Items[CachIdentifier] as ResourceManager<TResource, TResourceComparer>;
		}

		return result;
	}
}
Exposing the singleton ResourceManager (ResourceManager.cs)
How to I force an ASP.NET Web Control to render somewhere else?
When creating a custom ASP.NET Web Control you will typically override the Render method to inject the desired HTML elements into the web page that is returned to the web browser. The ResourceManager, however, requires more control over where the HTML is injected. Deferred resources need to be rendered at the end of the web page. Non-deferred resources need to be rendered in the web page’s <head>.
The ASP.NET Page Lifecycle specifies that a Page will fire a PreRender event prior to rendering it’s control heirarchy. By inserting Literal Controls into a Page’s control heirarchy during it’s PreRender event we can set up “placeholders”. Later, when the ResourceManager’s PreRender event is fired it can leverage these placeholders to surgically inject it’s resources into the web page.
Why can’t we just add the resources to the web page during the ResourceManager’s Render event? Because ASP.NET will throw a nasty error, “The control collection cannot be modified during DataBind, Init, Load, PreRender or Unload phases.” Apparently a Page doesn’t have the same restrictions as a Control.
Using stragtegically placed Literal Controls to render resources (ResourceManager.cs)
Resource Manager Proxy Control
The ResourceManagerProxy is very similar to Microsoft’s ScriptManagerProxy. It is used when an instance of the ResourceManager is not available. Multiple instances of the ResourceManagerProxy can co-exist within a page hierarchy. The ResourceManagerProxy is just that – a proxy. It doesn’t really do much on it’s own and relies upon the ResourceManager to manage and render the resources assigned to it. The ScriptManagerProxy’s <Resources> property is just a façade that exposes the singleton instance of the ResourceManager.
[PersistenceMode(PersistenceMode.InnerProperty)]
public List<TResource> Resources
{
	get
	{
		if (ResourceManager<TResource, TResourceComparer>.Current != null)
			return ResourceManager<TResource, TResourceComparer>.Current.Resources;

		throw new InvalidOperationException(
			string.Format("No {0} ResourceManager has been declared.", typeof(TResource)));
	}
}
The ResourceManagerProxy’s resources are actually managed by the ResourceManager (ResourceManagerProxy.cs)
Here is an example of how to register some stylesheets in a Page code-behind using the StyleManagerProxy.
styleManagerProxy.CompositeResource.Resources.Add(new Style() { Media = "screen", Path = "~/styles/style1.css" });
styleManagerProxy.CompositeResource.Resources.Add(new Style() { Media = "screen", Path = "~/styles/style1.css" });
styleManagerProxy.CompositeResource.Resources.Add(new Style() { Media = "screen", Path = "~/styles/style2.css" });
styleManagerProxy.CompositeResource.Resources.Add(new Style() { Media = "screen", Path = "~/styles/style2.css" });
styleManagerProxy.CompositeResource.Resources.Add(new Style() { Media = "print", Path = "~/styles/style3.css" });
styleManagerProxy.CompositeResource.Resources.Add(new Style() { Media = "print", Path = "~/styles/style4.css" });
Registering stylsheets in a Page code-behind using the ScottsJewels.Web.UI.StyleManagerProxy (StyleManagerProxy.cs)
Here is an example of the HTML output produced by the StyleManager. Notice that the StyleManager consolidates and groups the stylesheets prior to rendering them.
HTML output produced by ScottsJewels.Web.UI.StyleManager (StyleManager.cs)
Resource Manager HTTP Handler
The ResourceHttpHandler is very similar to the HttpHandler used by Microsoft’s ScriptManager. Upon encountering an HTML element rendered by the ResourceManager a web browser will make an HTTP Request against the web server. The ResourceHttpHandler’s job is to intercept this request, interpret it, and return the appropriate resource.
The underlying logic of the ResourceHttpHandler is very simple. Find the requested resources, merge them if necessary, and stream them back to the web browser.
public void ProcessRequest(HttpContext context)
{
	if (context.Request.QueryString["Resource"] != null)
	{
		string[] requestedResources = context.Request.QueryString["Resource"].Split(new[] { ',' }, Int32.MaxValue, StringSplitOptions.RemoveEmptyEntries);

		string resourcePhysicalPath;

		foreach (string resource in requestedResources)
		{
			resourcePhysicalPath = context.Server.MapPath(resource);

			if (File.Exists(resourcePhysicalPath))
			{
				using (StreamReader reader = new StreamReader(resourcePhysicalPath))
				{
					context.Response.BinaryWrite(StringToByteArray(reader.ReadToEnd()));
					context.Response.ContentType = Resource.ContentType;
					context.Response.Flush();
				}
			}
			else
			{
				context.Response.StatusCode = 404;
			}
		}
	}
}
The ProcessRequest function of the ResourceHttpHandler (ResourceHttpHandler.cs)
What is an ASP.NET HttpHandler?
When a web browser requests an ASP.NET resource such as a Web Page (.aspx), a User Control (.ascx), or a Web Service (.asmx/.svc) the request is routed to an ASP.NET HttpHandler. The HttpHandler processes the request and returns a response to the web browser. An ASP.NET resource is mapped to an HttpHandler in the web.config file.
Here are some HttpHandler mappings from the .NET 4.0 global web.config file. This configuration maps requests for WebResource.axd to the AssemblyResourceLoader HttpHandler. As shown earlier WebResource.axd is requested by HTML <script> elements injected by Microsoft’s ScriptManager. The other two mappings are for ASP.NET Web Forms and User Controls respectively.
Sample of HttpHandler mappings from C:\Windows\Microsoft.NET\Framework\v4.0.30319\Config\web.config
You can create your own custom HttpHandler by deriving a new class from IHttpHandler. To enable a custom HttpHandler you need to register it in your Web Application’s web.config. Registration varies depending on what version of web server that you are running.
If you are running IIS 6, 7 Classic, or Visual Studio’s built-in web server you should register your custom HttpHandler like this …
HttpHandler configuration for all web servers using <validation validateIntegratedModeConfiguration=”false”/>
How does the HttpResourceHandler retrieve resources?
The ResourceManager renders relative paths to the web page for all of the resources. When the web browser requests these resources from the ResourceHttpHandler the handler needs to be able to reconcile the relative path to the physical location on the web server. This is accomplished by using the Server.MapPath function. One limitation of the ResourceManager is that it can only process local resources. You can not register resources from sources other than the web application itself.
Conclusion
So there we have it. A robust yet extendable improvement to Microsoft’s ASP.NET ScriptManager Control.
The source code is available here. Please let me know if you have any questions or suggestions on how it can be improved.
I know what you’re thinking. Oh great, another article on AJAX! Okay, sure. You’re right. But seriously, when I was originally attempting to learn this stuff I found myself jumping through hoops just trying to get a simple example to work…
How do I configure a web service to return JSON?
What in the heck is JSON?
Why not use XML?
What is JQuery?
How do I call a Web Service from JavaScript?
Yeah, there were articles. Lots of articles. But I found that no single article presented a complete example. Some would focus on the client. Some the server. Some would gloss over the “why” and emphasize the “how”. Others would pull in obscure technology that, while cool, would be completely at odds in a business environment.
So, here’s my own entry into wide assortment of AJAX articles – a simple Echo Service.
Why an Echo Service?
It’s a very simple way to demonstrate how to send/receive JSON objects between a client browser and a Web Service. This is common pattern that is used in modern websites. A simple example makes it easier to showcase a bunch of cool (yet essential) technologies such as…
Like XML but with a (much) smaller footprint. JSON is Javascript. It can be serialized into a human-readable string or deserialized into a Javascript object that can be used programatically in Javascript code.
Microsoft’s implementation of a SOA framework. We’ll use it to create a web service.
The Echo Service
Overview
First, we’re going to create an EchoService Web Service using Microsoft’s Windows Communication Foundation (WCF). A Message class will be used to facilitate communication with the EchoService. The Message will be automatically converted to/from JSON by WCF.
Next, we’re going to create an ASP.NET EchoPage Web Form. A blank JSON representation of the Message class will be exposed to the EchoPage’s client-side. This JSON Message will be populated with some text and submitted to the EchoService using JQuery’s AJAX implementation.
Finally, we’re going to apply some enhancements to the EchoService and EchoPage to make them a little more robust – while eliminating unecessary code.
EchoService WCF Web Service
The EchoService exposes a single Echo() method that receives and returns a JSON object. Why a JSON object and not just a bunch of params? Because parameters are sloppy and difficult to manage. Also, it’s easier to deal with the same data object on both the server and the client.
The EchoService’s handling of JSON is declared in the attributes for the Echo() method. Notice the ResponseFormat and RequestFormat indicators. This tells WCF to implicitly convert between the Message class and JSON.
The client-side portion of the EchoPage uses JQuery’s AJAX implementation to submit (and receive) Messages to the EchoService. The “data” parameter specifies the data that you want to submit to the EchoService. The “dataType : json” instructs JQuery to expect a JSON result from the EchoService. JQuery will implicitly convert the EchoService’s response. The “success” function is called upon a successful transaction.
Be very careful when specifying your “data” parameter. It should be in the form of a JSON (name/value pair) object where the name corresponds to the parameter name on the EchoService’s Echo() method. The value is your actual data – serialized using the JSON.Stringify() function. Also, take special notice of the quotation marks. I’ve had problems before with single versus double-quotes.
What’s the deal with the .d in the AJAX success function?
Since ASP.NET 3.5 Microsoft’s WCF Service encapsulates all JSON responses in a “d” name-value pair for security reasons. You can read more about it here and here. A side-effect of this is that we need to handle the encapsulation in our client-side Javascript …
data = data.hasOwnProperty('d') ? data.d : data;
EchoPage.aspx
What’s the deal with the JSON.stringify() ?
When submitting a request to the EchoService using JQuery’s AJAX the data needs to be in the form of a string. JSON.stringify() serializes our Message (which is a JSON object) so that it can be submitted properly.
$.ajax({
   type  : "POST",
   url   : "EchoService.svc/Echo",
   data  : '{ "message" : ' + JSON.stringify(jsonMessage) + '}',
...
EchoPage.aspx
Server-Side (.aspx.cs)
The server-side portion of the EchoPage is relatively sparse. When we start optimizing our code later it will disappear entirely. For now, the server-side portion of the EchoPage creates a JSON representation of an empty Message.
protected string jsonMessage;

protected void Page_Load(object sender, EventArgs e)
{
   DataContractJsonSerializer serializer = new DataContractJsonSerializer(typeof(Message));
   using (MemoryStream ms = new MemoryStream())
   {
      serializer.WriteObject(ms, new Message());
      jsonMessage = Encoding.Default.GetString(ms.ToArray()); // Viola!
   }
}
EchoPage.aspx.cs
This JSON Message is exposed to the client-side Javascript as a var and is used in the JQuery AJAX submission to the EchoService.
var jsonMessage = <%= jsonMessage %>;
EchoPage.aspx
Okay, great. Is that it?
No, although the above code works there are a few issues that we should probably look into …
ASP.NET’s JSON security is a nice touch. However, our handling of the “d” encapsulation on the client-side of the EchoPage is clunky.
Our serialization of the Message object into JSON on the server-side of the EchoPage is very specific to a particular class.
If an error occurs while the EchoService is processing a Message there is no way to properly notify the EchoPage so that it might handle the error gracefully.
Polishing the Echo Service
JQuery’s AJAX dataFilter
JQuery exposes a customizable “dataFilter” for it’s AJAX calls. Declaring a dataType instructed JQuery to implicitly handle the response from a Web Service. Declaring a dataFilter puts the responsibility solely on the developer.
We can leverage JQuery’s AJAX dataFilter when handling ASP.NET’s “d” security feature on the EchoPage. Notice that we need to programatically deserialize the EchoService’s response into a Javascript object using JSON.parse().
$.ajax({
   type : "POST",
   url : "EchoService.svc/Echo",
   data : '{ "message" : ' + JSON.stringify(jsonMessage) + '}',
   /* dataType: "json",  */
   contentType : "application/json; charset=utf-8",
   dataFilter : function(data) {
            data = JSON.parse(data);
            return data.hasOwnProperty("d") ? data.d : data;
         },
   success: function(data, textStatus, httpRequest) {
            /* data = data.hasOwnProperty('d') ? data.d :  data; */
            $("#responseMessage").html(data.Text);
         },
   error: function(httpRequest, status, errorThrown) {
            $("#responseMessage").addClass("error");
            $("#responseMessage").html("There was a problem calling the Echo Service. Error : " + errorThrown + "!");
         }
});
EchoPage.aspx
JSON Serialization Extension Method
NET 3.5 introduced Extension Methods. Extension Methods allow you to add new methods to an existing type. Adding an extension method to the .NET base object class exposes the method to all classes.
Currently the EchoPage can only serialize a Message into JSON. However, by moving the code into an Extension Method we can clean up the EchoPage and eliminate a lot of (potentially) redundant code. This is what the new .GetJsonString() Extension Method looks like …
/// <summary>
/// Extension methods to .NET classes.
/// </summary>
public static class Extensions
{
   /// <summary>
   /// Extends object to with a JSON serializer.
   /// </summary>

   /// The object as a serialized JSON string.
   public static string GetJsonString(this object obj)
   {
      DataContractJsonSerializer serializer = new DataContractJsonSerializer(obj.GetType());
      using (MemoryStream ms = new MemoryStream())
      {
         serializer.WriteObject(ms, obj);
         return Encoding.Default.GetString(ms.ToArray());
      }
   }
}
Extensions.cs
The EchoPage can now call .GetJsonString() directly from the Message data object.
var jsonMessage = <%= (new SimpleAJAXEchoService.Message()).GetJsonString() %>
EchoPage.aspx
As far as the server-side code for the EchoPage? Gone.
/// <summary>
/// An Web Page that "talks" to the Echo Service using AJAX.
/// </summary>

public partial class EchoPage : System.Web.UI.Page
{
   // The addition of the .GetJsonString() method eliminates all of this code. Furthermore, it can be called against any class derived from
   // object (which is pretty much anything).

/* Gone!
   /// <summary>
   /// A serialized JSON representation of the Message class. Will be exposed to the EchoPage's Javascript and used to submit data to
   /// the EchoService.
   /// </summary>
   protected void Page_Load(object sender, EventArgs e)
   {
      // We'll need to submit an instance of the Message class to the EchoService from the EchoPage using Javascript. JSON is an ideal format to
      // work with. Let's serialize an instance of Message into a JSON string and expose it to the EchoPage's Javascript.
      DataContractJsonSerializer serializer = new DataContractJsonSerializer(typeof(Message));
      using (MemoryStream ms = new MemoryStream())
      {
         serializer.WriteObject(ms, new Message());
         jsonMessage = Encoding.Default.GetString(ms.ToArray()); // Viola!
      }
    }
*/
}
EchoPage.aspx.cs
Encapsulating the Response
By wrapping the response from the EchoService we can more effectively handle errors that it might throw on the EchoPage. We can wrap up the EchoService’s response Message in a new ClientResponse wrapper. In addition to a Payload (the Message) the ClientResponse exposes an IsSuccessful and ErrorMessage.
/// <summary>
/// A generic client response wrapper. Wraps a web service response so that
/// additional (troubleshooting) information can be returned alongside the payload.
/// </summary>

/// The payload type to encapsulate.
[DataContract]
public class ClientResponse
{
   /// <summary>
   /// The data to return to the client.
   /// </summary>
   [DataMember]
   public T Payload { get; set; }

   /// <summary>
   /// True, if the data was retrieved sucessfully.
   /// </summary>
   [DataMember]
   public bool IsSuccessful { get; set; }

   /// <summary>
   /// The error message if the data was not retrieved sucessfully.
   /// </summary>
   [DataMember]
   public string ErrorMessage { get; set; }

   /// <summary>
   /// Constructor.
   /// </summary>
   public ClientResponse()
   {
      IsSuccessful = true;
      ErrorMessage = string.Empty;
   }

   /// <summary>
   /// Constructor.
   /// </summary>
   /// True, if the data was retrieved sucessfully.
   /// The data to return to the client.
   /// The error message if the data was not retrieved sucessfully.
   public ClientResponse(bool isSuccessful, T payload, string errorMessage) : this()
   {
      IsSuccessful = isSuccessful;
      Payload = payload;
      ErrorMessage = errorMessage;
   }
}
ClientResponse.cs
We can leverage JQuery’s AJAX dataFilter to implictly handle the ClientResponse wrapper. Any errors incurred will now be passed onto JQuery’s AJAX error() function.
$.ajax({
   type: "POST",
   url: "EchoService.svc/Echo",
   data: '{ "message" : ' + JSON.stringify(jsonMessage) + '}',
   /* dataType: "json",  */
   contentType: "application/json; charset=utf-8",
   dataFilter: function(data) {
           data = JSON.parse(data);
           data = data.hasOwnProperty("d") ? data.d : data;
           if (data.hasOwnProperty("IsSuccessful")) {
             if (data.IsSuccessful == true) {
               return data.Payload;
             }
             else {
               var errorMessage = "Error";

               if (data.hasOwnProperty("ErrorMessage") && data.ErrorMessage !== null) {
                  errorMessage = data.ErrorMessage;
               }
               throw errorMessage;
             }
           }

           return data;
         },
   error:   function(httpRequest, status, errorThrown) {
         $("#responseMessage").addClass("error");
         $("#responseMessage").html("There was a problem calling the Echo Service. Error : " + errorThrown + "!");
      }
});
EchoPage.aspx
Conclusion
Okay, sure. The Echo Service was a simple example. But hey! It showcased a whole bunch of cool technologies in a nice little package. Now, next time someone asks you on the street, “Excuse me, but what is AJAX?” you can look them in the eyes and reply, “Let me tell you about a simple little Echo Service that I know…”.
The source code is available here. Please let me know if you have and questions or comments.